Microsoft Laptop

  • Subscribe to our RSS feed.
  • Twitter
  • StumbleUpon
  • Reddit
  • Facebook
  • Digg

Saturday, 27 July 2013

Moving to OpenShift and Back to Github

Posted on 20:38 by Unknown
Moved everything related into github.
Simply Fast Convenient.
Should have done that long ago.

Attitude Adjustment TP-Link WR1043ND Backup Download
Attitude Adjustment TP-Link WR1043ND Firmware Download
Read More
Posted in | No comments

Wednesday, 22 May 2013

OpenWRT Release Tagged

Posted on 05:58 by Unknown

For users on fibre you can set port priority using swconfig
swconfig dev rtl8366rb port 1 set priority 1
To check 
 swconfig dev rtl8366rb port 1 get priority
To get it to run persistently on boot
echo 'swconfig dev rtl8366rb port 1 set priority 1' >> rc.local
This will only work on patched rtl8366rb drivers.
For unpatch openwrt firmware you have to use vconfig.

Updated to R37083

Attitude Adjustment with full ipv6 support including LuCI.
Downgrade the dhcpmasq to a non ipv6 version as the function is already added into the default Attitude Adjustment.
Review all the LuCI options and fix them, expose more wifi options.
This release is really a good one!.

For WR1043ND
"-Os  -pipe -march=24kc -mno-mips16 -mgp32 -fno-caller-saves -mno-branch-likely -mplt -msym32"

I also patched lighttpd to use
server.network-backend = "linux-sendfile"
server.event-handler = "linux-sysepoll"

This is done by patching the Makefile to enable linux-sendfile function which I do not know why it was disabled in OpenWRT's lighttpd Makefile.
I did it by #undef sendfile_broken and #define have_send_file

I managed to add the repo to github
OpenWRT  TL-WDR4300
OpenWRT TL-WR1043ND

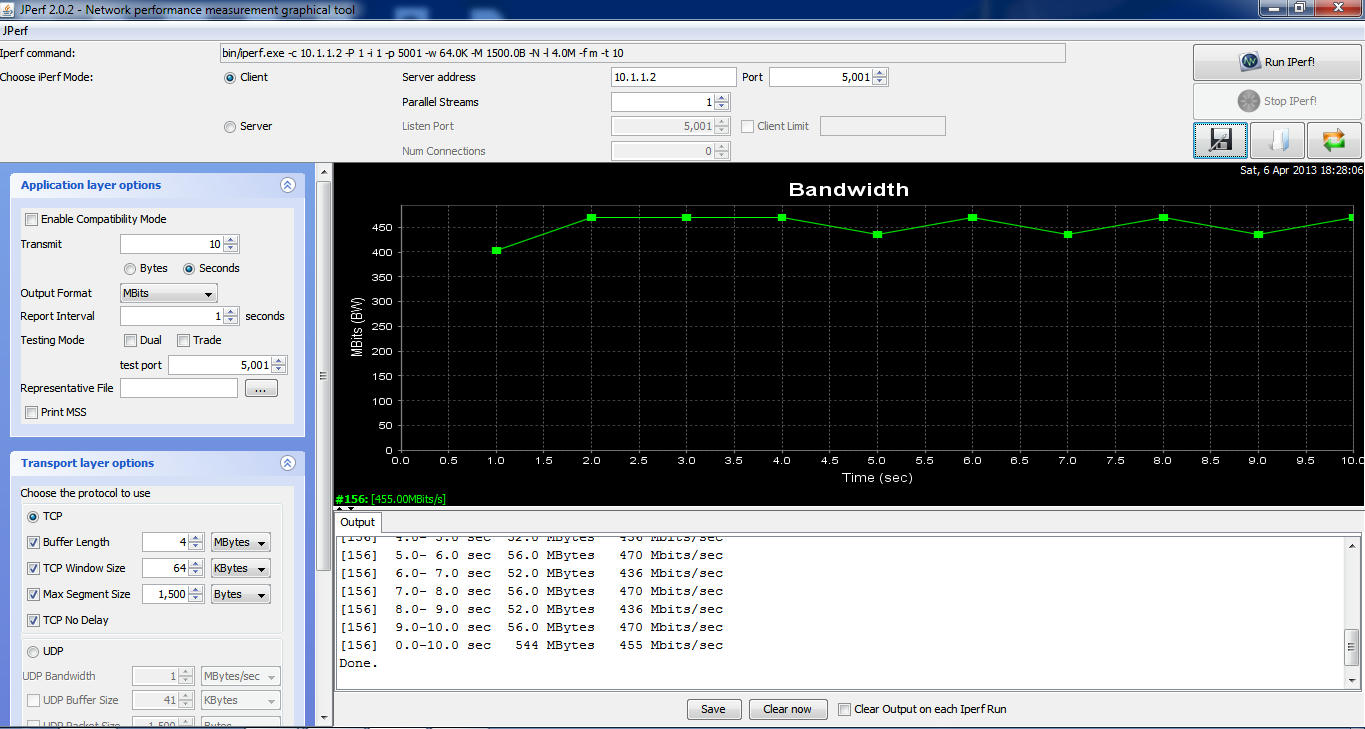
For my jperf (iperf +java frontend) I recorded increase in NAT speeds for both Routers but I would like those with highspeed internet to give me feedbacks.

Reminder: setting Wireless Region to 'US ' unlocks all "Wireless Goodness"

You can check updates on OpenWRT side using their development site.

Cheers!

Update:

Updates refreshed.
Removed Atheros Options since they are actually not support from documentation.
Integrate Jumbo Switch and Storm Filter since there are no issues.

Attitude Adjustment is Tagged and released!

I have also released a Beta version with Jumbo Frames and Storm Filtering
ssh into the router and use

swconfig dev rtl8366rb show (to display switch setting)

swconfig dev rtl8366rb set max_length 3

swconfig dev rtl8366rb set apply (apply the settings)

The rest you can figure out on your own using help option.

Note that the Jumbo Frame is a switch only option reason is that the AR9132 SoC DOES NOT SUPPORT JUMBO FRAME only the switch RTL8366RB do.

I have just release another update, changes are as follows:
-Rename some of the stuff in LuCI
-Removal of excess packages(torrents etc) now 1.8 MB left for you to install the stuff you want
  1. There is a lot of feedback from people who want to install specific packages for their own needs so the best way is to give them space to do that.
-Compress Javascript and CSS
-Update certain packages
-Rename PnP and uShare modules device information
-Remove pure-ftpd and added vsftpd with TLS
(managed to compile successfully and tested it)
  1. vsftpd with TLS does encrypted FTP using less flash and less RAM 
Added Port Monitoring Patches to the switch driver of both Routers

OpenWRT Attitude Adjustment Release For TL-WDR4300
LAN to WAN Wired Benchmark Software Routing


OpenWRT Attitude Adjustment Release for TL-WR1043ND
LAN to WAN Wired Benchmark Software Routing

With L7-Protocol and QoS (Default Configuration)


With L7-Protocol and QoS Service Stopped MSS disabled


Wireless LAN to WAN (2M Line of Sight)
With L7-Protocol and QoS Service Stopped MSS disabled
Using AES WPA2-PSK encryption 40MHZ Fat Channel, noscan enabled dtim_period=1
Basically what you can expect on Wireless.
Note: Results may vary due to interference of surrounding networks

    As usual
    Factory for upgrading from TP-LINK stock firmware to OpenWRT firmware
    Sysupgrade for upgrading from older OpenWRT version to newer OpenWRT version
    Read More
    Posted in | No comments

    Wednesday, 23 January 2013

    Fedora 18 Installation Review

    Posted on 20:08 by Unknown
    When Fedora 18 was released there was alot of negative reviews about it.
    I have to agree with a lot of these opinions.
    The LiveCD was badly done.
    The installer was pure rubbish. In making the UI Touch Friendly a lot of core features for customising the installation was removed.
    To me it was like hell freezing over for Linux. During installation I have to think 5 minutes before clicking to the next screen because I am never sure if the installer will nuke my second dual bootable partition, luckily I cautiously made it by double checking every process.
    Finally I got it pretty usable after getting through the hellish installation process.

    Stop making stupid UI and pissing off the loyal users!
    People who continue to use Linux started as noobs and learn it because it is logical not because of stupid UI that works like crap but looks good.

    I downloaded and installed KDE Spin, GNOME is crap.

    KDE understands that Tablets are in nature different from Desktops.
    They do have a Tablet Mode (it is called plasma) but it is hidden when you select the Desktop Mode.
    They do not do stupid things like unifying Touch UI and Desktop UI when their input devices and nature are completely different.

    So this post will give a general idea of how to survive Fedora 18 installation.

    Things to note:
    1) ALWAYS REVIEW the partition layout or the chance that it will nuke all other partitions is very high!

    2) Add "nomodeset" to the end of the kernel booting parameter if you are using Nvidia Drivers on computer with a Nvidia Graphics Adapter otherwise it will hang during booting.

    3) Remember to install the akmod for nvidia if you are using the Nvidia Graphics Adapter otherwise a kernel update will hang the booting process. The akmod acts as a backup nvidia kmod driver when the kernel was updated before the nvidia driver. You should install kmod-nvidia and akmod-nvidia together.

    4) Add RPMFusion repository and if you want you can install steam repository if you want to game on it

    5)Edit the file /etc/default/grub and add the following lines to get a pretty boot screen that matches your resolution.
    In this example my resolution is 1366*768 (if your resolution is different just change the values accordingly):
    GRUB_GFXMODE=1360x768x32
    GRUB_GFXPAYLOAD=keep
    GRUB_GFXPAYLOAD_LINUX=1360x768x32
    Then run grub2-mkconfig -o /boot/grub2/grub.cfg as root/sudo
    Also run dracut -f as root/sudo

    6) Finally the following software are recommended:
    • freetype-fonts
    • vlc
    • libreoffice
    • chrome
    • firefox
    • adobe-flash
    • elementary icons for a professional look
    • You can also change the plymouth to use fedup animation instead of the default. (Use plymouth-set-default-theme)
    Other than that all is well. The great thing about Linux is NO ONE can force a crap UI on you.
    If GNOME screws up go KDE etc.
    KDE allows you to configure everything to your preference, cuts your screen nicely into 4 if you need to compare different windows. An absolute joy to use.

    Note that this guide isn't an installation guide, it is more of an advice to existing Linux users about the gotchas of Fedora 18.

    Fedora 18 can be an awesome OS to use, provided you managed to get through the crappy installation. And avoid GNOME.

    Thats it hope this can help you get through to enjoy Fedora 18!
    Read More
    Posted in | No comments

    Saturday, 22 September 2012

    OpenWRT updates

    Posted on 06:57 by Unknown
    It has been a while since I have written anything, but if you notice I have been updating the OpenWRT Attitude Adjustment Builds on TP-Link WR1043ND.

    I have removed a lot of excess packages since so you can actually install the stuff you want. You can do extroot if there is still not enough.

    Upgrading the firmware is actually a piece of cake, I do it in 5 minutes.
    1) Make sure the backup utility in openwrt backs up the configuration you want.
    2) Create archive using the backup utility
    3) Flash and clear settings
    4) Log in to router update time and disable unwanted startups
    5) Upload the backup archive. Done!

    Cheers.
    Read More
    Posted in | No comments

    Friday, 1 June 2012

    Celebrate IPv6 Day with OpenWRT

    Posted on 00:05 by Unknown

    As of Attitude Adjustment and Trunk this article is no longer applicable to set up 6in4 please refer to the new guide on OpenWRT WikiPages.

    6 June is World IPv6 day.
    Major ISPs, home networking equipment manufacturers, and web companies around the world are coming together to permanently enable IPv6 for their products and services by 6 June 2012.
    However not all Internet Service Provider support IPv6 for home users, however you can still get an IPv6 connection working by creating a IPv6 in IPv4 tunnel.
    This is known as 6in4.
    Your IPv6 packets will be encapsulated in IPv4 and sent via a Tunnel Broker via Hurricane Electric.
    Hurricane Electric provides free tunnel brokers for end users. 
    TP-Link WR1043ND originally does not support IPv6 however by using the firmware Image I have compiled and share, you can create a 6in4 tunnel to enable IPv6.
    This is because I included 6in4 as well as radvd packages.
    This post will show you how to create a IPv6 tunnel broker and setup the OpenWRT router to provide IPv6 connectivity to connected wifi devices.
     
    First go to http://tunnelbroker.net/ to register & create a free account.
    After signing up, log in.
    You can create up to 5 tunnels.
    You may want to choose a tunnel server closest to your country you live in.


    After creating the tunnel click on Main Page then click on the tunnel link (boxed in red).


    You will go to this page which contains all your tunnel configuration.


    Click on Example Configuration and Select OpenWRT


    Next Open Up OpenWRT LuCI Router Configuration Page and add a new Interface:


    Name the new interface "henet"

    Configure the interface:


    Set Advance Settings:


    Set Firewall Settings

    Save and Apply.

    In Altitude Adjustment a dnsmasq has a updated version called dnsmasq-dhcpv6.
    If you want to use dnsmasq-dhcpv6 just add the 2 lines to your /etc/dnsmasq.conf
    dhcp-range=2001:1234:5678:9101::,ra-names
    enable-ra
    The bold and underline octets refers to the HENET first 4 octets.
    If you want to use radvd follow the guide below:

    Now you need to configure Radvd to advertise the IPv6 Address to connected devices.
    In OpenWRT choose Network -> Radvd


    Follow the configuration below, remember to add 1 to the third octet, this is for a /64 IPv6 address only.
    Click on the picture to zoom if you cannot see properly
     

    Lastly click on interface -> lan
    As above enter the same IPv6 address (35+1) in the IPv6 box


    Remember to restart the interface and radvd.
    You can now reconnect your wifi devices to the router.
    It should be able to acquire IPv6 Addresses.
    After that go to ipv6.google.com or www.kame.net/
    For the webpages to display correctly your browser must be able to handle IPv6 as well.
    Firefox, Internet Explorer and Chrome supports IPv6.
    Read More
    Posted in | No comments

    Friday, 2 March 2012

    OpenWRT Built for TP-Link WR1043ND

    Posted on 20:07 by Unknown
    PLEASE READ THIS POST COMPLETELY TO PREVENT ISSUES WITH YOUR ROUTER

    What this firmware does

    This firmware aims to be an opensource replacement for the stock TP-Link firmware in the Wireless N Gigabit TL-WR1043ND Router.
    The firmware aims to provide equivalent or better features compared stock firmware.
    The firmware will also leave empty flash sectors for users to install addition packages for special features they require.
    Unlike stock openwrt firmware, this is a firmware fully optimized for performance, optimization is targeted at the MIPS24Kc System On Chip, debugging features stripped and scripts are minified, compressed specifically for this Router platform.

    It is advised to add a heatsink to the AR9132 SoC, it does get quite hot after flashing my custom OpenWT firmware during intensive processing.

    Software Feature

    1. Protoco Supported: Static/DHCP/Dual Stack/6in4/6to4/6rd/PPP/PPtP/PPPoE/3G UMTS/L2TP/Relay
    2. LuCI GUI (Bootstrap) with Lighttpd Web Server
    3. Dynamic DNS (Support HTTPS by skipping SSL Certificate checks)
    4. QoS (Quality Of Service) Scripts
    5. TinyProxy
    6. UPnP (Universal Plug & Play)
    7. SAMBA 3.6 (Windows File Sharing)
    8. MultiWAN 
    9. Harddisk Idle (Saves Power on attached External Harddisk when not in use)
    10. Add User and Delete User accounts (no su function, use ssh root@youripaddress to get root while logged into router via SSH, this saves flash and achieves the same effect )
    11. External Harddisk supporting only EXT2/3/4 FileSystem (NTFS is SLOW and FAT is unreliable, while the EXT Kernel Module allows support for all 3 versions of EXT Filesystem)
    12. Vsftpd with SSL Support
    13. MiniDLNA Media Sharing Server
    14. Layer 7 Filtering
    15. Transmission Bittorrent Capability GUI and CLI
    16. Patched Realtek Switch Driver supporting (Port Priority/Port Mirroring/Jumbo Passthrough/BCStormFiltering/VLAN4K)
    17. Reset to Defaults using the Reset Button GPIO
    18. Full Wireless Support 64/128/152-bit WEP / WPA / WPA2,WPA-PSK / WPA2-PSK including Enterprise Radius Authentication
    19. Ipset
    20. Fdisk Partitioning Tool
    21. Wake On LAN
    22. USB Printer Server
    23. Restore to OpenWRT default feature (just press and hold reset button)

      Additional Optimizations

      1. Expose more LuCI Options than Stock OpenWRT
      2. Additional LuCI patching to improve GUI for touch devices
      3. Optimized sysctl defaults
      4. Compiler flags optimization
      5. Additional packages are optimized for size
      6. All Wireless Channels unlock (if US region is selected)
      7. Max Transmit Power 24dbm
      8. Tested NAT throughput > 250Mbps LAN to WAN using jperf
      9. Minified CSS and Javascript 
      10. Patched Switch Driver for additional functionality 
      11. Remove additional debugging features from firmware
      openwrt-ar71xx-tl-wr1043nd-v1-squashfs-factory.bin - For TP-Link WR1043ND that are NOT running OpenWRT

      openwrt-ar71xx-tl-wr1043nd-v1-squashfs-sysupgrade.bin - For  TP-Link WR1043ND currently running OpenWRT

      Before Flashing please read my previous posts about TP-Link WR1043ND to know what you are getting into. Consult the documentation @ OpenWRT Website or ask if you have any queries.

      You can download and install additional packages through the OpenWRT repository (the package installer is built into LuCI) but it will occupy more space on the JJFS partitions.

      Reboot After Disabling Unused Features For Better Performance


      My custom firmware comes with loads of features, however OpenWRT by default enables all features so you might want to disable features you don't need.

      This will boost the performance of services you need to run.
      If you experience low performance due to insufficient memory, you might want to create and mount a swap partition.


      DO NOT DISABLE IMPORTANT FUNCTIONS LIKE NETWORK!

      If you cannot access the Router try holding down the reset button this will reset the Router back to default.
      If you still cannot access the Router try serial ttl adapter.
      (This cheap device can debrick all configuration lockups except the bootloader so don't touch the bootloader)

      DO NOT UNINSTALL THE PACKAGES THAT ARE ALREADY THERE!

      The image is built using squashfs so it is READ ONLY. If you try to uninstall it only removes the hardlinks, no space is saved. If you don't want a function just disable it.

      USE TRANSMISSION ONLY WITH AN EXTERNALLY ATTACHED HARDDISK!

      The Router only has 32MB of RAM, when you torrent, the files are over 1GB.
      You need to configure Transmission in LuCI to write all data to the externally mounted harddisk!
      By default Transmission writes to RAM because there is no harddisk.

      -------------------------------Old Firmware & New Firmware Below-------------------------------

      Make sure you have sufficient FREE RAM (Check using LuCI SystemInfo) before you Flash any firmware!

      To free up memory for upgrading firmware, ssh into the router then type
      sysctl -w vm.drop_caches=1
      This will tell the kernel to drop page caches so memory is freed up for you to upgrade firmware. You need to free up memory because before the firmware is flashed to the flash memory, it has to be copied into the DRAM.
      You can download the files here.

      As I have posted I am shifting from Mediafire due to the issues I encountered as described in this post.

      The new files will be available on my github below.
      Attitude Adjustment TP-Link WR1043ND
      Addition packages you can download and install into your OpenWRT Router to extend its capabilities.
      Attitude Adjustment TP-Link WR1043ND Packages

      If you want to build your own firmware, I have placed the files in the Git Repo below:
      OpenWRT  TL-WDR4300
      OpenWRT TL-WR1043ND
      Please note that to minify the Javascript & CSS and fix LuCI naming run the scripts in the following order del.sh -> luci.sh -> closure.sh & yuicompressor.sh.
      The path should be amended in the scripts according to where you place the buildroot.
      If you want to add my changes to whatever router you have simply diff the files and take the changes you want.

      It is recommended to reset the all the wireless client profiles to the router after an upgrade.

      I achieved 300Mbps LAN to WAN over wire NAT on this firmware. To get the same results you need to
      -Disable P2P Block
      -Disable MSS Clamping in firewall
      -Reboot

      Read More
      Posted in | No comments

      Sunday, 26 February 2012

      Configuring Pure-FTPd with TLS on OpenWRT

      Posted on 06:56 by Unknown

      This is a simple guide to configuring Pure-FTPd on OpenWRT which is available on the TP-Link WR1043ND OpenWRT Image I compiled.
      Pure-FTPd is a secure FTP Server by www.pureftpd.org
      Configuring OpenWRT is more like configuring a barebones Linux Terminal Server than many other commercial Routers. There is NO LuCI GUI for Pure-FTPd.
      The reason why I chose Pure-Pure-FTPd is
      • Offers Optional TLS Encryption on OpenWRT
      • Not a very big FTP Server
      First, you have to login via an SSH Client to your OpenWRT Router and get use to it if you are going to leverage on the Power and Flexibility on OpenWRT (If you custom compile OpenWRT without LuCI GUI you get to save even more flash memory!).

      You can use any SSH Client, in Windows I recommend PuTTY while on Linux the built-in SSH will do. To learn how to login via CLI and edit files please go through the previous postings.

      Pure-FTPd uses a few configuration files to set itself up.
      Originally Pure-FTPd is designed to run without config files. Just run the binary with the correct switches it should set itself up but in OpenWRT it is designed to read the config file to set itself up.

      To see the full switches on Pure-FTPd on OpenWRT simply cat the initialization scripts.

      The initialization script is located in /etc/init.d/pure-ftpd

      Run cat /etc/init.d/pure-ftpd  and you should see the following:
      #!/bin/sh /etc/rc.common
      # Copyright (C) 2006-2011 OpenWrt.org

      START=50

      # TODO: allow multiple instance to run with different pid-files

      # XXX: pure-ftpd changes it's name to 'pure-ftpd (SERVER) ...'
      SERVICE_MATCH_EXEC=
      SERVICE_MATCH_NAME=1
      SERVICE_USE_PID=1

      append_bool() {
              local section="$1"
              local option="$2"
              local value="$3"
              local _val
              config_get_bool _val "$section" "$option" '0'
              [ "$_val" -gt 0 ] && append args "$3"
      }

      append_string() {
              local section="$1"
              local option="$2"
              local value="$3"
              local _val
              config_get _val "$section" "$option"
              [ -n "$_val" ] && append args "$3 $_val"
      }

      start_instance() {
              local section="$1"

              config_get_bool enabled "$section" 'enabled' '1'
              [ $enabled -gt 0 ] || return 1

              args=""
              append_string "$section" trustedgid "-a"
              append_string "$section" syslogfacility "-f"
              append_string "$section" fortunesfile "-F"
              append_string "$section" maxidletime "-I"
              append_string "$section" maxdiskusagepct "-k"
              append_string "$section" limitrecursion "-L"
              append_string "$section" anonymouscancreate "-M"
              append_string "$section" maxload "-m"
              append_string "$section" quota "-n"
              append_string "$section" altlog "-O"
              append_string "$section" passiveportrange "-p"
              append_string "$section" forcepassiveip "-P"
              append_string "$section" anonymousratio "-q"
              append_string "$section" userratio "-Q"
              append_string "$section" anonymousbandwidth "-t"
              append_string "$section" userbandwidth "-T"
              append_string "$section" minuid "-u"
              append_string "$section" trustedip "-V"
              append_string "$section" tls "-Y"
              append_string "$section" tlsciphersuite "-J"

              append_bool "$section" uploadscript "-o"
              append_bool "$section" natmode "-N"
              append_bool "$section" autorename "-r"
              append_bool "$section" nochmod "-R"
              append_bool "$section" antiwarez "-s"
              append_bool "$section" allowuserfxp "-w"
              append_bool "$section" allowanonymousfxp "-W"
              append_bool "$section" prohibitdotfileswrite "-x"
              append_bool "$section" prohibitdotfilesread "-X"
              append_bool "$section" allowdotfiles "-z"
              append_bool "$section" customerproof "-Z"
              append_bool "$section" anonymouscantupload "-i"
              append_bool "$section" createhomedir "-j"
              append_bool "$section" keepallfiles "-K"
              append_bool "$section" norename "-G"
              append_bool "$section" dontresolve "-H"
              append_bool "$section" verboselog "-d"
              append_bool "$section" displaydotfiles "-D"
              append_bool "$section" anonymousonly "-e"
              append_bool "$section" brokenclientscompatibility "-b"
              append_bool "$section" notruncate "-0"
              append_bool "$section" logpid "-1"
              append_bool "$section" ipv4only "-4"
              append_bool "$section" ipv6only "-6"

              append_string "$section" bind "-S"
              append_string "$section" login "-l"

              append_bool "$section" noanonymous "-E"
              append_bool "$section" chrooteveryone "-A"
              append_string "$section" maxclientsperip "-c"
              append_string "$section" maxclientsnumber "-C"
              append_string "$section" peruserlimits "-y"
              append_string "$section" umask "-U"

              append_string "$section" port "-S"
              append_string "$section" authentication "-l"

              service_start /usr/sbin/pure-ftpd -B $args
      }

      start() {
              config_load "pure-ftpd"
              config_foreach start_instance "pure-ftpd"
      }

      stop() {
              service_stop /usr/sbin/pure-ftpd
      }
      From what you can read you can tell the initialization scripts translates switches like "-k" into human readable config options and all the available switches are shown above.

      To control Pure-FTPd the commands are as follow
      Syntax: /etc/init.d/pure-ftpd [command]

      Available commands:
              start   Start the service
              stop    Stop the service
              restart Restart the service
              reload  Reload configuration files (or restart if that fails)
              enable  Enable service autostart
              disable Disable service autostart
      Eg: To start Pure-FTPd run
      /etc/init.d/pure-ftpd start

      It is that simple so CLI isn't really as difficult as most imagine.

      Pure-FTPd also uses 2 database file as access-control lists they are located at
      /etc/pureftpd.passwd 
      (This is like your UNIX passwd file except it is for Pure-FTPd it contains user accounts, shell etc)
      /etc/pureftpd.pdb
      (It is Pure-FTPd database file I like to think of it as your UNIX shadow file)

      First you add a system user and system group as a default account on UNIX that Pure-FTPd will create virtual user from.
      addgroup pure_ftpd_grp #or any othername as you want

      adduser -H -G pure_ftpd_grp pure_ftpd_user #adds user to previously created group - change groupname accordingly, afterwards you will be asked for password for user (-H indicates that I don't want to assign home directory - if you want to you need to change -H to -h /homedirectory)
      For me I assign the home directory to the directory I want to be logging from FTP.
      FTP will fail if the directory change permission is not correct so you need to set it to the right directory.

      Next you add the virtual user to Pure-FTPd Access Control

      pure-pw useradd FTP_LOGIN -u pure_ftpd_user -d /ftp_directory #change FTP_LOGIN, pure_ftpd_user and /ftp_directory as you wish (pure_ftpd_user is same as you created in previous step). I set the same directory as above.

      To see the Pure-FTPd accounts use the commands
      pure-pw useradd <login> [-f <passwd file>] -u <uid> [-g <gid>]
                      -D/-d <home directory> [-c <gecos>]
                      [-t <download bandwidth>] [-T <upload bandwidth>]
                      [-n <max number of files>] [-N <max Mbytes>]
                      [-q <upload ratio>] [-Q <download ratio>]
                      [-r <allow client ip>/<mask>] [-R <deny client ip>/<mask>]
                      [-i <allow local ip>/<mask>] [-I <deny local ip>/<mask>]
                      [-y <max number of concurrent sessions>]
                      [-z <hhmm>-<hhmm>] [-m]

      pure-pw usermod <login> -f <passwd file> -u <uid> [-g <gid>]
                      -D/-d <home directory> -[c <gecos>]
                      [-t <download bandwidth>] [-T <upload bandwidth>]
                      [-n <max number of files>] [-N <max Mbytes>]
                      [-q <upload ratio>] [-Q <download ratio>]
                      [-r <allow client ip>/<mask>] [-R <deny client ip>/<mask>]
                      [-i <allow local ip>/<mask>] [-I <deny local ip>/<mask>]
                      [-y <max number of concurrent sessions>]
                      [-z <hhmm>-<hhmm>] [-m]

      pure-pw userdel <login> [-f <passwd file>] [-m]

      pure-pw passwd  <login> [-f <passwd file>] [-m]

      pure-pw show    <login> [-f <passwd file>]

      pure-pw mkdb    [<puredb database file> [-f <passwd file>]]
                      [-F <puredb file>]

      pure-pw list    [-f <passwd file>]

      -d <home directory> : chroot user (recommended)
      -D <home directory> : don't chroot user
      -<option> '' : set this option to unlimited
      -m : also update the /etc/pureftpd.pdb database
      For a 1:10 ratio, use -q 1 -Q 10
      To allow access only between 9 am and 6 pm, use -z 0900-1800
      Every time you modify the FTP Accounts you need to run pure-pw mkdb to apply the changes.

      Now we edit the Pure-FTPd config file at /etc/config/pure-ftpd

      vi /etc/config/pure-ftpd

      I will provide you a sample so you don't have to read about all the options and what are they used for.

      config pure-ftpd
              option port             '21'
              option noanonymous      '1'
              option chrooteveryone   '1'
              option maxclientsperip  '20'
              option maxclientsnumber '40'
              option umask            '133:022'
              option authentication   'unix'
              option enabled          '1'
              option passiveportrange '1985:2000'
              option tls              '1'
              option daemonize        '1'
              option authentication   'puredb:/etc/pureftpd.pdb'
              option prohibitdotfileswrite '1'
              option prohibitdotfilesread '1'
              option userbandwidth '50:50'
      #       option natmode '1'
      #       option brokenclientscompatibility' '1'
      Basically this runs pure-ftpd on Port 21 with passive ports from 1985-2000 with anonymous login disabled, tls set on optional (if client request it will provide if not just unencrypted communication).
      The default directory is chrooted which means user cannot change from their default directory to /.
      The # comments out lines, it should only be enabled if there are incompatibilities with the firewalls and clients. After you get good at FTP you might want to tweak the bandwidth and number of connections and other advance settings for more performance.

      Next we will do TLS encryption

      You have to generate a self-signed certification using OpenSSL, you should do it on the PC and copy the certificate to the router unless you are a masochist to want to do it on a 400MHZ MIPS Processor.

      To generate the certificate run on your PC (with OpenSSL installed) run 
      openssl req -x509 -days 365 -nodes -newkey rsa:1024 -keyout [Destination Directory]/pure-ftpd.pem -out [Destination Directory]/pure-ftpd.pem

      You can use days to specify how long before the self-signed certificate expire.

      This will create a certificate file called pure-ftpd.pem for TLS in the destination directory.
      Note the destination directory has to be the SAME.
      Pure-FTPd reads the TLS certificate in /etc/ssl/private so we make a directory there as is it is not created by default  

      mkdir -p /etc/ssl/private

      Then we Upload the file to the router to the directory we created.You should have /etc/ssl/private/pure-ftpd.pem This is location where Pure-FTPd will try to find a certificate to use for TLS communication if any.

      Then we change the file permission
      chmod 600 /etc/ssl/private/pure-ftpd.pem
      Finally we have to open the ports on the firewall to allow FTP communication.
      Note there are 2 types of ports we need to open FTP Active Ports and Passive Ports.
      We do it via LuCI GUI, go to Network -> Firewall -> Traffic Rules and Add the following Ruleset


      Save and Apply.

      Finally we restart Pure-FTPd so it will relaunch with the correct settings.
      /etc/init.d/pureftpd restart

      So now you need an FTP Client. On Web Browsers like Firefox there is a client built in by default.
      To utilise TLS encryption you have to use better clients, I recommend FileZilla.
      You specify TLS in the Connection Options.
        
      You have to get a Dynamic DNS address to reverse lookup your Router's external IP Address.
      There are free and paid options for home users free is usually good enough.
      AFRAID @ http://freedns.afraid.org/ is a good Free Dynamic DNS Address Provider(Funny name though =) ).
      It allows numerous domains for you to choose from.

      Again DDNS Updating Scripts is built into my 3.25 Kernel Trunk Router's Image by default but I will not be writing about setting up Dynamic DNS records (I modified the DDNS scripts to support HTTPS (by skipping checks) default OpenWRT DDNS does not have that).

      You should be able to login to your FTP Server from everywhere on Earth from the Internet in both Active and Passive Modes provided your workplace does not block FTP ports if so simply change port 21 to one of the unblock ports.

      Hopefully my guide is simple enough for you to understand how to setup an FTP server on OpenWRT.
      Read More
      Posted in | No comments
      Newer Posts Older Posts Home
      Subscribe to: Posts (Atom)

      Popular Posts

      • Delete Windows System Files
        If you play around with Windows System Files sometimes it is not possible to delte them off after you had your fun. The following commands w...
      • Internet Explorer Tweak
        Here is a registry tweak for Internet Explorer Similar to the Mozilla Firefox tweak this enable you to increase the number simultaneous ser...
      • How to Mod your Laptop VGA BIOS
        Basically there are 2 locations where the VGA BIOS in laptops. Some OEMS embed the VGA BIOS in the EFI/BIOS in your laptops, other OEMs have...
      • Acer Phoenix BIOS Emergency Recovery
        This is for people who don't listen and interrupt the flashing BIOS for unknown reasons. This will work provided the BIOS BootBlock isn...
      • Secure Your Windows CD-Key (For Vista and 7)
        As you know everytime you activate a Windows Installation your Product Key can be retrieved via Software means. Don't believe me? Downl...
      • Changing the Acer Arcade Shortcut
        While surfing the Windows Registry (You must be thinking that I am weird =P) yesterday I found something interesting It is actually possible...
      • Some Interesting Modding Ideas
        I modded my Aspire 4530 AGAIN to control resultant temperature. Below are some ideas and pictures. Another mod idea This time a black anodi...
      • How to obtain the DSDT from your laptop
        There are many ways to rip the DSDT out of the laptop BIOS. If there is a BIOS editor it is possible to rip out the .AML file. However below...
      • Acer Aspire 4530 Boot Screen
        Acer Aspire 4530 Boot Dianogostic Screen PhoenixBIOS 4.0 Release 6.1 Copyright 1985-2008 Phoenix Technologies Ltd. All Rights Reserve 1.052....
      • List Of Modified BIOS Collection
        Here are the list of Modified BIOS Collection (mainly SLIC Mods), no warranty provided use at your own discretion! Acer Aspire 4520G BIOS Ac...

      Categories

      • 32bit
      • 64bit
      • acer
      • ahci
      • amd
      • apple
      • aspire 4530
      • aspire 4535G
      • aspire 4740
      • atheros
      • atom
      • BIOS
      • boot
      • cleanup
      • configure
      • device
      • disk
      • dismantle
      • download
      • driver
      • fan control
      • firefox
      • firewall
      • firmware
      • fix
      • flash
      • graphics
      • hwmonitor
      • internet
      • linux
      • macs
      • microsoft
      • modified
      • nvidia
      • optimize
      • overclock
      • performance
      • power savings
      • powermizer
      • proxy
      • ram
      • Realtek
      • review
      • secure
      • shortcut
      • speaker
      • synaptics
      • temperature
      • theme
      • timeline
      • tweak
      • undervolt
      • update
      • wallpaper
      • windows 7
      • windows vista
      • Windows Xp
      • winsat
      • wlan

      Blog Archive

      • ▼  2013 (10)
        • ▼  November (2)
          • A Simple How to use MiniDLNA on OpenWRT
          • OpenWRT TL-WDR3600/4300/4310 Release
        • ►  October (3)
        • ►  September (1)
        • ►  August (1)
        • ►  July (1)
        • ►  May (1)
        • ►  January (1)
      • ►  2012 (4)
        • ►  September (1)
        • ►  June (1)
        • ►  March (1)
        • ►  February (1)
      • ►  2011 (21)
        • ►  September (1)
        • ►  July (4)
        • ►  June (3)
        • ►  May (3)
        • ►  April (3)
        • ►  March (4)
        • ►  February (2)
        • ►  January (1)
      • ►  2010 (36)
        • ►  December (3)
        • ►  November (2)
        • ►  October (4)
        • ►  September (1)
        • ►  August (5)
        • ►  July (1)
        • ►  June (5)
        • ►  May (3)
        • ►  April (3)
        • ►  March (6)
        • ►  February (1)
        • ►  January (2)
      • ►  2009 (81)
        • ►  December (3)
        • ►  November (3)
        • ►  October (9)
        • ►  September (5)
        • ►  August (1)
        • ►  July (5)
        • ►  June (8)
        • ►  May (15)
        • ►  April (10)
        • ►  March (13)
        • ►  February (8)
        • ►  January (1)
      • ►  2008 (8)
        • ►  November (5)
        • ►  July (3)
      Powered by Blogger.

      About Me

      Unknown
      View my complete profile