Microsoft Laptop

  • Subscribe to our RSS feed.
  • Twitter
  • StumbleUpon
  • Reddit
  • Facebook
  • Digg
Showing posts with label windows vista. Show all posts

Tuesday, 29 March 2011

Managing Security using UAC on Windows 7 Home Editions

Posted on 05:07 by Unknown
This post demonstrates how to manage Security Levels on Windows 7 Home Editions.

Only Windows 7 Professional and above editions have a front end secpol.msc to manage local security policies.

For Windows 7 Home Edition you can manage the security policies by manually changing the registry values.

The registry location is shown in the picture below.


The corresponding security levels is as describe below:

Key:
_______________________________________________________________

ConsentPromptBehaviorAdmin (Affects account created as Administrators)
Value - Mode 
0 - Elevate Without Prompting (No Security) NOT RECOMMENDED
1 - Prompt for Credentials on the secure desktop (Most Secure) RECOMMENDED
2 - Prompt for Consent on secure desktop (Default Setting)
3 - Prompt for Credentials
4 - Prompt for Consent
5 - Prompt for Consent for non-Windows Binaries
_______________________________________________________________

Key:
_______________________________________________________________

ConsentPromptBehaviorUser (Affects account created as Users)
Value - Mode 
0 - Elevate Without Prompting (No Security) NOT RECOMMENDED
1 - Prompt for Credentials on the secure desktop (Most Secure) RECOMMENDED
2 - Prompt for Consent on secure desktop (Default Setting)
3 - Prompt for Credentials
4 - Prompt for Consent
5 - Prompt for Consent for non-Windows Binaries

 ______________________________________________________________


On Windows 7 Home Editions the default allows users created with admin rights to mindlessly run executables causing headaches for administrators.

This also prevents people who "borrow" your computers with Windows 7 Home Editions from messing with it by locking down security.

You can lock down the security by changing the corresponding registry values hope you guys find this is useful.

By default Windows Administrative Share is enabled on all versions.
However on Home Premium Versions Administrative Backend is disabled but this is a security risk on Linux System you can actually see the administrative shares. It appears as C$ depending on the partitions present.
You can actually access the system disk if you have the administrative password!


To fix this problem do the following:
Type 'REGEDIT', hit Enter
Navigate to the following registry key:
HKEY_LOCAL_MACHINE\SOFTWARE\Microsoft\Windows\CurrentVersion\Policies\System
Create the new DWORD (32-bit) Value and in the name field type: LocalAccountTokenFilterPolicy
Leave the default value of 0.
or
Navigate to the following registry key:
HKEY_LOCAL_MACHINE\SYSTEM\CurrentControlSet\Services\LanManServer\Parameters
Create the new DWORD (32-bit) Value and in the name field type: AutoShareWks and press Enter. (You can also leave this setting with its default value of 0.)
Reboot your PC.

Read More
Posted in windows 7, windows vista | No comments

Wednesday, 15 December 2010

Script to Install Driver Packages

Posted on 01:44 by Unknown
This bat script is written by me to mass install drivers, activate OEM Windows as well as perform Disk Optimization to alleviate some of the repetitive actions.
You are free to use as you wish but no warranty is provided.
You just need to put the bat script in the same folder as the drivers and OEM Certificate and launch it with Administrative Permission as shown in the example below.


You will most likely need to make some minor changes to suit the script to your purpose.
REM indicates comments.
Start Copy below after this line:
__________________________________________________________________________________

    @echo off

    REM Script Originally Written by the Author of aspiregemstone.blogspot.com

    REM You are free to modify, share & use, completely Free of Charge.

    REM But kindly please acknowledge the source in the Spirit Of Sharing. Thanks =)

    FOR /D %%I IN (%0) DO CD /d %%~dpI

    cls

    echo Creating OEM Certificate Directory...

    mkdir "C:\Windows\system32\OEM"

    echo Copying OEM Certificate...

    copy "OEM.XRM-MS" "C:\Windows\system32\OEM"

    echo Activating Windows 7...

    echo Please wait...This might take a while...

    REM Rename the OEM Certificate to OEM.XRM-MS

    slmgr.vbs -ilc C:\Windows\System32\OEM\OEM.XRM-MS

    REM Replace XXXXX-XXXXX-XXXXX-XXXXX-XXXXX with the OEM Key

    slmgr -ipk XXXXX-XXXXX-XXXXX-XXXXX-XXXXX

    echo Done!

    echo Installing Drivers...

    echo DO NOT RESTART THE COMPUTER!

    REM Rename the Driver Packages

    Chipset_Driver.exe

    Graphics_Driver.exe

    Ethernet_Driver.exe

    Wireless_Driver.exe

    Printer_Driver.exe

    WinTV_Driver.exe

    REM Below is how the script access extracted Drivers

    Audio_Driver\Setup.exe

    Web_Camera\Setup.exe

    Storage_Driver\Setup.exe

    echo All DRIVERS INSTALLED!

    echo Cleaning up TEMP Folders

    C:

    REM Remove Temp Folders created by HP and Intel Driver Packages

    del /S /Q /F C:\SWsetup

    del /S /Q /F C:\swsetup

    del /S /Q /F C:\Intel

    REM Manually invoke optimization

    Rundll32.exe advapi32.dll,ProcessIdleTasks

    echo You may restart the Computer now!

    pause
__________________________________________________________________________________

Save the script as Setup.bat and Right Click to launch it with Admin Rights.
Read More
Posted in driver, windows 7, windows vista | No comments

Friday, 2 July 2010

Fuss Free Computing

Posted on 07:00 by Unknown
I hear a lot of stories regarding the state of Windows users find themselves.
However you can be certain that 90% of the time it is the users' fault.
I have another article on how to maintain the longevity of the hardware but this post specifically aims to teach you how to maintain the state of your operating system.
It is tried and tested on my system therefore I don't see how it is not applicable to anyone else.
Ok here goes

Rule 1: Don't install any software you don't know

I know it is difficult since they let you download for FREE right? No.
Only download reputable software from reputable sources.
Do not install software that forces you to download and run it to access certain resources.
A lot of freeware advertised in banners are either spyware or malware in their own rights.
Good software spreads by the word of mouth. Ask your IT-Savy friends for advice on Freeware.


Rule 2: Do Not Download & Run Files not expected from friends

Do not assume that mail coming from friends are safe. Some Malware do spread from contact list so unless you are expecting the mail and or attachments from friends just trash the mail. You can tell whether the mail is genuine from the way the text is phrase as well.

Rule 3: Less is more

Contrary to freebies in computing more software = less performance.
If we take a logical approach, more software = more code/data to be executed.
Assuming processing is constant,  performance drops. Logical?
So install what you actually will use and software that brings real benefits to your computing experience, avoid programs that tries runs itself on startup because it brings delay to boot time execution.

Rule 4: Only Optimization is Windows Optimization

Out of the so many Windows optimization the only real optimization is the Windows built in ones.(You can find the optimization below documented in documents published in WHDC (Windows Hardware Developer Central).
Open Command Prompt with Elevated Rights & type the following:
C:\Windows\System32)Rundll32.exe advapi32.dll,ProcessIdleTasks
You will see harddisk lights light up as Windows started optimizing itself.
It is safe to assume that it is completed once Harddisk Activity lights ceases.
Next run Windows Defragmenter 
Open Command Prompt with Elevated Rights & type the following:
C:\Windows\System32)Defrag C:\ /v /u
The /v /u flags will inform you about the status of completion.
Finally Open Command Prompt with Elevated Rights & type the following:
C:\Windows\System32)Defrag C:\ /v /u /b
The /b flag will tell Windows to perform an optimization known as boot optimization to reduce boot time.
Some other Optimization does the same optimization as documented by Microsoft so installing them is like doubling the work so you actually do not need to install any third party software optimizer.
However Windows Defragmenter is a necessary evil inherent because of the way NTFS, Microsoft File System allocates Disk space, defragmentation is the only solution to defragment non-contiguous files especially after a lot of reinstalls and uninstalls.

Rule 5: Delete the "Setup.exe" after installing

Whenever you download and install a software like Firefox you get a installer called Setup.exe. If I were to use an analogy it is like the packaging whenever you buy a product after you take out the product you can throw the box away. Over time these EXEs built up when you install software wasting unnessary space on the harddisk. Just like your real house do some house keeping on your harddisk.

Rule 6: Do Not Install Toolbars

This is a fair new occurrence you see many software publishers offering toolbars for Web Browsers some come bundled with "freeware". In any case Do Not install them.
Why? Because the Web Browsers Authors do not specifically test the toolbars to work properly alongside the browsers. There is no guarantee it will not affect your browser in any negative manner.

Rule 7: Disable AutoRun & AutoPlay

 Even though Microsoft beefed up Windows Security with UAC and malware that auto launches itself from the thumbdrive can still cause some unnecessary damage. If you need to launch an executable just launch it manually and save yourself the unnecessary risk of a malware attack. To disable it just access Control Panel click on AutoPlay and disable it for all devices. If autoplay is disable NO MALWARE can attempt to launch itself into your system unless you launch it manually.


Lastly to get a free and good anti-virus look no further than Microsoft Security Essentials.
Why do I recommend this software because it is free for every Genuine Windows, and updates are tested before release.
I believe you heard horror stories of 3rd party Anti-Virus killing your Operating Systems.
1)I believe that Microsoft test their definition files and patches before release.
2)A good anti-virus isn't overly suspicious. Microsoft Security Essentials have good detection rate but at the same time it isn't overly zealous like a suspicious policeman thinking every citizen is a potential criminal like some other 3rd party OS.
3)I have tried MSE and it plays nice on Windows Vista and  above Operating System without being a resource hog. Some people believe that a Security Software should protect us against all know threats even drive by sites but I believe an Anti-Virus software is the last line of defense against malware, users safe surfing and computer usage habits is the FIRST defence. Just following the few simple rules should guarantee a fuss free computing even on Windows. Paying more for Macs isn't the solution, sure using a less common OS might reduce the chance of encountering malware since the malware programmers tend to target the majority but ultimately it is the usage habits that matters.
Read More
Posted in windows 7, windows vista, Windows Xp | No comments

Thursday, 1 October 2009

How To Choose What Laptop System To Get?

Posted on 09:14 by Unknown
Basically there are only a few questions you need to ask.
1.Size

How big you need your laptop to be?
Keep in mind size is related to weight, the smaller the laptop the lighter it usually is.
<12.1>
13.1 inches (Mainstream Laptops)
14.1 inches (Mainstream Laptops)
15.1 inches (Mainstream Intensive Gaming Laptops)
16.1 inches (Desktop Replacement)
>16.1 inches (Desktop Replacement)

Usually if you need to move it around 14.1 -15.1 inches would be around the max for mobility.

2.Usage

Processor

Intel

For Intel Processor typically it is easily identified
Intel Core i (Processor Class Number) - (3 Digit SKU Number)(Alphabet 1)(Alphabet 2)

The Processor Class Number is either 3/5 or 7.
3 refers to the low end Processors
5 refers to the mainstream Processors
7 refers to the high end Processors
The 1st Digit SKU Number refers to the instruction set in the Processor.
3X0 means
  1. No Intel® Turbo Boost Technology,
  2. No Intel® Virtualization Technology for Directed I/O (VT-d), 
  3. No Intel® Trusted Execution Technology, 
  4. No AES New Instructions
4X0 means
  1. No Intel® Virtualization Technology for Directed I/O (VT-d), 
  2. No Intel® Trusted Execution Technology, 
  3. No AES New Instructions
5X0 and above
  1. All Instruction Set Supported
The 2nd Digit refers to the different Frequency of the Processor Family

For the alphabet there are a number of fixed Alphabets
M - Mainstream
Q - Quad Core (4 Cores, 8 Threads, No Intel HD Graphics due to high TDP)
X - Xtreme (Unlocked Multiplier)
U - Ultra Low Voltage (Low Frequency + Low Voltage)
L - Low Voltage (Low Voltage only)
E - Embedded (Not Upgradable)
AMD

For AMD Processor it is not as easy.

Generation Griffin
Identifier:
AMD (Model) X(No. of Cores) (SKU Alphabet)-(Frequency Identifier No.)(Odd/Even Last Digit)
  1. Turion refers to high end model
  2. Athlon refers to mainstream model
  3. Sempron refers to low end model
X2 refers to Dual Core

Ultra refers to Total 2MB L2 Cache otherwise 1MB L2 Cache or less.

ZM refers to Turion Processor with 3 Power State
RM refers to Turion Processor with 3 Power State
QL refers to Athlon Processor with 2 Power State
SI refers to Total 512 KB Cache with 2 Power State
Frequency Identifier No. starts from 4X to 8X.
  1. RM-70 starts from 2GHZ (Every 2 increase Frequency Increase by 100MHZ ) Odd Last Digit refers to an increase in HyperTransport Frequency from the Even Digit SKU  
  2. RM-80 starts from 2.1GHZ (Every 2 increase Frequency Increase by 100MHZ ) Odd Last Digit refers to an increase in HyperTransport Frequency from the Even Digit SKU  
  3. V refers to Low Voltage Processor
Generation Caspian
Identifier:
AMD (Model) (Generation II) Ultra (No. of Cores) (Type Alphabet) (3 Digit SKU No.)
  1. Turion refers to high end model
  2. Athlon refers to mainstream model
  3. Sempron refers to low end model
Generation II refer to K10 Architecture

Ultra refers to Total 2MB L2 Cache otherwise 1MB L2 Cache or less.

Type Alphabet
  1. M refers to Mainstream
  2. L refers to Low Voltage
3 Digit SKU
6XX refers to Turion Ultra Series Starting from 2.4 GHZ, every increment in 20 increase by 100MHZ with 5 Power States
5XX refers to Turion Series Starting from 2.2 GHZ, every increment in 20 increase by 100MHZ with 5 Power States
3XX refers to Athlon Series Starting from 2.0 GHZ, every increment in 20 increase by 100MHZ with 3 Power States
Note Starting Frequency of L Series differ from M Series

Generation Champlain
 
The Generation Caspian adds Quad Core Mobile Processor to the market.

Identifier: X NNN
X is either X for Black Edition (Unlocked Multiplier 45 Watt TDP ), N for MainStream (35 Watt TDP) & P for MainStream Lower Power Consumption (25 Watt TDP), V for Low End (25 TDP Single Core).

1st Digit refers to SKU
9 - Quad Core with 21.3GB/s HyperTransport
8 - Triple Core with 21.3GB/s HyperTransport
6 - Dual Core with 21.3GB/s HyperTransport
5 - Dual Core with 17GB/s HyperTransport
3 - Dual Core with 64bit Floating Point Unit (I suspect it is the old Caspian Refresh) (All the new Champlain should have 128Bit Floating Point Units) 17GB/s HyperTransport
1 - Single Core with 64bit Floating Point Unit

All Champlain Generation has 0.5 MB L2 Cache per CPU Core.

Graphics (For Gaming GPU > CPU)

For occasional gaming get at least some decent graphics from Nvidia, ATi.
For Intel Graphics if you must at least go for 3150,4500MHD or the new Intel HD Graphics.
They have Video Codec Decoding Abilties for Adobe Flash 10.1.
For ATi any Radeon HD will do, DO NOT go for Radeon Xpress they are obselete.
For Nvidia, go for anything below 8000 Series. 7000 series are obselete.
Both Nvidia 7000 Series and Radeon Xpress do not support GPU computing and DirectX 10
Use Notebookcheck as a rough guide for gaming performance.
Class 3, Class 2, Class 1 are suitable for occasional gaming.

For more intensive gaming consider getting Class 2 and Class 1 Graphics however they are most available only on 14.1/15.1 inch and above laptops.
Reason being more powerful graphics requires more powerful fansink these contributes to size hence usually they can only be found on 14.1 inch and above systems.

RAM
I don't really bother as it is very easy and cheap to upgrade laptop RAM.
You get more cost saving upgrading RAM yourself than buying a high RAM laptop.

Harddisk
Size is of no concern as they come with at least 120GB and that is more than sufficient.

Edit:
With regards to how good a laptop is in terms of quality you have to look at the design layout.
1) Google the motherboard prints of the particular laptop
2) Heatsink size must be sufficiently large enough particularly for AMD Processor Laptops and those with Nvidia/ATi GPU, larger mass allows higher heat capacity so temperature will not be too high.
The GPU, CPU and Northbridge must not be too close to each other.

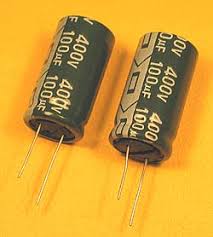
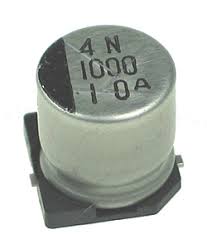
3) The capacitors must be of high quality

High Quality Capacitor
Lower Quality Capacitor

Read More
Posted in windows 7, windows vista, Windows Xp | No comments

Tuesday, 25 August 2009

Secure Your Windows CD-Key (For Vista and 7)

Posted on 05:45 by Unknown
As you know everytime you activate a Windows Installation your Product Key can be retrieved via Software means.
Don't believe me?
Download this and retrieve your Product Key in Clear Text.
So is there an alternative solution so people will not steal your Product Key from your computer when you are not looking?
Yes there is.
Open Command Prompt with Administrative Permission and Run the following commands.
slmgr /cpky
If you try to retrieve your Product Key again with the same software, you will get this.

The Registry Entry Containing the Product Key has been cleared and Windows remains activated!
Read More
Posted in secure, windows 7, windows vista | No comments

Friday, 24 July 2009

How to protect your computer from malware infested thumbdrive

Posted on 08:11 by Unknown
I have seen virus infected thumbdrives especially on computers that is poorly administrated (i.e. Users given administrative privilege) and especially when the users have no clue of the dangers of internet and downloads suspicious files with executable extensions.
Combine this with not-so-frequently updated anti-virus software it is a foregone conclusion malware infection will occur.

This will lead to frequent system crashes and poor Windows Experience and end of the day people usually point fingers at Microsoft etc and not themselves as the cause of malware infection.

As the system gets laden with more and more viruses system crashes and lag occur as the malware attempts to make unauthorised connection to the internet depending on what it was originally designed for.
Most virus do not attempt to disable the computer for obvious reasons.
They want to stay undetected so they can steal data from the infected host or simply use the host as part of a bot network, however things get ugly when more different viruses comes into play.

A virus will compete with other programs including other Virus for system resources if the computer do not have sufficient resource to feed them lag occurs if other viruses attempt to interfere with system files hijacked by other viruses a clash will resulting in system crash and Blue Screen Of Death.

Malware spread via a number of medium Internet as well as Removable Drives.
As the topic is fairly big I shall only focus on how to prevent Virus on thumbdrive from entering your host system.

First of all when I insert a thumbdrive a good anti-virus will attempt to scan it, if the Virus signature match it database it wil immediately isolate the file to prevent it from running as shown below.

The good news is even if you don't have anti-virus you can prevent them from running and see if the thumbdrive is infected .

Lets take a look at the infected thumbdrive.
Go to Folder Options and make the following changes to enable you to see all the files present on a thumbdrive.
Select "Show Hidden Files and Folders"
Uncheck "Hide Extension For Known File Types"
Uncheck "Hide Protected System Files and Folders"
If you have a Linux/BSD/Solaris System Partition you can boot in it and attempt to take a look into your Windows Partition, all the System Files in the C:\ will show up (including both important Windows System Files and Malware).


Malware usually obscure themselves as system files so you will not be able to spot them if you do not set the setting shown above.
Take note REAL system files will also reveal themselves so DO NOT delete files if you are not sure they are Windows System Files or not.
Deleting Windows System Files can cause System to be UNBOOTABLE.

Soon you can see other virus showing up.( Note:SPENSER.EXE is no longer on the drive as the Anti-Virus removed it)


A strangely named file can be seen above probably another virus which attempted to copy itself to the thumbdrive but SPENSER.EXE beat it to hijacking of the autorun.inf so it doesn't do anything.

As I have said Viruses hijack system files for them to perform misdeeds on thumbdrive they usually hijack autorun.inf.
Note: autorun.inf is originally a system file to enable users to autolaunch installation programs upon insertion of removable drive.

Lets take a look at the infected thumbdrive's autorun.inf (Right Click Open with Notepad).

If you remembered earlier the system anti-virus detected SPENSER.EXE
Look at how SPENSER.EXE hijacked the autorun.inf in order to auto launch itself upon insertion of the thumbdrive.

So how can you prevent this?
It is simple. Simply disable autorun in Xp or autoplay in Vista.
If autoplay/autorun is disabled the system will ignore the autorun.inf hence preventing the virus from runnning effectively and if you remember Virus hide themselves as System Files so you will never launch it accidentally.
However this is only for generic virus.
Some Virus are powerpoint or word macros programmed so disable Macro in Office Software will do the trick.
Read More
Posted in windows 7, windows vista, Windows Xp | No comments

Monday, 6 July 2009

Optimize Windows Vista Boot

Posted on 00:24 by Unknown
What you should do to conserve and optimize disk space and boot time.

1) After download software like Firefox, after installation please delete the installer.


eg. Setup.exe

New Versions will come out and internet download speeds are so fast, so there is no point keeping it.

2) Do this weekly:
Start>> All Programs>> Accesories>> System Tools>> Disk Clean Up


Check Everything Except for Hibernation File.

Or download and install a autodiskcleanup script I created

CCleaner is a extra ware that does the same thing it uses System Resource hence I don't use this.

3) Open Control Panel >> Administrative Tools >> Services
Disable "SuperFetch"
Stop "Superfetch"
Reason being Superfetch isn't very efficient, very often it overfetches Programs you rarely use, increasing boot time as a result.

4) Clean temporary Directories.
They are:

C:\Users\{Your User Name}\AppData\Local\Temp
C:\Windows\Temp
C:\Windows\Prefetch (Delete the ReadyBoot Contents before ReadyBoot folder)
I have created a batch file to kill superfetch.
Download and run with Administrator permission here (Superfetch Killer)
5) Here is a Windows Batch File that clears useless file recursively in all directories.
Batch file is provided by mydigitallife

Open in Notepad to see the script content.
To Run, Right Click "Run as Admin"

Next run sdelete to zero the harddisk space and return all unused space

Use the command:
sdelete -c
After that do a Disk Defragmentation and Reboot

Using this method my Acer Aspire 4530 now boots in 5 Rolling Bars instead of the previous 18 &
My 5 year old Desktop has the following specification:
Intel Pentium 4 HT 2.8GHZ 512KB L2 Cache (NorthWood)
4GB DDR RAM 400MHZ
250GB WD 16MB Buffer Cache
875P Motherboard
Currently the dinosaur is running Windows Vista rather speedily so try it!


Read More
Posted in boot, disk, download, optimize, windows vista | No comments

Thursday, 14 May 2009

Reformating & Disk Erasure of Harddisk

Posted on 07:29 by Unknown
For some of you who seldom perform OS re installation you might not know the differences clearly.
First, reformatting is usually done when the operating system is corrupted beyond repair.
Usually when your machine is bogged down a lot of malware, reformatting solves the issue faster than finding fixes for each malware.
Personally, I prefer reformatting because certain types of malware corrupts System Files beyond repair.
What reformatting does is that it destroys the partition tables and recreate them.
In Windows it would be C:\ partition.
The old data is still present but it is no longer readable by normal methods as all the references to the old data is overwritten (It is like the content page is destroyed hence the book appears as new because all indexes are gone, the old data is still present but there is no link to access them properly) but this is a "as good as new" for end users who want a new OS installation.

Disk Erasure Tools is usually used by organizations with highly sensitive information.
Tools such as DBAN or Secure Erase removes all traces of data by overwriting the whole hard disk with other data.

Differences between DBAN and Secure Erase
  • DBAN writes by Sector therefore when bad sectors are redirected data erasure maybe incomplete. However Secure Erase writes by Cylinders so complete data erasure is guaranteed.
  • DBAN takes a longer time compared to Secure Erase.
Why is this so?

Secure Erase is the standard included by hard disk manufacturers to clear sensitive data as a feature requested by governmental organizations.

Quoted from the Data Sanitisation Tutorial

Complete eradication of user data off drives can be accomplished by running data Secure Erasure utilities such as the freeware “HDDerase” downloadable here. It executes the Federally-approved (NIST 800-88) Secure Erase command in the ATA ANSI standard, which is implemented in all recent ATA drives greater than 15-20 GB. A similar command in the SCSI ANSI standard is optional and not yet implemented in drives tested. Normal Secure Erase takes 30-60 minutes to complete. Some ATA drives also implement the standard Enhanced Secure Erase command that takes only milliseconds to complete.

It uses a standard ATA set hard disk native instruction set to wipe the entire drive quickly.

You might have heard that 1 or 2 pass of overwriting might not be enough to clean the hard drive however this is not true as nowadays hard disk comes in high density capacity.
For a similar sized hard disk 5-10 years ago it can only contain like 30 or less GBs.
Hence when you overwrite such high capacity hard disk it is impossible to recreate the original data.

An analogy I can think of would be you have 2 trays of coloured arranged sand, one fine, one coarse.
If you imagine each particle to be data, if I substitute half with sand particles of another colour randomly, the tray with the fine sand will look more messed up then the tray with coarse particles.

Sdelete is like a DBAN inside Windows.
What it does using the -c (clean command) is it takes all the unused hard disk space and overwrites them.
You can also use it to overwrite the data region for a particular file.
Usually when you delete something in Windows it only remove the reference to the file and marks the region from occupied to unused.
When you use sdelete, it will remove the reference to the file and overwrites the region with random data before marking it from occupied to unused.

I hope you understand more about hard disk from this simple introduction.
Read More
Posted in disk, windows 7, windows vista, Windows Xp | No comments

Saturday, 2 May 2009

How to upgrade Vista 32bit to 64bit using your original license key

Posted on 17:00 by Unknown


Firstly I don't support piracy, please do this only if you have the original Vista License Sticker (Above) on your System.

The reason I am doing this post is because OEM Vendors usually install Vista 32bit on Retail Systems, however you can get more performance on your system if you used a 64bit OS instead, it is unfair to users to bear the system limitations.

What this guide is good for?
  • You want a bloatware free Vista Install at the same time you don't want to purchase another Vista License.
  • You want to upgrade your original 32bit Vista to 64bit Vista
  • You lost the original recovery partition and do not have the recovery cd and yet you don't want to buy the recovery cd or a new Vista License.
NOTE: This will only work for Laptops or OEM Desktops preloaded with OEM Vista as these Systems has a special SLIC 2.0 BIOS which enables OEM Activation.
Do not message me HERE on how to make this work on Systems that do not have OEM Vista preloaded with it.

Lets take for example the Acer Aspire 4530 Laptop (Tested).
On a Vista Client 32bit OS it can only utilise up to 2.8GB of RAM regardless of the Total RAM available.
(Maximium usable RAM is 3GB in all 32bit Vista Editions)
However on a Vista Client 64bit OS it can support up to 3.8GB of RAM
(Assuming you have the maximum 4GB installed)
The performance difference is significant 1.0GB difference.(the missing 0.2 is due to 9100MG Integrated Graphics).

Backup All Your Important Data Before Proceding !
  1. Firstly google and prepare all the 64bit Vista Drivers you need.
  2. Next take any retail copy of Vista (or download an uncracked version from Bittorrent. There is no need to get a retail CD-Key as we will be using OEM CD-Key) and install the type you own.
Example if you have a Vista Home Premium License Sticker, install the Vista Home Premium Version.

  • Uncheck Automatically Activate When Online, and Do Not type in any Product Key.

After installing and setting up the OS, download the Acer OEM Certificate and put it inside :

C:\Windows\system32\OEM

If you don't have the folder, create it.

Then open up a Command Windows with Vista Administrative Permission and Enter the Commands below.

slmgr.vbs -ilc C:\Windows\System32\OEM\Acer.xrm-ms

Next, choose one of the Acer OEM Keys shown below the version you have installed in your system:
Note the OEM Keys are NOT UNIQUE meaning EVERY Acer Laptop which has Vista Preloaded is using one of the following CD-Keys, depending on the version of Vista.


Then Activate

Then install the 64bit drivers.

You are done.

Note: The Activation is done offline, you do not need any internet connection to do this.

If you have other Vendor laptops, PM me for their respective OEM Certs and CD-Key if you need it.

Use this keyfinder to check your current OEM License Key and match it to the appropriate OEM Certificate

Gateway & Emachines Cerfitifcate Download
HP & Compaq Certificate Download

Toshiba Certificate Download (There are 4 Certs try the correct one)
ASUS Certificate Download
Sony Certificate Download

Fujitsu Certificate Download

The Windows 7 Clean Install Instruction is here
Read More
Posted in 32bit, 64bit, windows vista | No comments

Thursday, 30 April 2009

Windows 7 Wallpapers (Include Latest RC)

Posted on 02:18 by Unknown
Here is the Updated Windows 7 wallpaper Collection

The latest release it up to RC (Release Candidate)

I have place the Original Windows 7 Wallpapers + RC Wallpapers + Windows 7 Beta Wallpapers into one zip file.

I have also rename & tag some of them to avoid file clashing with the original Vista Wallpaper.

After you download you can safely extract them to
C:\Windows\Web\Wallpaper
They will not overwrite your original Vista Wallpapers.

Download them here

If you are using Windows Xp and would like to download Vista Wallpapers,click here

You can simply extract them to your Wallpaper Folder they will not overwrite your original Wallpapers or the Windows Vista Wallpapers as well.
Enjoy
Read More
Posted in download, wallpaper, windows 7, windows vista, Windows Xp | No comments

Windows Vista Wallpapers

Posted on 01:46 by Unknown
For Windows Xp/Windows 7 users who wish to have the Vista Wallpapers Collection, I have uploaded them here 

If you are interested in Windows 7 Wallpaper, click here

If you are using Windows 7 please rename the files before extracting to your Windows 7 Wallpaper Collections.
Read More
Posted in download, wallpaper, windows 7, windows vista, Windows Xp | No comments

Windows Vista SP2

Posted on 00:23 by Unknown
Windows Vista Service Pack is out (not officially).
Your can download it now using a bittorrent client

Windows Vista SP2

(english, japanese, spanish, german and french)

BUILD: 6002.18005.090410-1830
FILE: Windows6.0-KB948465-X64.exe
SIZE: 605,410,472 bytes
CRC32: 1737E14D
MD5: A3BCB1FFDB366397FA5FAB0898EB098D
SHA-1: BE8D74ADC029FA7350FC1F0D32BEF853C0519A92
--------------------------------------------------------------------------
BUILD: 6002.18005.090410-1830
FILE: Windows6.0-KB948465-X86.exe
SIZE: 365,230,920 bytes
CRC32: 3368C777
MD5: C9394FD32DB15619328AF4FF0315750A
SHA-1: 106C0484D7449CC4B70353C21D0C0D63E4BA66C3

Torrent:
X86 here
X64 here

Upon completion of Update and Reboot
Click
Start >> All Programs >> Accessories >> Command Prompt
Then Right Click "Run as Admin"
Then enter:
Compcln.exe

This will clean up the updates to save disk space if you are certain you are not going to uninstall any updates
Read More
Posted in windows vista | No comments

Tuesday, 28 April 2009

Check PC Performance In Depth Details with WinSAT in Vista & Windows 7

Posted on 07:10 by Unknown
Open up a Command Prompt with Adminstrative Permission
To do that follow this step:

Go to
Start >> All Programs >> Accessories >> Command Prompt
Right Click, Choose Run as Administrator while selection Command Prompt

Next in the Command Prompt Windows,

Type in
cd C:\Users\**User Name\Desktop

** Replace User Name with your User Account Name in Vista

Press Enter,

You should see the Command Prompt as:
C:\Users\**User Name\Desktop>
Then type the following:
winsat formal -v >> winsat_result.txt
Wait for Windows System Assessment to finish

You should see a new text file called winsat_result.txt in Desktop.

Open it using wordpad to see the full System Assessment Details

Read More
Posted in performance, windows 7, windows vista, winsat | No comments

Sunday, 12 April 2009

Disable USB Messages

Posted on 20:40 by Unknown
Sometimes Messages telling you that a particular device can perform faster will appear.
This is true especially on Aspire 4530 Webcam.
The reason is the WebCam is attached to a Full-Speed USB port which allows less data transfer rate then a High-Speed USB port.
To correct this simply uncheck the option:

Go to Control Panel Device Manager
Open the USB Control Hubs until you see one of these dialogue boxes.


Uncheck and Save.
Read More
Posted in device, windows 7, windows vista | No comments

Friday, 27 March 2009

Converting from IDE to AHCI in Windows Vista

Posted on 21:04 by Unknown
When you do a fresh install on Vista
First select to boot in IDE mode by selecting IDE in BIOS
After completing the install
Do the following
  1. Click Start, type regedit in the Start Search box, and then press ENTER.
  2. If you receive the User Account Control dialog box, click Continue.
  3. Locate and then click the following registry subkey:
    HKEY_LOCAL_MACHINE\System\CurrentControlSet\Services\Msahci
  4. In the right pane, right-click Start in the Name column, and then click Modify.
  5. In the Value data box, type 0, and then click OK.
  6. On the File menu, click Exit to close Registry Editor.
Restart and select AHCI in BIOS

This only applies when you are reformatting your computer from scratch from a Vista Install CD
If you are doing image recovery the above is already completed


From Microsoft Help & Support
Read More
Posted in ahci, windows vista | No comments

Friday, 20 March 2009

Vista Cursor For Windows Xp

Posted on 08:58 by Unknown
I am sure Xp users are bored of seeing Hour Glass after a while
I have Linked 2 Sets of Vista Cursor
( I didn't make any of them and I have forgotten where I got this from)


Vista Cursor Black
Vista Cursor Blue

  • Extract the file to a folder
  • Right Click the Install.inf and Select Install
  • Go to Mouse Property in Control Panel
  • Select the newly installed Mouse Cursor Set
  • Apply then Save the Cursor Set
And you are done !


Read More
Posted in download, theme, windows vista, Windows Xp | No comments

Wednesday, 18 March 2009

Windows Networking Guide

Posted on 07:12 by Unknown
Here is a interesting site contain information regarding Windows Networking

For Windows Vista, Server 2008 Guide see here

There are also many other interesting knowledge regarding networking there to check out

If you are not comfortable with modifying values via commandline there are downloads available too
Read More
Posted in internet, windows vista | No comments

Monday, 16 March 2009

Nice Firefox Themes

Posted on 08:24 by Unknown
Nothing Technical for this entry

I will just be introducing some nice themes for Firefox


ANTHEM

Made by Wesley Hales
Download here


Office 2007 Black

Made by t-rane

Download here

HEAVEN.CUBE 1.43

Made by h3j4
Download here

Just Black (A Cylence theme for Firefox 3) 1.0.1

Made by Julien Saurin
Download here

These themes seriously makes IE, Safari and Opera look boring =P

All the themes mix very well with the default Vista themes.I like them because although they are black themes they are not too dark. Enjoy =)


Read More
Posted in firefox, theme, windows vista | No comments

Sunday, 15 March 2009

Explaining Windows Xp/Vista Startup

Posted on 03:54 by Unknown
Note: This is applicable to BOTH Windows Xp and Vista as msconfig is present in both OS

Another reason why Windows Boot are often very slow because Programs Add themselves to the startup automatically making Windows Start the Programs on EVERY boot whether you need it or not

Start>> Run>>Type "msconfig" >> Enter

You should see this

To disable a particular startup simply uncheck the box next to the entry

If you want to remove a particular entry from msconfig scroll to the left you should see the following

The box in Red indicates the location of the registry entry which the program you installed added in order to start automatically

To remove it
Start>> Run>> Type "regedit" >> Enter

Navigate to the location in Red

You should see something like this:

To remove the entry from msconfig simply delete it from here
  • Always make sure the program you removed is non-essential otherwise certain important third party program will not run
An example from the above is "NvCplDaemon" which is actually Nvidia Graphics Control Panel
  • Unless you really don't need it, it is safer to disable startup from msconfig rather than deleting the registry entry
Read More
Posted in optimize, windows vista, Windows Xp | No comments

Saturday, 28 February 2009

Ultimate Windows Tweaker Update

Posted on 01:35 by Unknown
Edit:
There is an update to Ultimate Vista Tweaker, however the updates do not introduce new significant tweaks

Tweak Vista to remove as many unwanted functions as possible to make it faster and more responsive
Ultimate Windows Tweaker is actually a front-end for Windows Registry no additional Services or Programs is installed into your system
Get it here
You can alternatively find the registry entries manually and tweak it however it is not worth the time when someone already made a user friendly front end

Tweaks I used
____________________________________________________________________


I disabled the annoying pop up balloon tips because pop ups really irritates me
____________________________________________________________________


I set the Shutdown time to a lower setting
It is not good to set it to the lowest because Vista has lots of services, setting it too low can cause Service Abortion pop ups which is not a good thing and the default shutdown time is too long

I set Menu Speed to fastest because Vista animation is rather slow hence it irritates a user who wants to do real work This tweak will make Vista more responsive

Disable Vista built in Zip if you use third party compression tools no use having 2 identical tools on the machine (Most of the time 3rd party compression tools are better

Disable ReadyBoost because it is really useless
You are better off buying RAM upgrades

Disable Tablet Input if you are NOT using a Tablet
____________________________________________________________________

Disable Autoplay
Autoplay can sometime cause Virus Programs on Thumbdrive to be executed you will not want to test Vista security or your Anti Virus's abilities by enabling this

Disable Windows Mail if you are using Outlook or Thunderbird or anyother Email Client

Disable Windows Media Center if you are not using your PC as a entertainment Centre for TV Programmes
____________________________________________________________________


Hide your server from browsing list so when you connect to a network other PC will not know you are connected to the network

If you don't use Remote Desktop into this machine disable it

Disable File Access to this machine from other PCs in the network for better security

Disable IPC for other users again a security setting

Disable Recent share so your network access history to other Computers will be safe from prying eyes (this is not Internet History but LAN History)

Auto Discovery of Media is redundant (If you want the media files just copy it to your PC :P)

Set the bandwidth setting according to your network performance (Mine is high)
____________________________________________________________________
Read More
Posted in download, optimize, tweak, windows vista | No comments
Older Posts Home
Subscribe to: Posts (Atom)

Popular Posts

  • Delete Windows System Files
    If you play around with Windows System Files sometimes it is not possible to delte them off after you had your fun. The following commands w...
  • Internet Explorer Tweak
    Here is a registry tweak for Internet Explorer Similar to the Mozilla Firefox tweak this enable you to increase the number simultaneous ser...
  • How to Mod your Laptop VGA BIOS
    Basically there are 2 locations where the VGA BIOS in laptops. Some OEMS embed the VGA BIOS in the EFI/BIOS in your laptops, other OEMs have...
  • Acer Phoenix BIOS Emergency Recovery
    This is for people who don't listen and interrupt the flashing BIOS for unknown reasons. This will work provided the BIOS BootBlock isn...
  • Secure Your Windows CD-Key (For Vista and 7)
    As you know everytime you activate a Windows Installation your Product Key can be retrieved via Software means. Don't believe me? Downl...
  • Changing the Acer Arcade Shortcut
    While surfing the Windows Registry (You must be thinking that I am weird =P) yesterday I found something interesting It is actually possible...
  • Some Interesting Modding Ideas
    I modded my Aspire 4530 AGAIN to control resultant temperature. Below are some ideas and pictures. Another mod idea This time a black anodi...
  • How to obtain the DSDT from your laptop
    There are many ways to rip the DSDT out of the laptop BIOS. If there is a BIOS editor it is possible to rip out the .AML file. However below...
  • Acer Aspire 4530 Boot Screen
    Acer Aspire 4530 Boot Dianogostic Screen PhoenixBIOS 4.0 Release 6.1 Copyright 1985-2008 Phoenix Technologies Ltd. All Rights Reserve 1.052....
  • List Of Modified BIOS Collection
    Here are the list of Modified BIOS Collection (mainly SLIC Mods), no warranty provided use at your own discretion! Acer Aspire 4520G BIOS Ac...

Categories

  • 32bit
  • 64bit
  • acer
  • ahci
  • amd
  • apple
  • aspire 4530
  • aspire 4535G
  • aspire 4740
  • atheros
  • atom
  • BIOS
  • boot
  • cleanup
  • configure
  • device
  • disk
  • dismantle
  • download
  • driver
  • fan control
  • firefox
  • firewall
  • firmware
  • fix
  • flash
  • graphics
  • hwmonitor
  • internet
  • linux
  • macs
  • microsoft
  • modified
  • nvidia
  • optimize
  • overclock
  • performance
  • power savings
  • powermizer
  • proxy
  • ram
  • Realtek
  • review
  • secure
  • shortcut
  • speaker
  • synaptics
  • temperature
  • theme
  • timeline
  • tweak
  • undervolt
  • update
  • wallpaper
  • windows 7
  • windows vista
  • Windows Xp
  • winsat
  • wlan

Blog Archive

  • ▼  2013 (10)
    • ▼  November (2)
      • A Simple How to use MiniDLNA on OpenWRT
      • OpenWRT TL-WDR3600/4300/4310 Release
    • ►  October (3)
    • ►  September (1)
    • ►  August (1)
    • ►  July (1)
    • ►  May (1)
    • ►  January (1)
  • ►  2012 (4)
    • ►  September (1)
    • ►  June (1)
    • ►  March (1)
    • ►  February (1)
  • ►  2011 (21)
    • ►  September (1)
    • ►  July (4)
    • ►  June (3)
    • ►  May (3)
    • ►  April (3)
    • ►  March (4)
    • ►  February (2)
    • ►  January (1)
  • ►  2010 (36)
    • ►  December (3)
    • ►  November (2)
    • ►  October (4)
    • ►  September (1)
    • ►  August (5)
    • ►  July (1)
    • ►  June (5)
    • ►  May (3)
    • ►  April (3)
    • ►  March (6)
    • ►  February (1)
    • ►  January (2)
  • ►  2009 (81)
    • ►  December (3)
    • ►  November (3)
    • ►  October (9)
    • ►  September (5)
    • ►  August (1)
    • ►  July (5)
    • ►  June (8)
    • ►  May (15)
    • ►  April (10)
    • ►  March (13)
    • ►  February (8)
    • ►  January (1)
  • ►  2008 (8)
    • ►  November (5)
    • ►  July (3)
Powered by Blogger.

About Me

Unknown
View my complete profile