Microsoft Laptop

  • Subscribe to our RSS feed.
  • Twitter
  • StumbleUpon
  • Reddit
  • Facebook
  • Digg
Showing posts with label overclock. Show all posts

Wednesday, 1 September 2010

Linux Nvidia Driver OverClocking

Posted on 08:40 by Unknown
A lot of people don't read "README"s hence they missed a lot of things.

It reflects on the laziness of people of this generation refusal to read, write and learn with the only desire to enjoy and relax. Can't really blame them since it is how the world markets success.
I am guilty of that sometimes as well.


Anyway today I read through the Nvidia Propriety Driver's README and found a number of Nvidia XConfig options usually neglected.

I will only list interesting ones below, the full list is here, Read through it for more information.

To add them simply add the entries under /etc/X11/xorg.conf.
Something like this (in red):
.............................................
Section "Monitor"
Identifier "Monitor0"
VendorName "Unknown"
ModelName "Unknown"
HorizSync 28.0 - 33.0
VertRefresh 43.0 - 72.0
Option "DPMS"
EndSection

Section "Device"
Identifier "Videocard0"
Driver "nvidia"
Option "NoLogo" "on"
Option "Coolbits" "1"
Option "OnDemandVBlankInterrupts" "on"
EndSection
....................................


Interesting Sections below.............

Option "NoLogo" "boolean"
Disable drawing of the NVIDIA logo splash screen at X startup. Default: the logo is drawn for screens with depth 24.
This skips the Nvidia Splash Screen during boot up.

Option "ThermalConfigurationCheck" "boolean"
The NVIDIA X driver will fail initialization on a GPU if it detects that the GPU has a bad thermal configuration. This may indicate a problem with how your graphics board was built, or simply a driver bug. It is recommended that you contact your graphics board vendor if you encounter this problem. This option can be set to False to bypass this test. Default: true (the thermal configuration test is performed).
Turn On Thermal Protection on GPU.


Option "Coolbits" "integer"
Enables various unsupported features, such as support for GPU clock manipulation in the NV-CONTROL X extension. This option accepts a bit mask of features to enable.

WARNING: this may cause system damage and void warranties. This utility can run your computer system out of the manufacturer's design specifications, including, but not limited to: higher system voltages, above normal temperatures, excessive frequencies, and changes to BIOS that may corrupt the BIOS. Your computer's operating system may hang and result in data loss or corrupted images. Depending on the manufacturer of your computer system, the computer system, hardware and software warranties may be voided, and you may not receive any further manufacturer support. NVIDIA does not provide customer service support for the Coolbits option. It is for these reasons that absolutely no warranty or guarantee is either express or implied. Before enabling and using, you should determine the suitability of the utility for your intended use, and you shall assume all responsibility in connection therewith. When "1" (Bit 0) is set in the "Coolbits" option value, the nvidia-settings utility will contain a page labeled "Clock Frequencies" through which clock settings can be manipulated. On mobile GPUs, limited clock manipulation support is available when "1" is set in the "Coolbits" option value: clocks can be lowered relative to the default settings, but overclocking is not supported due to the thermal constraints of notebook designs.
When "2" (Bit 1) is set in the "Coolbits" option value, the NVIDIA driver will attempt to initialize SLI when using GPUs with different amounts of video memory.
When "4" (Bit 2) is set in the "Coolbits" option value, the nvidia-settings Thermal Monitor page will allow configuration of GPU fan speed, on graphics boards with programmable fan capability.
The default for this option is 0 (unsupported features are disabled).
In other word enable OverClocking of Nvidia GPU in Linux + SLI Mods.


Option "MultiGPU" "string"

This option controls the configuration of Multi-GPU rendering in supported configurations.
Value Behavior
0, no, off, false, Single Use only a single GPU when rendering
1, yes, on, true, Auto Enable Multi-GPU and allow the driver to automatically select the appropriate rendering mode.
AFR Enable Multi-GPU and use the Alternate Frame Rendering mode.
SFR Enable Multi-GPU and use the Split Frame Rendering mode.
AA Enable Multi-GPU and use antialiasing. Use this in conjunction with full scene antialiasing to improve visual quality.

Option "SLI" "string"

This option controls the configuration of SLI rendering in supported configurations.
Value Behavior
0, no, off, false, Single Use only a single GPU when rendering
1, yes, on, true, Auto Enable SLI and allow the driver to automatically select the appropriate rendering mode.
AFR Enable SLI and use the Alternate Frame Rendering mode.
SFR Enable SLI and use the Split Frame Rendering mode.
AA Enable SLI and use SLI Antialiasing. Use this in conjunction with full scene antialiasing to improve visual quality.
AFRofAA Enable SLI and use SLI Alternate Frame Rendering of Antialiasing mode. Use this in conjunction with full scene antialiasing to improve visual quality. This option is only valid for SLI configurations with 4 GPUs.
Mosaic Enable SLI and use SLI Mosaic Mode. Use this in conjunction with the MetaModes X configuration option to specify the combination of mode(s) used on each display.
SLI and Multirendering advance configuration.


Option "OnDemandVBlankInterrupts" "boolean"

Normally, VBlank interrupts are generated on every vertical refresh of every display device connected to the GPU(s) installed in a given system. This experimental option enables on-demand VBlank control, allowing the driver to enable VBlank interrupt generation only when it is required. This can help conserve power.

Default: off (on-demand VBlank control is disabled).

More power saving in Linux.

The rest are either enabled by default or nothing much interesting.

That is all.
Read More
Posted in linux, nvidia, overclock | No comments

Monday, 30 November 2009

K10STAT AMD Griffin Processor UnderVolting Guide

Posted on 07:32 by Unknown


FAQ


Why UnderVolt?


Because when a lower voltage can sustain your clockspeed, a stress tested undervolt will preserve battery life and reduce heat generated without affecting your CPU performance at all !!


Zero performance handicap with less heat output and longer battery life!! (Your yield may vary)


If it is so great why manufacturers don't undervolt?


Because they manufacture processors in bulk you can't expect them to test and undervolt every single processor to the best of its capabilities!


So they simply take the a slightly higher approximate stable voltage out of the whole batch and burn the same value into every chip of the same family!


Will it spoil my processor?


No it won't, because it doesn't involve making it hotter.

In non-biological system usually heat destroys and cold preserves.

During testing, BSOD (Blue Screen of Death) is common but after a restart the Processor Voltage should restore to original value.

After finalizing the stable voltages, then you set the program to run undervolted values every startup.

I strongly recommend stress testing ALL THE P-STATES before setting up the final values so your computer will not crash when you are doing your important work (or in the middle of gaming).


Why don't you use Windows Startup to run it?


Microsoft seems to be encouraging running start-ups through Task Scheduler, not to mention Task Scheduler allows good control over program automated execution.


Which Processor is it for ?


Basically AMD K10 Series Processors.


But I am using Intel Processors?


For Core 2 Duo Processor you can use RMClock, if you are using 64bit Operating System you might need to google for 64bit libraries to replace some of the 32bit libraries. You can google it up.

For Core i3/5/7 users, I haven’t heard of any undervolting tool but I personally seen in the BIOS/EFI ACPI P-State Control is Unlockable, so BIOS/EFI modding is a possible solution.


But I am using AMD TL Series and below Processors ?

Use RMClock as well refer to “But I am using Intel Processors”.

Older AMD Processors should be supported by RMClock.


Getting Started


Firstly download K10STAT from here (I didn't make this program).

I Extracted it to C:\Program Files\K10STAT (K10STAT is 64bit and 32bit capable as well)

Configure K10STAT


When you run K10STAT you should see the menu above.

You can set a maximum of 5 Profiles.


FID: The multiplier for the Processor

(FID doesn't work in AMD Multiplier Locked Processors)


DID: The P-State of the Processor

Note all Processors supported by K10STAT uses K10 Power Design


CPU-Voltage:


That is what we are interested in.

To set the voltage for P0 simply select P0 and select the corresponding voltage and apply.

Remember: Min 0.75 V Max 1.2 V!

Caspian CPUs maybe able to run lower than 0.75V

For me -0.05V is the Max Stable voltage for P0 state any lower it BSOD!


Up%:


This is the amount of CPU usage load before the processor changes P-State from high (eg.P3) to low (eg.P2)  to meet the minimum load requirements.

Currently it is set at 60% meaning it will switch from P2 to P1 when processor detect 60% CPU load and the same applies from switching from P1 to P0.


Down%:


It is basically the opposite of Up %

This is the amount of CPU usage load before the processor decrease P-State to meet the minimum load requirements.


Up (milliseconds):


It is the time delay the processor takes to switch from one P-State to the next higher performance P-State.


Down (milliseconds):


It is basically the opposite of Up.

It is the time the processor takes to switch from one P-State to the next lower performance P-State.


After you have set suitable values (-0.05 recommended on first try).


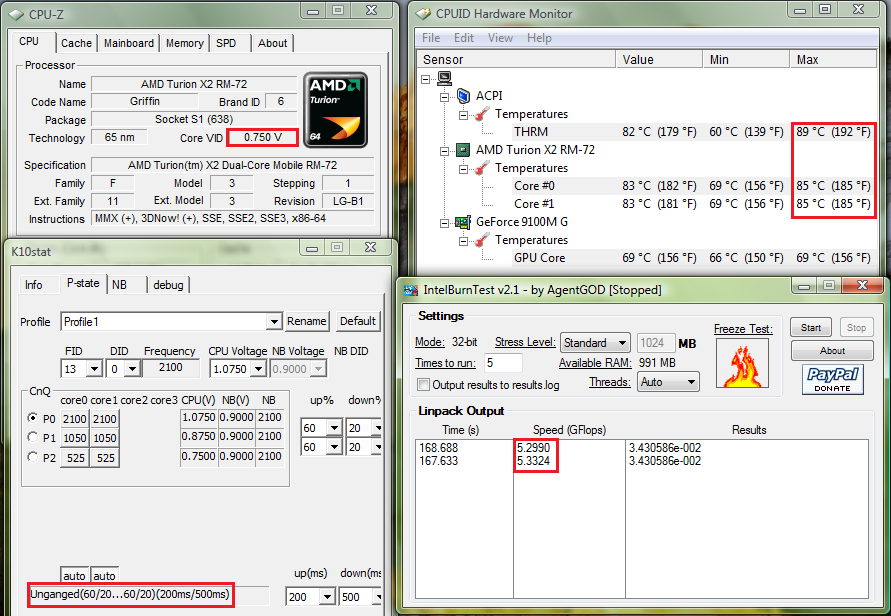
Use Windows Processor Power Management to test different levels.


Use 4 Windows as shown above, to monitor all the P-States so it is more convenient to access the values and monitor the states.


First remember to enable K10STAT Clock Control


To test simply click on the Core of the P-State immediately the Processor will assume the P-State.


Test each P-State by running Intel Burn In (Google and Download) or any suitable CPU loading tool.


For me the voltage values that passed Intel Burn In test are 1.075V, 0.850V and 0.750V.


At 1.025V, it BSOD after 2 mins.

At 1.0372V-1.050V it produced the wrong result.


Test all P-States you have modified so it won’t crash whenever the CPU switches to any of them.


To pass LinPack, the result calculated by the CPU must be consistent.

After you have affirmed the stable voltage values then you may proceed to set it to start automatically.


Setting K10STAT for StartUp


Open Task Scheduler by accessing Start Menu\All Programs\Accessories\System Tools\Task Scheduler


Create a Task


Alternatively you can make it run as a SYSTEM task (as shown below)


If you want the K10STAT icon to appear in the systray run the program under your user account.

If you run it as SYSTEM account the program will run too(in the background) but it will not be visible in the systray.

Click "Change User or Group" then Enter "System" then choose "Check Names" then select OK.


or you can create it as a startup process as shown below. (RECOMMENDED because it will run before a logon is required)


**Please note a file called K10stat.dat containing the undervolt settings will be created in the C:\Windows\System32 folder because it is the default path for admin rights unless you changed the "Start In (Optional)" parameters, the setting just under the "Add Arguments (Optional)" parameters as shown below.


The program will load the settings from K10STAT.dat so make sure all the changes are written to the file.

When you launch K10STAT manually a new K10STAT.dat will be created in C:\Program Files\K10STAT which Task Scheduler WILL NOT LOAD.

It will only load the K10STAT.dat in C:\Windows\System32 unless you change the "Start In" parameters to "C:\Program Files\K10STAT".


If you do not specify “Start In” parameters, the file “K10stat.dat” will be created in C:\Windows\System32 (Default Administrator Path) as shown below.


The following arguments are available (Source: http://dsus4.blog126.fc2.com/blog-entry-3.html)


Command Line Option

-lp:#(1-5) - load profile#(1-5) and write to MSR.


-nw - Start K10stat with No Window.


-ClkCtrl:#(0-4) - Enable Clock Control by K10stat.


0: No Control

1: Control clock of each core.

2: Control clock of all cores together (Criterion is most loaded core).

3: Control clock of all cores together (Criterion is average of all cores).

4: Control clock of all cores together (Criterion is least loaded core).

If you set -ClkCtrl:2 you get slightly better performance at the expense of more power consumption because the processor increases P-States together rather than independently.


Because Windows proceed on the assumption that cores are unganged by default on the RM/ZM Series processor.

Whether it is ganged by default is dependent on the hardware design.


AMD K10 Processors were designed originally to use unganged mode to conserve power.


-StayOnTray - use this option with -nw for Clock Control Mode.(Note after a sleep if the CPU MSR registers are resetted, voltages will revert to default, hence you need -StayOnTray to ensure it is always running in the background)

e.g.Target:

"C:\Program Files\K10stat\K10STAT.exe" -lp:1 -ClkCtrl:2 -StayOnTray -nw


Finally you can Control your CPU using the K10STAT Systray if you enabled -StayOnTray manually as well.


-ClkCtrl:#(0-4) - Enable Clock Control by K10stat (Refer to above).


0:No Control


1:Control clock of each core.

UnGanged means each CPU Core #0 & #1 operates independently of each other so at any one time their frequency and DID could be different.(This is the original intent of the design of the Turion Chips as they are given different power planes.)


2:Control clock of all cores together (Criterion is most loaded core).

This means the CPU will raise/drop the DID of Core #0 & #1 together when it detects the one of higher Core has reached the criteria for a Frequency boost or Throttle Down.


3:Control clock of all cores together (Criterion is average of all cores).

This means the CPU will raise/drop the DID of Core #0 & #1 together when it detects the average of both core has reached the criteria for a Frequency boost or Throttle Down.


4:Control clock of all cores together (Criterion is least loaded core).

This means the CPU will raise/drop the DID of Core #0 & #1 together when it detects the one of lowest Core has reached the criteria for a Frequency boost or Throttle Down.


A new function called Lock-P-state is available in new versions of K10Stat.


It is another way you can lock the P-state for P-state testing again you should enable Clock Control before performing the P-State Testing.


Down Core refers to switching off 1 of the Cores either Core0 or Core1.


Testing


__________________________________________________________________


Original Factory Default Settings

_________________________________________________________________________


UnderVolted 1.075V


In Unganged Mode

__________________________________________________________________


UnderVolted 1.075V


In Ganged Mode (Based on highest core)

__________________________________________________________________


Thats All !


AMD Technical Documentation Regarding Turion Processors here


(Contains Temperature Limits P-States and Voltages)

Read More
Posted in amd, overclock, power savings, undervolt | No comments

Wednesday, 10 June 2009

OverClocking Nvidia Graphics

Posted on 09:35 by Unknown

For you guys who own Nvidia Graphics on PC or Laptop
EVGA Precision is a great Overclocking utility.
I don't really overclock my Nvidia 9100M G as it is a bad idea to overclock lousy GPUs.
You may end up destroying it over a measly few frames per second.
This tool's friendly interface doesn't need introduction.
Word of Warning:
Do not happily push the bars and press apply without thinking,especially the memory clock bar.
I am not responsible for the destruction of your GFX.

Read More
Posted in graphics, nvidia, overclock | No comments
Older Posts Home
Subscribe to: Posts (Atom)

Popular Posts

  • Delete Windows System Files
    If you play around with Windows System Files sometimes it is not possible to delte them off after you had your fun. The following commands w...
  • Internet Explorer Tweak
    Here is a registry tweak for Internet Explorer Similar to the Mozilla Firefox tweak this enable you to increase the number simultaneous ser...
  • How to Mod your Laptop VGA BIOS
    Basically there are 2 locations where the VGA BIOS in laptops. Some OEMS embed the VGA BIOS in the EFI/BIOS in your laptops, other OEMs have...
  • Acer Phoenix BIOS Emergency Recovery
    This is for people who don't listen and interrupt the flashing BIOS for unknown reasons. This will work provided the BIOS BootBlock isn...
  • Secure Your Windows CD-Key (For Vista and 7)
    As you know everytime you activate a Windows Installation your Product Key can be retrieved via Software means. Don't believe me? Downl...
  • Changing the Acer Arcade Shortcut
    While surfing the Windows Registry (You must be thinking that I am weird =P) yesterday I found something interesting It is actually possible...
  • Some Interesting Modding Ideas
    I modded my Aspire 4530 AGAIN to control resultant temperature. Below are some ideas and pictures. Another mod idea This time a black anodi...
  • How to obtain the DSDT from your laptop
    There are many ways to rip the DSDT out of the laptop BIOS. If there is a BIOS editor it is possible to rip out the .AML file. However below...
  • Acer Aspire 4530 Boot Screen
    Acer Aspire 4530 Boot Dianogostic Screen PhoenixBIOS 4.0 Release 6.1 Copyright 1985-2008 Phoenix Technologies Ltd. All Rights Reserve 1.052....
  • List Of Modified BIOS Collection
    Here are the list of Modified BIOS Collection (mainly SLIC Mods), no warranty provided use at your own discretion! Acer Aspire 4520G BIOS Ac...

Categories

  • 32bit
  • 64bit
  • acer
  • ahci
  • amd
  • apple
  • aspire 4530
  • aspire 4535G
  • aspire 4740
  • atheros
  • atom
  • BIOS
  • boot
  • cleanup
  • configure
  • device
  • disk
  • dismantle
  • download
  • driver
  • fan control
  • firefox
  • firewall
  • firmware
  • fix
  • flash
  • graphics
  • hwmonitor
  • internet
  • linux
  • macs
  • microsoft
  • modified
  • nvidia
  • optimize
  • overclock
  • performance
  • power savings
  • powermizer
  • proxy
  • ram
  • Realtek
  • review
  • secure
  • shortcut
  • speaker
  • synaptics
  • temperature
  • theme
  • timeline
  • tweak
  • undervolt
  • update
  • wallpaper
  • windows 7
  • windows vista
  • Windows Xp
  • winsat
  • wlan

Blog Archive

  • ▼  2013 (10)
    • ▼  November (2)
      • A Simple How to use MiniDLNA on OpenWRT
      • OpenWRT TL-WDR3600/4300/4310 Release
    • ►  October (3)
    • ►  September (1)
    • ►  August (1)
    • ►  July (1)
    • ►  May (1)
    • ►  January (1)
  • ►  2012 (4)
    • ►  September (1)
    • ►  June (1)
    • ►  March (1)
    • ►  February (1)
  • ►  2011 (21)
    • ►  September (1)
    • ►  July (4)
    • ►  June (3)
    • ►  May (3)
    • ►  April (3)
    • ►  March (4)
    • ►  February (2)
    • ►  January (1)
  • ►  2010 (36)
    • ►  December (3)
    • ►  November (2)
    • ►  October (4)
    • ►  September (1)
    • ►  August (5)
    • ►  July (1)
    • ►  June (5)
    • ►  May (3)
    • ►  April (3)
    • ►  March (6)
    • ►  February (1)
    • ►  January (2)
  • ►  2009 (81)
    • ►  December (3)
    • ►  November (3)
    • ►  October (9)
    • ►  September (5)
    • ►  August (1)
    • ►  July (5)
    • ►  June (8)
    • ►  May (15)
    • ►  April (10)
    • ►  March (13)
    • ►  February (8)
    • ►  January (1)
  • ►  2008 (8)
    • ►  November (5)
    • ►  July (3)
Powered by Blogger.

About Me

Unknown
View my complete profile