Microsoft Laptop

  • Subscribe to our RSS feed.
  • Twitter
  • StumbleUpon
  • Reddit
  • Facebook
  • Digg
Showing posts with label aspire 4530. Show all posts

Friday, 20 August 2010

OpenSUSE on Aspire 4530

Posted on 10:10 by Unknown
I took a switch to OpenSUSE because I could no longer stand the Brown and the fugly name Ubuntu.
Before I finally chose OpenSUSE I was deciding whether to try Fedora as well. However UI of Fedora was rather similar to Ubuntu so I tried OpenSUSE instead.
The Green Theme of OpenSUSE will match the Green Tag of Aspire 4530 (just below the keyboard) very well.  Owners of Aspire 4530 will know what I mean. LOL

Lets get started:

First go to OpenSUSE to download their Live CD for 32/64bit according to your needs.
The LiveCD is the size of a Normal CD and just what you need to install OpenSUSE, the DVD format is a waste of bandwidth and a overkill.

Everything works out of box except the display driver.

Things that need tweaking:
  • Nvidia Propriety Drivers.
OpenSUSE is interesting because Nvidia provides the driver updates from their own server.
Other Distro like Ubuntu has a 3rd party maintaining the driver but not OpenSUSE however due to licensing issues they cannnot include it in the default install.

After installing add the Nvidia Server to the repository
SYSTEM,  SYSTEM ,YAST

Software,Software Repo

Add
Protocol:HTTP
Server:download.nvidia.com (See Nvidia provides the direct package)
Directory on Server: /opensuse/11.2
Accept the Server Key (because you trust the server)
From the YAST Menu, Select Software Management search for the Nvidia Driver and install it.
The kicker is that OpenSUSE software updates is IRRITATINGLY SLOW.
So bear with it.

After installing and rebooting it will be automatically activated.


  • Restricted Formats
Due to licensing issues OpenSUSE doesn't have restricted format support out of box but they are downloadable here (Unfortunately the libraries broke the cheese webcam functionality).

Edit: To prevent breaking of the cheese webcam functionality do the following:

Add VLC to the software repository(Use VLC to play all your future videos)
Then use Fluedo Codec for Banshee
After this the webcam functionality will be preserved.

You might also want to do the following configuration of the conf files below.

Edit: /etc/sudoers
Append "DISPLAY" as shown below
Defaults env_keep = "LANG LC_ADDRESS LC_CTYPE LC_COLLATE LC_IDENTIFICATION LC_MEASUREMENT LC_MESSAGES LC_MONETARY LC_NAME LC_NUMERIC LC_PAPER LC_TELEPHONE LC_TIME LC_ALL LANGUAGE LINGUAS XDG_SESSION_COOKIE DISPLAY"

The reason so you can sudo something in GNOME Desktop Mode.

Edit /etc/fstab
Add noatime to the line of your main disk partition so it will not write last modified date to your Harddisk (Less unnnessary harddisk operations)

Add this line to /etc/fstab to make /tmp folder a RAMDisk so /tmp will be automatically cleared during shutdown.
tmp              /tmp            tmpfs    defaults,size=512m,noatime,nodiratime    0 0
The size allocated is 512MB.

Open YAST select bootloader
Rename the Windows 7 Entry to something you like.
Rename the OpenSUSE Entry to something you like. 
Set the default OS to something you use more often.
Add acpi_osi=Linux to the end of the OpenSUSE boot parameters (If you used my Modded BIOS with Linux in the ACPI)

Overall I like OpenSUSE a lot.
The fonts and themes are much better than Ubuntu.
The laptop is running cooler than Ubuntu for some reason I don't know.
WebCam runs as well with the default cheese application.
Adobe Flash runs well.
Batterylife is good as well (the same as Windows 7) previously on Ubuntu it had shorter batterylife.

Other Cool Features:
SYSTEM, YAST,Kernel Settings
You can adjust the CPU scheduling algo as shown below.


If you installed it on the same harddisk as your Windows OS, the Windows OS is accessible in the following folder
/windows/


For best Font Display use the following Settings in Appearance:
Select Detail


Select Slight Hinting instead of Full
In conclusion this is an awesome OS on Aspire 4530, you should try it!
Read More
Posted in aspire 4530 | No comments

Tuesday, 23 March 2010

Acer Aspire 4530 Drivers

Posted on 18:38 by Unknown
Please refer to the updated page here

WebCam Driver:
Download from here

For Windows 7 (Install 64bit Driver Version whenever applicable to a 64bit Windows OS, some drivers include a 2 in 1 installer to detect what OS you are using)

Chipset Driver:
Download from here

Audio Driver:
Download from here

VGA Driver:
Download from here

Launch Manager:
Acer Download site

Wireless Driver:
Just do a Windows Update from the OS the latest driver will be pushed down to the system if you included optional updates.

Card Reader Driver (Look for Card Reader Driver Download Section in Realtek Site):
Download from here

Modem Driver:
Acer Download site since Foxconn don't provide 3rd Party Driver Support

Bluetooth Driver(Look for Bluetooth Driver Download Section in BroadCom Site):
From BroadCom Site or Acer Download site

Touchpad Driver:
From HP Website

FingerPrint Driver (For Selected Models):
Windows Update will push down the drivers

Ethernet Driver(Look for BroadCom NetXtreme for Mobile Driver Download Section in BroadCom Site):
From BroadCom(Update Manual Via Windows Device Manager there is no installer) Site or Acer Download site

For Windows Xp users you need to install AMD Processor Driver from AMD Sites otherwise 'Quiet n Cool' wouldn't work.
Anyway I don't recommend Windows Xp when Windows 7 is out.
Read More
Posted in acer, aspire 4530, driver | No comments

Wednesday, 6 January 2010

Acer Aspire 4530 Drivers

Posted on 01:00 by Unknown
Windows 7 works perfectly on Acer Aspire 4530.
There are no compatibility issues.

Acer Aspire 4530 BIOS --------------------------------------------------------------------------------------------------------

Those who want Windows 7 OEM activated on Acer Aspire 4530 laptops go here
You will find the SLIC 2.1 BIOS Files there just flash using the flashing utilities provided by Acer and activate.

There are 3 Version 1.3333, 1.3334 and 1.3334 with some updated modules from 1.3336
(Because there is a booting issue with 1.3336 BIOS)
The ones with New VGA BIOS is modified with a updated VGA BIOS Module taken from a Emachine Laptop also equipped with Nvidia 9100M G Graphics. So take your Pick.
My personal recommendation is Z05_3334 with new VGA BIOS Module.

------------------------------------------------------------------------------------------------------------------------------------

Acer Aspire 4530 Application Launch Manager ------------------------------------------------------------------------------

Launch Manager (For Windows 7)
Custom ShortCut button tweak continued to work.

------------------------------------------------------------------------------------------------------------------------------------

Nvidia Chipset Driver(Motherboard Driver)----------------------------------------------------------------------------------

Download & Install Chipset Driver (from Nvidia) to remove the no coprocessor message.
Nvidia Chipset 64bit 
Nvidia Chipset 32bit


-------------------------------------------------------------------------------------------------------------------------------------

Graphics Adapter Driver (Display Driver)------------------------------------------------------------------------------------

Download and install the latest Nvidia Verde Drivers.

------------------------------------------------------------------------------------------------------------------------------------

Realtek Card Reader Driver (Card Reader Driver)----------------------------------------------------------------------------

Please note Acer failed to include the Latest Realtek USB Card Driver in their download page.
Please download it here.


------------------------------------------------------------------------------------------------------------------------------------

Realtek Audio Driver (Sound Driver)------------------------------------------------------------------------------------------

You can download it from here or from Realtek Website

------------------------------------------------------------------------------------------------------------------------------------

Synaptics Touchpad Driver ---------------------------------------------------------------------------------------------------

Download the driver from HP it will enable Multitouch (2 Finger Scroll, 3 Finger Press etc)

-----------------------------------------------------------------------------------------------------------------------------------

WebCam Software -------------------------------------------------------------------------------------------------------------

SuYin or Bison (If you have webcam issues this might help)

------------------------------------------------------------------------------------------------------------------------------------

The new Windows Experience Index for Acer Aspire 4530 (Remember to update DirectX otherwise the score will be 3.9)
If you used 64bit Windows 7 the score will be even higher...Below was done using 32bit Windows 7.

Gaming Temperatures on Windows 7 in Acer Aspire 4530


Remember to set Restore Point after you finish setting up all the software:
Go to Control Panel >> System >> Advance System Settings >> System Protection >>
Create Restore Point
Any issues regarding Windows 7 and Aspire 4530 post below.

Full Optimization for Aspire 4530 here
Realtek Driver Mod

Read More
Posted in acer, aspire 4530, driver, windows 7 | No comments

Friday, 18 December 2009

Fixed My Left Speaker

Posted on 00:59 by Unknown
Ok, I had issues with my left speaker on my laptop. It was dead.
So if I were to order the exact replacement it would cost more than $100 for the entire front panel palm rest moreover it was also out of warranty.
But it is not worth it because a speaker isn't worth that much for a replacement.
I had 2 approaches.
1)Remove the left speaker and replace the speaker (actually it is called a tweeter) with a Generic Internal Part.
This failed because the Generic Tweeters sold are not as high quality as the original and wasn't able to generate the exact frequency and amplitude of the original and undamaged right speaker.
2)Buy a off the shelf speaker set from ebay and replace the left speaker.
This approach worked.
I got a speaker set of another laptop model.
The speaker is an identical 4 ohm 2 watt speaker.
However I had to cut out the speaker connectors as they are split into 2 pin left, 2 pin right rather than the original 4 pin .
After some modification I was able to get the connectors right. Plugging them in works as well, producing the right sound.
However the right speaker was still slightly louder, I suspect the original speaker had an air column under which produced louder bass.

I am still satisfied with the final result as 1)it doesn't cost much 2)the new speakers were of comparable sound quality.

Edit:
The slight difference in sound quality wasn't due to the air column, it was due to the positioning under the speaker cover I shifted it slightly and attached it using tape and the difference was alleviated.
Read More
Posted in aspire 4530, speaker | No comments

Friday, 4 December 2009

Acer Aspire 4530 Actual Fan Control

Posted on 11:07 by Unknown
I found the actual control variable of Acer Aspire 4530 Fan.
It is actually a hex value located in the EC.
To access the EC Control Variables, Download and install Rw-Everything.
Next run the program.
Select EC Button to view the EC Variables
You should see the following as shown below:
If you set it to 13 then click done, you will quickly hear the fan spining at maximum speed.
Other values between 0-13 also alter the RPM but there are also values in between that does nothing.
Happy Experimentation!
Read More
Posted in aspire 4530, fan control | No comments

Friday, 9 October 2009

Issue For Aspire 4530 Owners on Windows 7

Posted on 09:33 by Unknown
Please take note when installing NForce Drivers
Make sure your Add/Remove Nvidia Driver has the entries below:

Use the 15.45 NForce Drivers I advised (Can be downloaded on Guru3d.com) DO NOT USE 15.37 NForce Drivers from Nvidia except for the AHCI Storage Driver from 15.37.
Note you get SMU Driver and PCI System Management Drivers, otherwise you get a Fatal Machine Check error occasionally in Windows 7 Event Log, you won't see any BSOD but the error log will be there .
In conclusion use the Storage Drivers from 15.37 and SMU and PCI System drivers from 15.45.

Update:
Please update the Storage Driver from 15.51 (from Guru3D) the driver from 15.37 causes occasional freezing issue.
Read More
Posted in acer, aspire 4530, download, driver, fix | No comments

Wednesday, 30 September 2009

Some Interesting Modding Ideas

Posted on 23:02 by Unknown
I modded my Aspire 4530 AGAIN to control resultant temperature.
Below are some ideas and pictures.


Another mod idea

This time a black anodized Aluminium heat sink (Can be found in any hardware store) is added to increase the mass.
I had to cut and file it to size.
On the plus side it had thermal adhesive tape under it which makes attaching it an easy task.

Read More
Posted in aspire 4530, modified, temperature, tweak | No comments

Sunday, 28 June 2009

Crazy Stuff I Did To Lower The Temperature Of The Laptop

Posted on 10:23 by Unknown
Here is the deal:
You have encounter high temperatures especially during gaming.
You contacted the Repair Centre.
They told you to update the BIOS (usually the fix include making the fan spin more often).
You have sent the laptop back and forth until you have given up.

Finally the warranty run out and you can only depend on yourself.

Below are the following mods you can do.


For me I did the following:

Note: Most steps require dismantling of the system it will help with expert supervision and googling and down loading of service manual to dismantle it.

  • Throw away the thermal pad on the GPU and use Arctic Silver 5 instead
  • Remove the original CPU thermal paste and use Arctic Silver 5 instead.
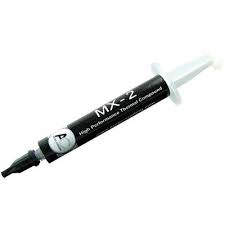
Arctic Cooling MX-2
Arctic Silver 5

  • Remove and throw away the "air filter" below the Laptop bottom cover to allow better air flow (I decided to do this after realizing this is the only part you can feel that air actually goes into the laptop, hence obstructing it restricts air flow hence remove it)
  • Sand the surface of heatsink which comes into contact with the GPU or CPU chip, using FINE SILICON CARBIDE PAPER
  • Sharpen the edges of the air vent casing (I got this inspiration by observing other Acer Aspire Laptop (Aspire 4935G) models, I noticed their vent size is gigantic compared to the vent size of this particular model hence it could be one of the gaming overheating factors. The new Acer Aspire 4736ZG Series Air Vents actually have even bigger holes than 4935G!)
Original (Top view)

Modified (Shave the vent corners)(Top view)

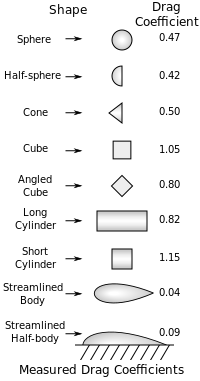
Actually the best cutting should be a wing shape pointing into the chassis.
The smaller the air drag the better.


Wikipedia

Not sure how much of this helps
But now my gaming temperatures fall below 90 degrees (around 85) and my idle temperature falls below 60 degrees (around 55) for the GPU.

Check out my recently modded laptop thermal exhaust:

Compare it to your original Aspire 4530 exhaust spot any difference?
Originally it has 16 dividers I cut out 8 of them so it looks like this.

5) I added Aluminium tape to bridge the laptop bottom chassis which is made out of metal to the heatsink.


Aluminium Tape

How I did it.

I rolled and flatten out one piece of Aluminium Tape to thicken it made sure it stucked in between the two interface without falling off (but not too tight).
Then I stick a tape over the heatsink and the chassis for better conduction.
The lowest temperature is now under 55 degrees hence it pretty much works.

6) UnderVolt the AMD Processor

7) Set the Graphics Mode to performance.

Read More
Posted in aspire 4530, optimize, temperature | No comments

Saturday, 27 June 2009

Harddisk Temperature on Aspire 4530

Posted on 01:47 by Unknown

HWMonitor currently does not detect Harddisk Temperature.
However HWiNFO32 does.
Here is a screenshot.


Read More
Posted in acer, aspire 4530, disk, temperature | No comments

Sunday, 7 June 2009

UnderVolting AMD Griffin Processor

Posted on 04:04 by Unknown

Edit:
You can read continue to read this as a guide but this is a better tool IMHO.

I chanced upon this site : http://amd.goexchange.de/

This is a new Tool designed to undervolt AMD Griffin ZM/RM/QL/SI Processors.
The program is free for home users (However you are encouraged to donate as it is a lot of work) and it is not free for business users


1)Why Undervolt?
In short conserve power (Battery Life) and reduce thermal emission (Overheating) with no effect on Computing Performance for more info check on the previous link.

2)For Intel Processors and AMD TL and older Series Mobile Processors RMClock is able to overclock them.

However no tool was available to underclock CPU until this tool was release.

How to use?

The documentation on the site is very lengthy and rather confusing.
I was confused first time I read it.

A very simplified guide as follows:

1) Create a folder in Program Files.
eg. Create C:\Program Files\GriffinControl

2) Download the files required (scroll down a bit you should see 2 files each for 32bit and the other 2 files for 64bit) and extract them to the folder you created in 1).

3) Open the GriffinControl_config.xml with notepad (the author provided a skeleton configuration file) .

You will only be looking at the following column and the values in bold
Note QL/SI Processor only should have 2 pstate number (I think it is 0 and 1 , no 2 not sure about this).
How do you go about setting voltage?

Basically AMD ZM/RM Series Processors has 3 Power State.

A full state runs at max frequency when you need the processing power it throttles up to maximium frequency giving you the computation power you need.
This is pstate number 0 which is 100% of the total CPU Power.
pstate number 1 is 50% of the total CPU Power.
pstate number 2 is 25% of the total CPU Power.

If you set too low a voltage the CPU will not run stably due to unsufficient voltage and cause BSOD.

For QL/SI Processor you only have 2 pstate, 0 & 1.
pstate number 0 which is 100% of the total CPU Power.
pstate number 1 is 50% of the total CPU Power.

How do you know the default voltages for the CPU?
Either you run CPUZ as shown by the picture at the end of this entry.
Then use Vista Processor Power Management to throttle at different percentages to find the 3 or 2 voltage level depending on what processor you have.
If you are not sure you can leave a comment at the end of this entry I will recommend values for you to try.
Another way is to refer to the config file provided with the downloads.

4)Reference this table for the list of Voltage ID.
eg. The value 42 as shown above translate to 1.025V and so on.

(Note the lowest VID is 64 no lower values will work and value above 36 can fry your processor )

Edit the values to the voltage you want.

For my RM-72 Processor, I tested 64,52 and 42 is the most extreme stable values.
Which translate to: 0.750V, 0.900V and 1.025V respectively.
Original Voltage: 0.800, 0.950V and 1.075V respectively.
A difference of 0.05V, 0.05V,0.05V , any higher it BSODS

Change the values accordingly and save.

6)Run GriffinControlService_32bit.exe for 32bit Windows and GriffinControlService_64bit for 64bit Windows.
Follow instruction and create the Windows Service if you encounter an error message you did something wrong.
Go to Services Menu and Start the Service if you ever want to delete the service you must stop it first (using the same manner, stopping it instead of starting it)
If you are doing testing make sure the service is set to manual start instead of Automatic so after BSOD it will default to original value and not BSOD repeatedly I learned this the hard way.
If you did not listen to me and it BSOD repeatedly, when it is possible to get to Windows Either start with last saved configuration or try to switch to Power Saver Mode in Vista Power Plan so it will not cause BSOD again.Don't worry no physical damage is done to the processor.

7) Run a CPU stressing Tool like Intel Burn In make sure no BSOD happens when running the tool so the voltage is stable. Use the Vista Processor Power Management to test the different Power States.
Set to auto start service if you are happy with the final setting.

This program is very well created especially when the author implemented it as a windows service, so donate to the author if you are able to.

Special Thanks to the author, now my CPU Voltage Temperature Dropped by a lot at max frequency.

Proof that it works!

Edit: The Service hung on Vista and created a Windows Event Log (no error message) so I set it to Delay Start and the problem went away.

At the end of the process the result of undervolting implies AMD chips are indeed overworked in order to catch up to Intel Processor Performance, the undervolted amount of 0.05 at max frequency implies this.
Any further undervolting results in BSOD.

Just encountered another BSOD raise voltages by 0.025

Finally whenever you encounter a hardware BSOD (read the message on the BSOD) just raise the voltage by 0.025.
Eg. when you BSOD on youtube you probably need to raise p-state 1 and p-state 2 by 0.025
My guess is when the CPU changes state from 2 to 1 it switches too quickly therefore insufficient voltage to support the boost hence it BSOD.
Read More
Posted in amd, aspire 4530, download, optimize, tweak, undervolt | No comments

Saturday, 30 May 2009

Acer Aspire 4530 Boot Screen

Posted on 02:36 by Unknown
Acer Aspire 4530 Boot Dianogostic Screen
PhoenixBIOS 4.0 Release 6.1
Copyright 1985-2008 Phoenix Technologies Ltd.
All Rights Reserve

1.052.A6 NVIDIA NFORCE

CPU0=AMD Turion(tm) X2 Dual-Core Mobile RM-72

CPU Stepping = B1 2100MHZ
MemClk = 333Mhz Tcl = 5.0 Trcd = 5 Tras = 12 Trp = 5
CPU<->MCP:LDT Frequency = 1800Mhz LDT Width = 16bit DOWN - 16bit UP
No TPM or TPM has a problem
2815M System RAM Passed
1024KB L2 Cache per Core
System BIOS shadowed
Video BIOS shadowed
Fixed Disk 0: WDC3200BEVT-222CT0
ATAPI CD-ROM:HL-DT-ST DVDRAM GSA-T50N
Mouse initialized
System Configuration Data updated

Press F2 to enter Setup

HyperTransport (HT), formerly known as Lightning Data Transport (LDT)
MCP (Media and Communications Processor)
Trusted Platform Module (TPM) is both the name of a published specification detailing a secure cryptoprocessor that can storecryptographic keys that protect information
ATAPI (AT Attachment Packet Interface) is an interface between your computer and attached CD-ROM drives and tape backup drives

Closest I can get to 2817 = 4096 - 1087 - 256 + 64
Or it could be some BIOS Programming legacy
Read More
Posted in acer, aspire 4530, BIOS, boot | No comments

Wednesday, 27 May 2009

Successor to Acer Aspire 4530

Posted on 18:29 by Unknown
Successor to Aspire 4535/4535G here.

If you guys are interested in Acer Aspire 4530, DO NOT get it.
The sucessor is out.
It is the Acer Aspire 4535G and 4535 (Without the G).

Same Processor with far advance graphics ATi Radeon 4570HD.
It is a class 2 graphics card which means it is capable of playing high-end games easily.
It uses a AMD Chipset meaning you can install and use AMD Overdrive to boost the performance of this laptop.

It also has a multi touchpad and a chiclet keyboard

According to this review it is confirmed that it uses the DDR2 Memory.
But don't worry either way it is vastly superior than its predecessor Aspire 4530.
I would have bought this laptop if I had not own 4530 and it is still alive.

The difference between 4535 and 4535G is that 4535G uses a more powerful Radeon 4570 HD while 4535 uses a Radeon 3200 HD.
Both are AMD Overdriveable.
Read More
Posted in acer, aspire 4530, aspire 4535G | No comments

Sunday, 17 May 2009

Another Acer Fan Control Program

Posted on 20:52 by Unknown
Here is another Acer Fan Control Program called A1CTL by Noda
Works for Acer Aspire Laptops as well.


I prefer this one as no installation is required just need to run with Admin permission.

Another Acer Fan Control Program called 1810tray by Intek.
Originally meant for Acer Timeline 1810 but works well on other Acer Laptops as well.
Read More
Posted in acer, aspire 4530, download, fan control | No comments

Saturday, 16 May 2009

Dissembling Aspire 4530 - Full Guide

Posted on 09:04 by Unknown


First if your Laptop is still under warranty doing this may void it!

  1. If you are not comfortable with opening your laptop do not do it.
  2. I hold no responsibility for any damage done to your laptop.
  3. If you follow this guide carefully and do it meticulously nothing bad should happen to it.
  4. Do not handle electrical components at the metal contacts or circuit board, hold it by the edges.
  5. Read this guide once and fully understand it before proceeding.

1) Disconnect ALL POWER (inclusive of battery pack + AC Power Adapter).
2) Ground yourself to make sure you are free of static.
3)Remove all the dummy SD & PCI Card from the Perimeter of the laptop.


Unscrew the screws circled in Red.
Then using a flat-head screw driver and lever the catches boxed in Green.
The laptop support pads are boxed in Blue if any of them fall off reattach them with new double sided tape.


The front panel should pop up as shown.
Gently pry it out.

You should see the following:

The left box shows the White Connector which consist of VGA/Monitor Port + Webcam port
Above it is the LCD Monitor Grounding Cable
Below it is the Microphone Cable

The right box shows the Wireless Antenna Cable for extended Range Detection of Wireless Networks

Removing the Keyboard


Next pry out the keyboard gently
The Flat Ribbon Cable is the PS/2 Port
Lever the Connector and disconnect the Cable
DO NOT BREAK SUCH CONNECTORS ON THE MOTHERBOARD IF THEY ARE BROKEN YOU HAVE TO GET A NEW MOTHERBOARD !


You should see something like the above

Next flip the laptop around and remove all the screws circled in Red.
It is actually ALL the screws you can see at the base.

Removing the Harddisk


Next, Unscrew the screws circled in Red (3 from the Harddisk Region, 2 from the Wireless Card Region).
Disconnect the Wireless Antenna from the Card boxed in Yellow by levering it out.
Don't pull it out vertically !
I noticed in my room white wire on top, black wire below, gives better connectivity.
Disconnect & remove the harddisk by sliding it towards the right and pull it out via the black flap.

Next unscrew the screws circled in Red (3 in the Harddisk Region).

Removing the LCD Monitor


Flip the laptop around.
Disconnect the box in blue and unscrew the screws circled in Red.
The top blue box holds the VGA Monitor Connector and the WebCam Connector.
The bottom blue box holds the Microphone Connector Cable.
The Red Circle above the top blue box hold the Monitor Grounding Cable.
Notice there are engravings beside the red circles.
60 stands for 60mm screw the long ones
45 stands for 45mm screw the short ones
There are only 2 types of screw you will encounter in this guide.
When removing the Monitor make sure you don't pull it out vertically, you might damage the plastic cable groove.
Follow the groove and remove it.


Next unscrew the screw circled in Red and disconnect the connectors boxed in blue.
The blue box on the Left is the Audio Connector for the laptop internal stereo speakers.
The blue box in the Centre is the Connector for the Acer ShortCut Buttons Panel.
The blue box on the Right is the PS/2 Connector for the Synaptics Touchpad.
The blue box on the Top is the Power Switch and LED Light module (The green circuit board on the top).

Removing the DVD Drive


The yellow box indicates the CMOS Battery (replaceble) you don't need to remove it.
In Case you need the CMOS battery data:
ML 1220 MAXWELL 3V (Rechargeable)
Next Slide out the DVD Drive by pushing it out towards the Right.
Unscrew the screw circled in Red (There are 2, 1 at the Top Right Corner, 1 at the Centre) .
Notice there is a screw like symbol beside each of them.


Here comes the difficult part.
It is now possible to separate the casing from the motherboard but there is one obstacle.
It is the Audio Adjustment Knob Region boxed in Red.
The Audio Adjustment Knob is integrated to the motherboard separating it from the motherboard is impossible.
So you have to carefully push the casing down so you can create a gap at the audio adjustment knob to pull the motherboard out.
Start prying from the top right corner.
DO THIS SLOWLY!
REMEMBER HASTE MAKE WASTE !
DON'T BREAK THE MOTHERBOARD BY OVER-STRAINING IT !
ENSURE ALL SECTION OF THE MOTHERBOARD IS WELL-SUPPORTED!

Heat sink Removal


Unscrew the screw circled in Red and disconnect the connector boxed in blue to remove the heatsink.
I will not post a picture of the dissembled outcome as I had applied an excellent layer of Arctic Silver 5.
If I remove it I have to reapply it.
To get a nice layer it takes a lot of time and patience more then the time taken to dissemble this laptop.
In short
Remove the thermal pad on the GPU.
Clean the GPU surface, CPU surface and Heatsink surface with Rubbing Alcohol (Google)
DO NOT USE WATER AS IT IS A GOOD ELECTRICAL CONDUCTOR!
Spread high quality thermal paste over the GPU and CPU surface (I recommend Arctic Cooling MX-2 or Arctic Silver 5).
Replace the parts.

Removing the Bluetooth

Turn the motherboard around
The bottom yellow box is the bluetooth card
There is 1 screw holding it
The top 2 boxes is the unused USB Connectors.
For Future purpose if you suddenly need to add a Wireless 3G card which has internal USB for Laptops you can use them.
Note:
You don't have to remove the motherboard from the casing to gain access to the USB Connectors or Bluetooth.

Removing Internal Speaker and Touchpad

Turn the plastic cover you removed around.
You will see screws to remove the Internal Speakers and Touchpad.
Just unscrew and remove them accordingly.
Note:
You don't have to remove the motherboard from the casing to gain access to the USB Connectors or Bluetooth.

It took me a long time to come up with this very simplified guide so please show appreciation by clicking the google ads if it helps you =)

To reassemble it just reverse the process.

WHEN IN DOUBT ASK!

Read More
Posted in acer, aspire 4530, dismantle | No comments

Friday, 8 May 2009

Result of Changing Thermal Paste

Posted on 21:33 by Unknown

(Temperatures at idle)

This is the new temperature reading after I changed the thermal paste.
Notice the new low reading especially on the GPU.
The reason is because Acer uses a thermal pad to conduct heat away from the GPU which is pretty inefficient.
After I changed the thermal pad and the original thermal paste, which is silicon based, the new temperatures are lower.
Originally the Processor Temperature is 60-70degrees.
Now it is 50-60 degrees at normal load 40-50 at idle.
Original the GPU is nearly 70 degrees now it is nearly 60 degrees.
10 degrees difference that is a lot.

(Temperatures while Gaming)

The temperature for the GPU used to exceed 100 degrees when gaming as some of you have experienced
Now it even barely hits 90 degrees (With elevated platform to allow airflow).
Hence I recommend if you want to game, please replace the factory thermal paste with high quality ones like Arctic Silver 5 or MX-2 if you are able to get one.
Arctic Cooling MX-2 is better as it is non-conductive, no cure time required and easier to apply.
Dissembly Guide here.


Example of the thermal pad use to transfer heat from the GPU to heatsink


In the Acer Aspire 4530 Air enters the laptop through the bottom and exits through the rear so for better ventilation try to prop the laptop bottom on an elevated platform to improve thermal circulation.

Full Dissembly Guide here
Read More
Posted in aspire 4530, temperature, tweak | No comments

Tuesday, 28 April 2009

Aspire 4530 AHCI Driver Installation for Window Xp

Posted on 20:49 by Unknown
I found a Solution for loading AHCI drivers for Windows Xp when installing Windows Xp on Aspire 4530
  • Download this AHCI Driver and extract it into a Floppy Disk or Thumbdrive (Untested).
  • When installing Windows Xp when the message "Press F6 to load additional Driver".
  • Press F6 and Load the AHCI Driver from Disk and Windows Xp should detect the harddrive in AHCI Mode.
Read More
Posted in ahci, aspire 4530, driver, Windows Xp | No comments

Saturday, 4 April 2009

Acer Aspire Fan Control

Posted on 04:16 by Unknown
I found this nifty utility.
It is supposedly for Acer Aspire One to control the fan unit.
So I downloaded and installed it thinking it would fail but it actually works for Acer Aspire Laptops too!
Here is the website

How to use:
When you complete the download, extract it.
You will find an Executable and an installer.
You need to run the Installer,Reboot then run the Executable.

Note:
The Fan Setting Stays even after you uninstall the program
You should notice the temperature of your laptop should fall even more and the fan spins more frequently if you lower it.
Read More
Posted in acer, aspire 4530, download, fan control | No comments

Wednesday, 11 March 2009

Acer Aspire 4530 WEI

Posted on 05:24 by Unknown
This is the Windows Experience Index score for my Acer Aspire 4530
Not bad for a value laptop =)
How about yours?

You should set Power Plans to High Performance to get a accurate score
You should also know the performance will vary according to RAM configurations as 9100M G is an integrated graphics which utilises System RAM

PS:To get higher WinSAT Scores Change the Windows Theme to Classic Theme and Rerun Windows System Assessment
Read More
Posted in acer, aspire 4530, performance, winsat | No comments
Older Posts Home
Subscribe to: Posts (Atom)

Popular Posts

  • Delete Windows System Files
    If you play around with Windows System Files sometimes it is not possible to delte them off after you had your fun. The following commands w...
  • Internet Explorer Tweak
    Here is a registry tweak for Internet Explorer Similar to the Mozilla Firefox tweak this enable you to increase the number simultaneous ser...
  • How to Mod your Laptop VGA BIOS
    Basically there are 2 locations where the VGA BIOS in laptops. Some OEMS embed the VGA BIOS in the EFI/BIOS in your laptops, other OEMs have...
  • Acer Phoenix BIOS Emergency Recovery
    This is for people who don't listen and interrupt the flashing BIOS for unknown reasons. This will work provided the BIOS BootBlock isn...
  • Secure Your Windows CD-Key (For Vista and 7)
    As you know everytime you activate a Windows Installation your Product Key can be retrieved via Software means. Don't believe me? Downl...
  • Changing the Acer Arcade Shortcut
    While surfing the Windows Registry (You must be thinking that I am weird =P) yesterday I found something interesting It is actually possible...
  • Some Interesting Modding Ideas
    I modded my Aspire 4530 AGAIN to control resultant temperature. Below are some ideas and pictures. Another mod idea This time a black anodi...
  • How to obtain the DSDT from your laptop
    There are many ways to rip the DSDT out of the laptop BIOS. If there is a BIOS editor it is possible to rip out the .AML file. However below...
  • Acer Aspire 4530 Boot Screen
    Acer Aspire 4530 Boot Dianogostic Screen PhoenixBIOS 4.0 Release 6.1 Copyright 1985-2008 Phoenix Technologies Ltd. All Rights Reserve 1.052....
  • List Of Modified BIOS Collection
    Here are the list of Modified BIOS Collection (mainly SLIC Mods), no warranty provided use at your own discretion! Acer Aspire 4520G BIOS Ac...

Categories

  • 32bit
  • 64bit
  • acer
  • ahci
  • amd
  • apple
  • aspire 4530
  • aspire 4535G
  • aspire 4740
  • atheros
  • atom
  • BIOS
  • boot
  • cleanup
  • configure
  • device
  • disk
  • dismantle
  • download
  • driver
  • fan control
  • firefox
  • firewall
  • firmware
  • fix
  • flash
  • graphics
  • hwmonitor
  • internet
  • linux
  • macs
  • microsoft
  • modified
  • nvidia
  • optimize
  • overclock
  • performance
  • power savings
  • powermizer
  • proxy
  • ram
  • Realtek
  • review
  • secure
  • shortcut
  • speaker
  • synaptics
  • temperature
  • theme
  • timeline
  • tweak
  • undervolt
  • update
  • wallpaper
  • windows 7
  • windows vista
  • Windows Xp
  • winsat
  • wlan

Blog Archive

  • ▼  2013 (10)
    • ▼  November (2)
      • A Simple How to use MiniDLNA on OpenWRT
      • OpenWRT TL-WDR3600/4300/4310 Release
    • ►  October (3)
    • ►  September (1)
    • ►  August (1)
    • ►  July (1)
    • ►  May (1)
    • ►  January (1)
  • ►  2012 (4)
    • ►  September (1)
    • ►  June (1)
    • ►  March (1)
    • ►  February (1)
  • ►  2011 (21)
    • ►  September (1)
    • ►  July (4)
    • ►  June (3)
    • ►  May (3)
    • ►  April (3)
    • ►  March (4)
    • ►  February (2)
    • ►  January (1)
  • ►  2010 (36)
    • ►  December (3)
    • ►  November (2)
    • ►  October (4)
    • ►  September (1)
    • ►  August (5)
    • ►  July (1)
    • ►  June (5)
    • ►  May (3)
    • ►  April (3)
    • ►  March (6)
    • ►  February (1)
    • ►  January (2)
  • ►  2009 (81)
    • ►  December (3)
    • ►  November (3)
    • ►  October (9)
    • ►  September (5)
    • ►  August (1)
    • ►  July (5)
    • ►  June (8)
    • ►  May (15)
    • ►  April (10)
    • ►  March (13)
    • ►  February (8)
    • ►  January (1)
  • ►  2008 (8)
    • ►  November (5)
    • ►  July (3)
Powered by Blogger.

About Me

Unknown
View my complete profile