Microsoft Laptop

  • Subscribe to our RSS feed.
  • Twitter
  • StumbleUpon
  • Reddit
  • Facebook
  • Digg

Friday, 15 July 2011

Hacking TP-Link WR1043ND Part 1

Posted on 05:21 by Unknown
This is a series of blog post detailing about how to hack the TP-Link WR1043ND to maximize its potential.
I will try to be as noob friendly as possible.
My Mods are in no way original, it is just a collection of existing mods combined into a few articles for easy instructional reading.
Special Thanks to the guys @ OpenWRT who made this possible.

The hacks done are as follows:
  1. Upgrade the Internal DDR RAM from 32MB to 64MB.
  2. Upgrading the firmware from TP-Link Stock Firmware to OpenWRT.
  3. Accessing/Operating OpenWRT from Shell Commands
  4. Configuring and Tweaking the Router for Maximium Performance. Please Read 3 first.
First of all why mod a router?
  • To make it do more for less because a router is actually an embedded system which can do more running Open Firmware rather than suffer the limitations imposed by stock firmware. After installing OpenWRT you will be able to install packages to make the router perform more tasks than ever.
  • To get better performance. Most manufacturers do not actually tweak the router performance much, rather they prefer to prettify the routers so they can sell more instead of making it do better at what it is supposed to do because most consumers are stupid.
  • Get latest updates. When running stock firmware, updates are pretty much at the mercy of manufacturers, compared to running open firmware like OpenWRT you get new updates every time there is a new release.
  • Learn more. You get to learn more about Linux and other stuff you never knew before and that itself is priceless.
Why you do not want to mod a router:
  • Firstly it voids warranty, it is possible that during the course of modding you may damage the router if you made a mistake hence it doesn't make sense for the manufacturer to pay for your mistake.
  • It is tedious and costly if you do not have the tools or the patience or brains.
The Router


The Router in question is the TP-Link WR1043ND.
Why TP-Link WR1043ND out of so many OpenWRT supported routers?
  1. It is cheap. If you check the market for routers you will find it selling for a low cost. I bought it for SGD$75. Do the conversion and you will be convinced.
  2. It is powerful. Again if you check the market you will find the next cheapest Gigabit Router priced at more than SGD$100. In the WR1043ND you will find lots of flash memory for installing OpenWRT as well. The 3 Antennas it possess further increase the Wireless Performance. It also contain a USB Port for expanded possibilities (FileSharing anybody?).
  3. It is Stable. Because of reason 1) and 2) many hardware hackers have bought and modified this router and OpenWRT to suit it, so it runs incredibly stable on OpenWRT.
TP-Link is a Network Device Manufacturer from China but being objective, I am not concern about branding. I don't get anything useful out of branding, rather I am more concern with the performance I can get for a low cost. Moreover it is a excellent product specification wise.

Information about the MIPS24KC Core SKU


The Specification:

The Core
CPU = Atheros AR9132-BC1E rev 2
MIPS Architecture Rev = MIPS 24Kc V7.4
ASEs implemented = mips16
(code-compression support only)
CPU Speed = 400MHz
Advance High Performance Bus (AHB) = 200MHZ
Instruction cache = 64kB, VIPT, 4-way, linesize 32 bytes
Data cache = 32kB, 4-way, VIPT, cache aliases, linesize 32 bytes
Flash Type = Serial
Flash Chip = 25P64V6P 99AJAV5 MYS722
Flash Size = 8MB
RAM Size = 32MB
RAM Bus = 400MHZ
RAM Chip = Zentel A3S56D40FTP
Switch = Realtek RTL8366RG A1G17A2 GA05B
Ethernet Port Count = Gigabit LAN and WAN Ports
Power = 12V/1.5A
USB = 1 USB 2.0 Port

The Radio
Wireless Radio = Atheros AR9103 3x3 MIMO
Channel Width = 20MHZ or 40MHZ
Antenna Connector Type = 3dBi Detachable RP-SMA Omni Directional Antenna X 3
Wireless Standard = IEEE 802.11b/g/n
WiFi Operating Frequency = 2.4~2.4835GHz (Single Band)
802.11n = up to 300Mbps
802.11g = 6, 9, 12, 18, 24, 36, 48, 54Mbps
802.11b = 1, 2, 5.5, 11Mbps
Part 1: Upgrading the DDR RAM

Upgrading the DDR RAM requires soldering, if you are not good at this you can skip this section.
 
Tools required:
  1. Soldering Iron
  2. Solder (Try to get good quality ones poor quality ones have very little flux hence difficult to solder)
  3. Soldering Flux
  4. Way to Desolder SMT Component ( I used ChipQuik, simple fast, easy, and clean )
  5. Desoldering Wick
  6. Dexterous Hands
  7. Magnifying Lens
  8. Tweezer 
  9. Isopropyl Alcohol for Cleaning also known as Rubbing Alcohol in Pharmacies
  10. Compatible DDR RAM IC (TSOP 66, 66 pins and 16bit Data Width, Check the DataSheet to be sure)
List Of Known Compatible RAM IC:
Hynix HY5DU121622DTP-D43
Infineon HYB25D512160B
a) Dissembling The Router
  1. Turn off the Power and Unplug all cables. This is common sense.
  2. Unscrew the Antennas, this is to prevent obstruction of soldering activity later.
  3. Ground yourself, depending on where you are, electrostatic charges can accumulated on your body and its discharge may damage sensitive electrical equipment.
  4. Remove the 2 Rubber Feet at the back of the router. The exposed screws are circled in Red.
  5. Pull the lid up from the back so the router lid is angled as shown below.
  6. Using a Flat Head Screw Driver, slide the tip into the slit exposed in front and give it a gentle twist and the cover should come off. Do it for both sides.                                                                                                           
  7. You should see the exposed board as shown. The DRAM to be desoldered is shown below boxed in Red                                                                                                                                                        
b)SMT Desoldering the DRAM
  1. Ensure the tip of the Soldering Iron is clean, otherwise you will have a hard time soldering.
  2. Spread some soldering flux along on the legs of the DRAM using a tweezer.
  3. Next, I melt the ChipQuik on the legs of the IC using the soldering Iron. ChipQuik is a low temperature solder which means it remains in liquid state at warm temperatures therefore it is easy to remove it.
  4. Make sure ChipQuik fuses with the legs of the RAM. Do not apply heat directly to ChipQuik or the legs or the DRAM or the Board using the soldering Iron. The trick is to touch the ChipQuik, melt it, spread it on the legs and remove the soldering Iron. This is to lessen the likelyhood of damaging the DRAM by excessive heating. Do this quickly repeatedly until the ChipQuik fuses with the legs of the DRAM. Do this for BOTH sides of the legs on the DRAM.
  5. When the ChipQuik fuses with all the legs of the DRAM, gently but firmly nudge the DRAM to dislodge it from the solder pads using a tweezer while ChipQuik is still fluid. If it doesn't budge repeat 3) and try again until it dislodges. Remove the DRAM.
  6. After it dislodges use a desoldering wick dip with some flux and put it on the remaining ChipQuik left on the board. You do not have to use desoldering wick on big pieces of ChipQuik you can pluck it off the green board when it cools.
  7. Heat the soldering wick with the soldering Iron and it should absorb the ChipQuik like a sponge with water.
  8. Clean the Soldering Pad using the method in 7.
  9. At the end you should be left with a 66 clean soldering pads ready accept a new IC.
  10. If you are still not sure what to do after reading this watch some youtube videos on SMT Soldering it will give you a better picture on SMT Soldering.
c) Soldering on the new DRAM
  1. You should have the DRAM IC upgrade ready as shown. 
  2. Apply some Flux on the Soldering Pad.
  3. Align the Pins of the New DRAM with the Soldering Pads. Notice there is a Black Circle on the DRAM. You need to match the Orientation of the DRAM with the Router Circuit Board diagram printed on the board.
  4. Make sure the legs are aligned on BOTH Side of the soldering pads. Apply Flux on the DRAM legs.
  5. Dip the tip of the Soldering Iron with some solder and spread it on the legs.
  6. Gently spread the solder on the legs using the Soldering Iron. Touch the solder, gently drag along the legs and release, repeat until all the legs are covered. If solder is stucked between 2 or more legs, apply more flux on the stucked solder and repeat Step 6 again.
  7. Make sure the solder do not short the legs of the DRAM.
  8. Examine the Legs using a Magnifying Lens to make sure no shorting occurs. Make sure every leg of the DRAM gets some solder. If you have too much solder remove the excess out using the soldering wick.
  9. Clean the Router Board and the DRAM using clean cloth dipped in Isopropyl Alcohol (Rubbing Alcohol) 
  10. Again If you are still not sure what to do after reading this watch some youtube videos on SMT Soldering it will give you a better picture on SMT Soldering.
Let the Router Board Dry (Alcohol evaporate quickly) turn on the power. Your Router should boot up just fine.
Unlike BroadCom MIPS routers most Atheros MIPS router do not need modification of the NVRAM to fully initialize the Memory.

Note that different Routers contain different memory. TSOP 66 is used by DDR Memory and has 66 Pins.
The other common memory found is TSOP 54 which has 54 pins but TSOP 54 has low Storage Density hence it is unlikely to find a compatible DRAM to upgrade to.

Extra Tips: If you feel your router is overheating this is a solution:

Read More
Posted in | No comments

Thursday, 16 June 2011

Ultimate Wireless Lan Upgrade Guide For Windows & Linux

Posted on 23:01 by Unknown
Recently I purchased a WiFi Card on Ebay.

The reason is because at certain areas in public places where I frequent, the WiFi Access Point has poor reception.

On my colleagues' computer especially those with Intel WiFi they were able to get at least 1 bar of signal where my Atheros Card couldn't even connect at all.

My Atheros AR5B91 is a 2 Transmit 2 Receive Single Band Card from Atheros.
It comes default with certain version of Acer Aspire 4740G (Acer use different parts for same laptop models).

The card that I purchased from ebay is a Intel Advance-N 6200 AGN. Search "Intel 6200" in Ebay.
It cost only USD$16 and is a 2 Transmit 2 Receive Dual Band Card from Intel.

Single Band means the Card can transmit and receive from the 2.4GHZ Radio Frequencies while a Dual Band Card can transmit and receive from the 2.4GHZ and 5GHZ Radio Frequencies.

This translates to greater range, frequencies and throughput.
Since it is only USD$16 and it can solve my WiFi issues why not?
In this case the cost over improvement justifies the upgrade.
Moreover it is an OEM Card not Engineering Sample.

The latest Intel 6205 AGN Card cost a whopping USD$30 for a Engineering  Sample and $40 for an OEM Card.
That is 2 times the cost of the Intel 6200 AGN Card.
Atheros do have high end Dual Band cards as well but they are even more horribly expensive.

Sorry for the poor picture quality below.

Firstly you need to uninstall the Older WiFi Card Driver:

This step is for Windows only because in Linux the WiFi Driver is a dynamically loaded Kernel Module.

1)Go to Control Panel to locate the Driver of your old Wireless Card. Uninstall it.

2)If it is not inside the Control Panel as an Installation Package go to Device Manager, Right Click and select uninstall.

3)Shutdown the computer.

Secondly you need to install the WiFi Card:

1)Turn over the base and unscrew the cover concealing the WiFi Card
(I placed the Intel card under the existing Atheros Card):


 2)Gently unplug the Black and White Cables attached to the WiFi


3)The WiFi Cable connection diagram is as shown below:


The old Atheros AR5B91 is as shown on the left while the new Intel 6200 AGN Card is shown on the right.

"1" Connects to the White Main Cable and "2" Connects to the Black Auxiliary Cable

Intel Cards have helpful Black and White Triangles to indicate the colour of the cable to connect.

Sometimes OEM mess up the Black and White Cables result in laptops having poor reception.
The solution is simply to swap them.

Thirdly you need to install the new WiFi Card Driver:


For Windows

1)By default Windows will not autodetect and Install the Driver for New WiFi Cards;
This is because when Windows 7 was released the device was not ready, the new Drivers were not sent to Microsoft yet hence they were unable to include the drivers inside the default Windows Installation

2)There are 2 Ways of obtaining the driver either 1 will do
  • Connect your computer via an Ethernet Cable, run Windows Updates and the WiFi Driver will appear in the list of important Updates(The lazy way, only basic drivers are installed).
  • Connect your computer via an Ethernet Cable. Download the driver directly from Intel(Recommended way Intel MyWiFi Software is available). 
    • Note: If the latest version of Intel WiFi Driver package does not include the driver for Intel 6200N  download the second latest version instead:  currently 14.0.2.2.
If the new Card gets installed with a extended name eg. (XXXX Wireless #2)  simply
  • Uninstall the Device (But do not delete the driver)
  • Do a Windows Registry Search on the keyword "XXXX" then delete the relevant entries (Please be-careful not to delete the wrong ones)
  • Click AutoDetect in Device Manager to reinstall the Device, the name should be corrected.

For Linux
 
1)You have to make sure the MicroCode of the WiFi Card is installed in your Linux Distribution.

Most Distribution have it installed by default but will load only if the relevant Card is detected(Dynamically Loaded Module).

Connect your computer via an Ethernet Cable
Open up the Software Manager and search for the keyword "Intel" then check the correct Firmware is installed for the Card Model.

2)If there are no issues, your new Network Interface should be detected as "wlan1" check using "su" enter password then "ifconfig"
If you want it to be called wlan0 as it should have been simply edit this file
/etc/udev/rules.d/70-persistent-net.rules
with a text editor vi or nano then delete the line containing "wlan0", replace it with the line containing "wlan1" then change "wlan1" to "wlan0". Reboot.

Performance

Of course, an upgrade has to yield visible, experimentally reproducible improved results.
If you do not have the data there is no upgrade to speak of.

When taking the readings, only the WiFi cards and the drivers are different (Duh?!) the rest of the variables are kept constant like position of the computer to access point etc.

My Access Point is an Aztech HW550-3G that is a 2 Transmit 2 Receive Ralink Chipset that transmit only on the 2.4GHZ range.
If you have an Dual Band Access Point you get even better performance now that the Intel WiFi can transmit on the 5GHZ frequencies.

Signal Strength Improvement on Windows

I used inSSIDer(google for the program) to get my readings. The value to be compared is the yellow text.
RSSI refers to the signal strength\quality of a WiFi Connection
Note: The RSSI readings are displayed with a negative sign.
Which means the less negative the better.

Also note that the upgrade unlocks the ability to transmit on the 5GHZ range this significantly increases the range because the 2.4GHZ frequencies are currently saturated in many areas.
Your Cordless Phones, Microwave Ovens and other Single Band Wireless Device over-occupies the 2.4GHZ frequency range.

Original Atheros AR5B91 Signal Strength:

Upgraded Intel 6200 AGN Signal Strength:

I noticed this Access Point in my vicinity:

Anyone who buys Apple Overpriced Products automatically earns a "idiot" label from me.

Apple Products are overpriced, run of mill hardware with good looking software and designs.
Hardware Hackers want cheap powerful hardware and they hack the software to unlock new capabilities so you rarely get extra value out of overpriced Apple Hardware.

Signal Strength Improvement on Linux

To Check Signal Strength on Linux, open a terminal.
Enter "su" to enter superuser admin mode.

Then type "iwlist wlan0 scanning".

Your Access Point Details will show up in text. You use the SSID to identify the network you are testing.
The listing sequence is random.

Old Atheros Readings:
Cell 02 - Address: 00:XX:XX:XX:XX:XX
                    Channel:10
                    Frequency:2.457 GHz (Channel 10)
                    Quality=38/70  Signal level=-72 dBm 
The new Intel 6200 AGN Readings:
Cell 06 - Address: 00:XX:XX:XX:XX:XX
                    Channel:10
                    Frequency:2.457 GHz (Channel 10)
                    Quality=47/70  Signal level=-63 dBm 
The Intel 6200 AGN Card has shown improved signal strength on both Windows and Linux Platform.

Throughput Improvement

Throughput is the rate of Data Flow per second.
The higher the better.

Basically the Sample 1.3GB file is hosted on a Server Connected by Ethernet cable to my router to make sure Wireless Connection is the limiting factor in data transfer rate.
Hence I wirelessly copied the file from the server to my upgraded laptop.
The file has to travel from the server to the router then wirelessly to the laptop, since data transfer over Ethernet Cable is greater than over wireless, Wireless Transfer rate becomes the limiting factor which we want to test.

The old Atheros Throughput:
  

The Atheros Card transfers at approximately 2.67MB/s

The Intel 6200 AGN Throughput:

The data transfer rate is approximately 3.47+MB/s.

Note that we can't use the percentage as a fair comparison because it is calculated as a percentage over the link speed .
The Atheros Card connects at a fixed link speed of 300Mb/s while the Intel Card connects at a variable speed (according to utilisation) probably for power conservation (Look at the red rectangle above).

During testing the data transfer for Intel Card was still climbing but it was quite obvious the Intel card has higher throughput so I just took a screenshot and concluded.

On a Dual Band capable Access Point the throughput is further boosted.

Basically this was quite an awesome Wireless Card Upgrade considering the low price and the considerable performance improvements.

So if you are suffering from Poor Range and Throughput (and you are sure it is not due to issue from the Acess Point) from your WiFi Card from other manufacturers like "Ralink, Broadcom, Atheros" a cheap upgrade to Intel WiFi might just be the solution.

Feel free ask any question about the upgrade.
Read More
Posted in atheros, wlan | No comments

Saturday, 4 June 2011

Nvidia & Acer Screw Ups

Posted on 05:51 by Unknown
Finally Fixed in Driver Version 280.26 the info below is now obsolete to fix the issue just download and install the latest Nvidia Driver.
Recently the stupid Acer Tech People left out the Device ID of Acer Aspire 4740G's Graphics Adapter G310M resulting in no more Verde Driver for Acer Aspire 4740G.
There is no justification or explanation from either Nvidia or Acer side.
You can imagine the frustration from this bullshit.
Screw Nvidia and Acer. Either way they are going down the Crapple route and are slowly making their way into my overprice laptops black list.


To fix Nvidia/Acer's screw up, open "nvac.inf" using a text editor found inside the extracted driver inside the "display driver" folder.
Ctrl - F and enter "0A75"
When you see this line
%NVIDIA_DEV.0A75.01% = Section011, PCI\VEN_10DE&DEV_0A75&SUBSYS_035A1025
Change it to
%NVIDIA_DEV.0A75.01% = Section011, PCI\VEN_10DE&DEV_0A75&SUBSYS_03181025 
Then save and exit and rerun the installer.
There is a big red warning sign because you modified the driver so it fails WHQL so just ignore it and continue to install.


Damn Nvidia & Acer.


If you do not want to see the stupid Red Warning Box complain to Acer / Nvidia about their screws up and make it heard.
Read More
Posted in | No comments

Thursday, 2 June 2011

How to Mod your Laptop VGA BIOS

Posted on 22:34 by Unknown
Basically there are 2 locations where the VGA BIOS in laptops.
Some OEMS embed the VGA BIOS in the EFI/BIOS in your laptops,
other OEMs have a separate VGA BIOS firmware on the VGA Card itself.

TYPE 1
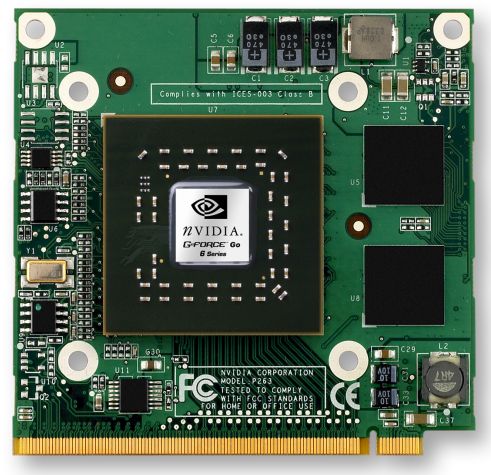
As a general rule laptops with discrete MXM board modules like the (picture below) has
the VGA BIOS as a separate piece of code located on the module itself.
It is NOT part of the EFI/BIOS of the Mainboard.

TYPE II
For OEM Boards with a GPU embedded on the Mainboard itself the VGA BIOS usually exist as a chunk of Code inside the BIOS of the Mainboard itself.
(Picture below shows the GPU on the top left corner on the mainboard covered by the black plastic)


Nowadays more and more OEMs are using TYPE II method of integration because
1) They can make the laptop more compact and light because separate MXM modules increase the thickness of the laptop.
2) It is cheaper to integrate everything on the mainboard using BGA soldering rather than have PCI-E connectors.

This article talks about modifying Type II VGA BIOS only.

First you have to identify the Type of Firmware the laptop uses, this is depends on the BIOS Vendor used by the OEM. An OEM can use a different BIOS vendor for different models.

The most prominent BIOS vendors are: Insyde, AMI, Phoenix, AWARD and Intel.

On the website mydigitallife you can find many tools coded by the members for BIOS disassembly.

We are going to use their tools to dissemble the VGA Module from the BIOS.

In this example, the Aspire 4740G uses the Insyde BIOS so download the PhoenixTool which is capable of dissembling Phoenix, Insyde, Dell and other EFI BIOS.

After downloading the PhoenixTool we decompress the PhoenixTool contents to a new folder.


We extract the PhoenixTool to a folder called  "NEW". The main program is called PhoenixTool.exe
After decompressing the disssembly Tool we proceed to download the EFI/BIOS from the OEM website and decompress it as well..


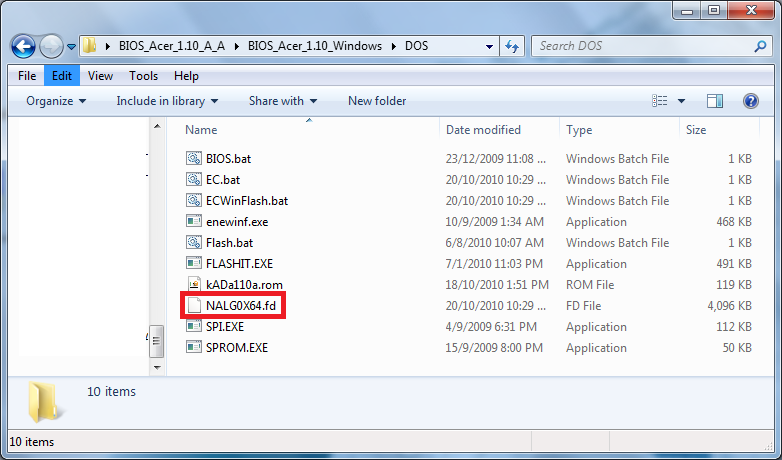
From Above we can see the Complete BIOS Firmware is called NALG0x64.fd.
BIOS usually uses file extension such as BIN, ROM, BIO, WPH, FD and many more. Different BIOS Vendor usually use a different identifier.


When we use the PhoenixTool.exe to open the NALG0x64.fd file, the tool also display the emergency Insyde Recovery Filename.


After the modules have been dissembled you should see the screen above. The modules have been dissembled in a newly created folder called "DUMP" where the original NALG0x64.fd is located.


The Red Box shows the VGA BIOS module. The VGA BIOS module is usually a 70-60KB file, to confirm if it is the VGA Module, you open it with a dissembler and check the content, you should see Nvidia text reference in the binary.


The dissembly of the file shows a lot of Nvidia Text Reference to further confirm if it is the exact module you want you should Google the SKU Code in the example above it is "GT218" which references to G310M Nvidia GPU.
Some laptop BIOS has more than 1 VGA BIOS because 1 Model can have many variations of Different Nvidia SKU GPUs.A good example would be the Acer Aspire 4741G.

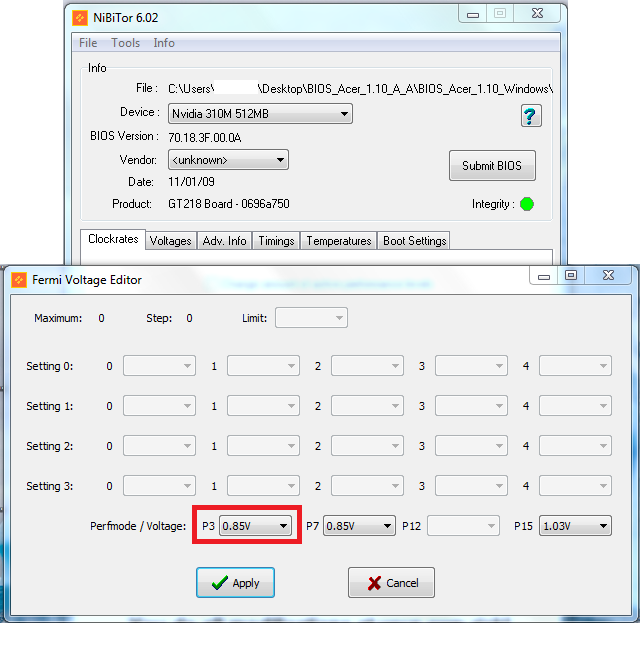
Next Download the Nibitor from MVKTECH website. Open the VGA Module and choose "Tools" Fermi Voltage Editor (For Newer Generation of Nvidia GPUs).
For ATi you would probably use Radeon BIOS Editor (RBE).
As you can see the original BIOS has the P3 state which is the default state (the lowest performance state) set at a voltage is 0.85V that is why when using HWMonitor you will never see the voltage drop below 0.85.
The lowest performance state can however use a lower voltage of 0.80V.


So we set the P3 State to 0.8V and Apply. Save the Modified VGA BIOS and exit.


Using EzH20, a Insyde BIOS Editor we open the original NALG0x64.fd file.


Select Components -> Replace Module. Each Insyde Module has a Unique GUID identifier.
8 Character - 4 Character - 4 Character - 4 Character - 12 Character
The Module we seek has the identifier "AC1E1B97-69C4-475D-8471-0F3893802F96"


Under "Module to Load" browse to the modified VGA BIOS.


Under "Change ROM GUID" enter the original identifier: "AC1E1B97-69C4-475D-8471-0F3893802F96"
Then Patch the Firmware.


Finally Save the Modified Firmware and flash it with the Insyde flashit Tool while replacing the original NALG0x64.fd with the modified NALG0x64.fd.
Read More
Posted in | No comments

Sunday, 29 May 2011

Acer Aspire 4740G VGA Firmware Mod

Posted on 09:06 by Unknown
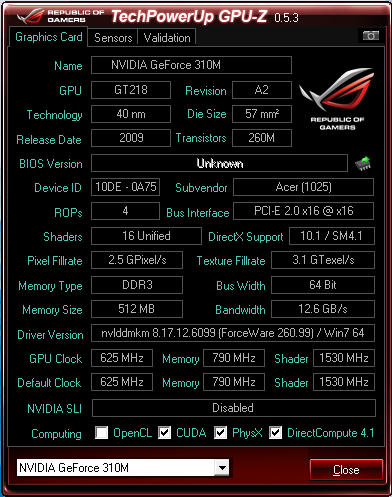
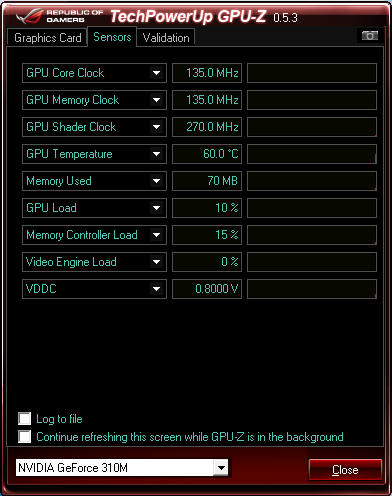
Originally the performance state of the G310M of the Acer Aspire 4740G is as follows
Default Mode:
135MHZ GPU Clock
270MHZ Shader Clock
135MHZ Memory Clock
0.85 Voltage
2D Mode:
405MHZ GPU Clock
810MHZ Shader Clock
405MHZ Memory Clock
0.85 Voltage
3D Mode:
625MHZ GPU Clock
1350MHZ Shader Clock
790MHZ Memory Clock
1.03 Voltage


In fact it is possible to reduce the voltage in Default Mode.
Technically it should save some power, hence I modified the VGA BIOS Module using Nibitor and set the Default Voltage to 0.80 Volts instead.
Flashing BIOS is to be attempted by the tech savy, this BIOS has been tested to be working on my laptop hence any issue with incorrect flashing would be your responsibility.
I share the modified BIOS here.
Read More
Posted in | No comments

Tuesday, 24 May 2011

Atheros Wireless LAN

Posted on 05:32 by Unknown
I am bring up this post again because I found another Atheros WiFi Driver that has functions not found in other Atheros Driver.
This driver is from HP.
http://ftp.hp.com/pub/softpaq/sp52001-52500/sp52131.exe

Why this driver you might ask? The screenshots below should answer your queries.

Access Additional Function not found in other Atheros Release


Useful Autoroaming Function if you need to move around multiple APs with your Atheros Equipped Laptop

Additional Encryption Schemes Not Found in other Atheros Driver


So you can choose which driver fits your needs.

After installation of Atheros Driver 8.X a utility should appear in the Control Panel.
Here are some screenshots:


Choice of 2 types of Atheros Wireless LAN Drivers:
  1. Modded Atheros Driver (Non-WHQL)(Vista & Xp)
Obtained from LaptopVideo2go
  1. Atheros Driver Version 8.X (WHQL)
If your Microsoft Virtual WiFi Device Driver disappears try running the following Commands in Command Prompt Administrator Mode.
C:\Windows\System32> netsh wlan set hostednetwork mode=allow ssid=NameOfNetwork key=StrongPassword
Read More
Posted in atheros, download, driver, wlan | No comments

Sunday, 1 May 2011

Transitioning to KDE

Posted on 19:28 by Unknown
Recently I have taken the switch to KDE instead of GNOME 3.

This is due to the fact that GNOME has taken the route of dumbing down the interface to resemble those of android and Meego, I decided to search for an alternative Desktop, because doing 3 steps to achieve something once done in 1 step is definitely a regression.

An OS on Desktop has to have sufficiently accessible and powerful interface especially for users of Linux who enjoys the level of customization they always had before.

Although I still hate applications that start with the 'K' character the usability of KDE makes this forgivable.

Rule 1: There is always a KDE equivalent of GNOME Application.
Rule  2: You are still running LInux.

The Concept of KDE after running it for a while is the use of Widgets.
You will find it is surprisingly very similar to Windows 7 in terms of GUI
(Actually I think Windows 7 copied UI from KDE as KDE 4 was released first but that is not what we are interested in today).

Some of the tweaks I used in OpenSUSE Gnome 11.4 is still applicable like the fonts and applications.

Some Screenshots on what I think are great in KDE 4.

Managed Thumbdrive Action by Clicking the USB Icon on the TaskBar

 Nice Graph displaying the Data Rates on a Network Interface

Type the program you want to run and it appears on the menu like Windows 7
Right Click on it to add a shortcut Taskbar or Desktop

Personalization Control Panel with Grouping

Able to Group Folders according to types

Sysinfo to display computer information

 Plasma Desktop Windows, Note the glowing borders.

Add Widgets of any type of any number just like Windows 7 gadgets

An Example of a Useful Widget, the weather widget

Desktop Effects Control, you can customize the effects you want, KDE Desktop Effects also has a graceful fail-over when an errors occurs. You can also choose to disable Desktop effects to save power just like Windows 7.

I hope these feature are convincing enough for you to try KDE because because it certainly won me over. Enjoy!
Read More
Posted in | No comments
Newer Posts Older Posts Home
Subscribe to: Posts (Atom)

Popular Posts

  • Delete Windows System Files
    If you play around with Windows System Files sometimes it is not possible to delte them off after you had your fun. The following commands w...
  • Internet Explorer Tweak
    Here is a registry tweak for Internet Explorer Similar to the Mozilla Firefox tweak this enable you to increase the number simultaneous ser...
  • How to Mod your Laptop VGA BIOS
    Basically there are 2 locations where the VGA BIOS in laptops. Some OEMS embed the VGA BIOS in the EFI/BIOS in your laptops, other OEMs have...
  • Acer Phoenix BIOS Emergency Recovery
    This is for people who don't listen and interrupt the flashing BIOS for unknown reasons. This will work provided the BIOS BootBlock isn...
  • Secure Your Windows CD-Key (For Vista and 7)
    As you know everytime you activate a Windows Installation your Product Key can be retrieved via Software means. Don't believe me? Downl...
  • Changing the Acer Arcade Shortcut
    While surfing the Windows Registry (You must be thinking that I am weird =P) yesterday I found something interesting It is actually possible...
  • Some Interesting Modding Ideas
    I modded my Aspire 4530 AGAIN to control resultant temperature. Below are some ideas and pictures. Another mod idea This time a black anodi...
  • How to obtain the DSDT from your laptop
    There are many ways to rip the DSDT out of the laptop BIOS. If there is a BIOS editor it is possible to rip out the .AML file. However below...
  • Acer Aspire 4530 Boot Screen
    Acer Aspire 4530 Boot Dianogostic Screen PhoenixBIOS 4.0 Release 6.1 Copyright 1985-2008 Phoenix Technologies Ltd. All Rights Reserve 1.052....
  • List Of Modified BIOS Collection
    Here are the list of Modified BIOS Collection (mainly SLIC Mods), no warranty provided use at your own discretion! Acer Aspire 4520G BIOS Ac...

Categories

  • 32bit
  • 64bit
  • acer
  • ahci
  • amd
  • apple
  • aspire 4530
  • aspire 4535G
  • aspire 4740
  • atheros
  • atom
  • BIOS
  • boot
  • cleanup
  • configure
  • device
  • disk
  • dismantle
  • download
  • driver
  • fan control
  • firefox
  • firewall
  • firmware
  • fix
  • flash
  • graphics
  • hwmonitor
  • internet
  • linux
  • macs
  • microsoft
  • modified
  • nvidia
  • optimize
  • overclock
  • performance
  • power savings
  • powermizer
  • proxy
  • ram
  • Realtek
  • review
  • secure
  • shortcut
  • speaker
  • synaptics
  • temperature
  • theme
  • timeline
  • tweak
  • undervolt
  • update
  • wallpaper
  • windows 7
  • windows vista
  • Windows Xp
  • winsat
  • wlan

Blog Archive

  • ▼  2013 (10)
    • ▼  November (2)
      • A Simple How to use MiniDLNA on OpenWRT
      • OpenWRT TL-WDR3600/4300/4310 Release
    • ►  October (3)
    • ►  September (1)
    • ►  August (1)
    • ►  July (1)
    • ►  May (1)
    • ►  January (1)
  • ►  2012 (4)
    • ►  September (1)
    • ►  June (1)
    • ►  March (1)
    • ►  February (1)
  • ►  2011 (21)
    • ►  September (1)
    • ►  July (4)
    • ►  June (3)
    • ►  May (3)
    • ►  April (3)
    • ►  March (4)
    • ►  February (2)
    • ►  January (1)
  • ►  2010 (36)
    • ►  December (3)
    • ►  November (2)
    • ►  October (4)
    • ►  September (1)
    • ►  August (5)
    • ►  July (1)
    • ►  June (5)
    • ►  May (3)
    • ►  April (3)
    • ►  March (6)
    • ►  February (1)
    • ►  January (2)
  • ►  2009 (81)
    • ►  December (3)
    • ►  November (3)
    • ►  October (9)
    • ►  September (5)
    • ►  August (1)
    • ►  July (5)
    • ►  June (8)
    • ►  May (15)
    • ►  April (10)
    • ►  March (13)
    • ►  February (8)
    • ►  January (1)
  • ►  2008 (8)
    • ►  November (5)
    • ►  July (3)
Powered by Blogger.

About Me

Unknown
View my complete profile