First if your Laptop is still under warranty doing this may void it!
- If you are not comfortable with opening your laptop do not do it.
- I hold no responsibility for any damage done to your laptop.
- If you follow this guide carefully and do it meticulously nothing bad should happen to it.
- Do not handle electrical components at the metal contacts or circuit board, hold it by the edges.
- Read this guide once and fully understand it before proceeding.
1) Disconnect ALL POWER (inclusive of battery pack + AC Power Adapter).
2) Ground yourself to make sure you are free of static.
3)Remove all the dummy SD & PCI Card from the Perimeter of the laptop.
Unscrew the screws circled in Red.
Then using a flat-head screw driver and lever the catches boxed in Green.
The laptop support pads are boxed in Blue if any of them fall off reattach them with new double sided tape.
The front panel should pop up as shown.
Gently pry it out.
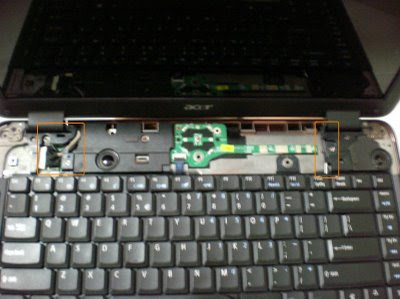
You should see the following:
The left box shows the White Connector which consist of VGA/Monitor Port + Webcam port
Above it is the LCD Monitor Grounding Cable
Below it is the Microphone Cable
The right box shows the Wireless Antenna Cable for extended Range Detection of Wireless Networks
Removing the Keyboard
Next pry out the keyboard gently
The Flat Ribbon Cable is the PS/2 Port
Lever the Connector and disconnect the Cable
DO NOT BREAK SUCH CONNECTORS ON THE MOTHERBOARD IF THEY ARE BROKEN YOU HAVE TO GET A NEW MOTHERBOARD !
You should see something like the above
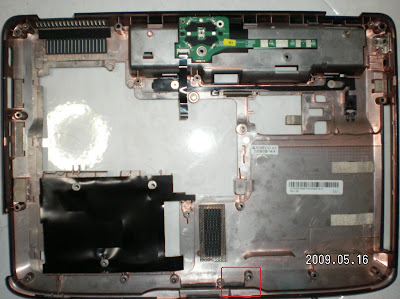
Next flip the laptop around and remove all the screws circled in Red.
It is actually ALL the screws you can see at the base.
Removing the Harddisk
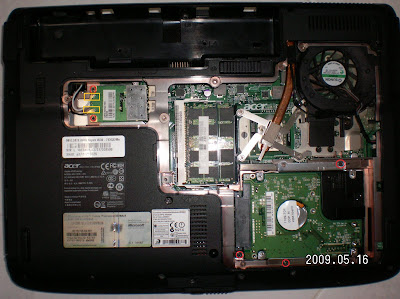
Next, Unscrew the screws circled in Red (3 from the Harddisk Region, 2 from the Wireless Card Region).
Disconnect the Wireless Antenna from the Card boxed in Yellow by levering it out.
Don't pull it out vertically !
I noticed in my room white wire on top, black wire below, gives better connectivity.
Disconnect & remove the harddisk by sliding it towards the right and pull it out via the black flap.
Next unscrew the screws circled in Red (3 in the Harddisk Region).
Removing the LCD Monitor
Flip the laptop around.
Disconnect the box in blue and unscrew the screws circled in Red.
The top blue box holds the VGA Monitor Connector and the WebCam Connector.
The bottom blue box holds the Microphone Connector Cable.
The Red Circle above the top blue box hold the Monitor Grounding Cable.
Notice there are engravings beside the red circles.
60 stands for 60mm screw the long ones
45 stands for 45mm screw the short ones
There are only 2 types of screw you will encounter in this guide.
When removing the Monitor make sure you don't pull it out vertically, you might damage the plastic cable groove.
Follow the groove and remove it.
Next unscrew the screw circled in Red and disconnect the connectors boxed in blue.
The blue box on the Left is the Audio Connector for the laptop internal stereo speakers.
The blue box in the Centre is the Connector for the Acer ShortCut Buttons Panel.
The blue box on the Right is the PS/2 Connector for the Synaptics Touchpad.
The blue box on the Top is the Power Switch and LED Light module (The green circuit board on the top).
Removing the DVD Drive
The yellow box indicates the CMOS Battery (replaceble) you don't need to remove it.
In Case you need the CMOS battery data:
Next Slide out the DVD Drive by pushing it out towards the Right.
Unscrew the screw circled in Red (There are 2, 1 at the Top Right Corner, 1 at the Centre) .
Notice there is a screw like symbol beside each of them.
Here comes the difficult part.
It is now possible to separate the casing from the motherboard but there is one obstacle.
It is the Audio Adjustment Knob Region boxed in Red.
The Audio Adjustment Knob is integrated to the motherboard separating it from the motherboard is impossible.
So you have to carefully push the casing down so you can create a gap at the audio adjustment knob to pull the motherboard out.
Start prying from the top right corner.
DO THIS SLOWLY!
REMEMBER HASTE MAKE WASTE !
DON'T BREAK THE MOTHERBOARD BY OVER-STRAINING IT !
ENSURE ALL SECTION OF THE MOTHERBOARD IS WELL-SUPPORTED!
Heat sink Removal
Unscrew the screw circled in Red and disconnect the connector boxed in blue to remove the heatsink.
I will not post a picture of the dissembled outcome as I had applied an excellent layer of Arctic Silver 5.
If I remove it I have to reapply it.
To get a nice layer it takes a lot of time and patience more then the time taken to dissemble this laptop.
In short
Remove the thermal pad on the GPU.
Clean the GPU surface, CPU surface and Heatsink surface with Rubbing Alcohol (Google)
DO NOT USE WATER AS IT IS A GOOD ELECTRICAL CONDUCTOR!
Spread high quality thermal paste over the GPU and CPU surface (I recommend Arctic Cooling MX-2 or Arctic Silver 5).
Replace the parts.
Removing the Bluetooth
Turn the motherboard around
The bottom yellow box is the bluetooth card
There is 1 screw holding it
The top 2 boxes is the unused USB Connectors.
For Future purpose if you suddenly need to add a Wireless 3G card which has internal USB for Laptops you can use them.
Note:
You don't have to remove the motherboard from the casing to gain access to the USB Connectors or Bluetooth.
Removing Internal Speaker and Touchpad
Turn the plastic cover you removed around.
You will see screws to remove the Internal Speakers and Touchpad.
Just unscrew and remove them accordingly.
Note:
You don't have to remove the motherboard from the casing to gain access to the USB Connectors or Bluetooth.
It took me a long time to come up with this very simplified guide so please show appreciation by clicking the google ads if it helps you =)
To reassemble it just reverse the process.
WHEN IN DOUBT ASK!


0 comments:
Post a Comment