To Tweak the OpenWRT for Pure Performance there is no other way than editing config files from Terminal so I hope you actually read Part 3 before.
There are 4 parts to Tweaking the Performance
Setting to Wireless N with G backward compatibility
The TP-Link WR1043ND Hardware has a 3 Transmit 3 Receive Radio that is only Single Band with 20/40MHZ Frequency. It has Wireless B/G/N Capability.
To fully understand WiFi Standards you need to read up on IEEE 802.11 standards.
We start by tweaking the Radio.
Wireless N allows backward compatibility with B and G, you need to set it to 802.11g+n.
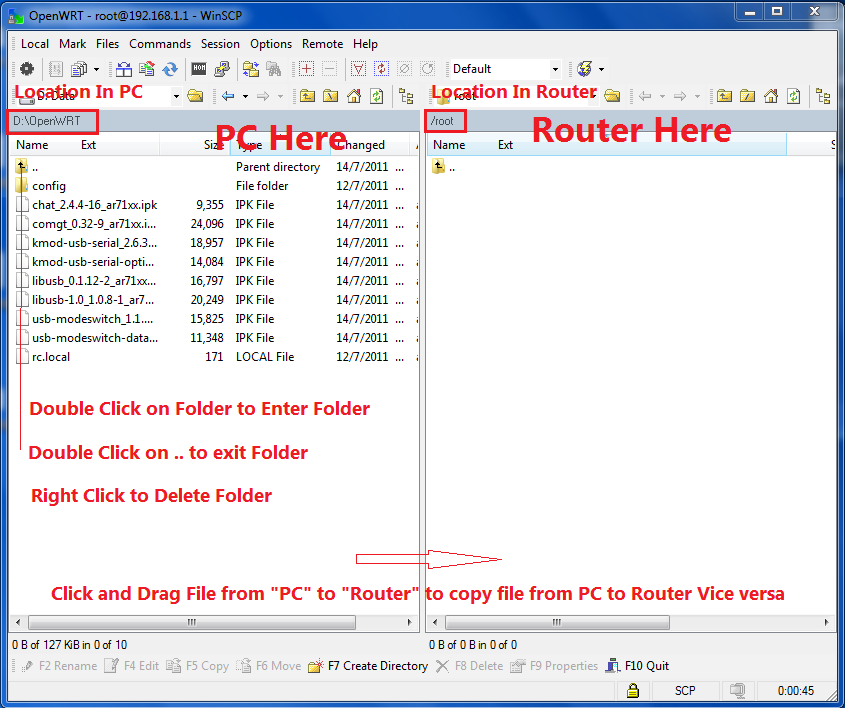
You can do this by logging into the Router via Putty using vi editor edit the file called "wireless" in /etc/config/, or do it in LuCI Web Interface(Router Config Page).

Adjusting Channel Width:
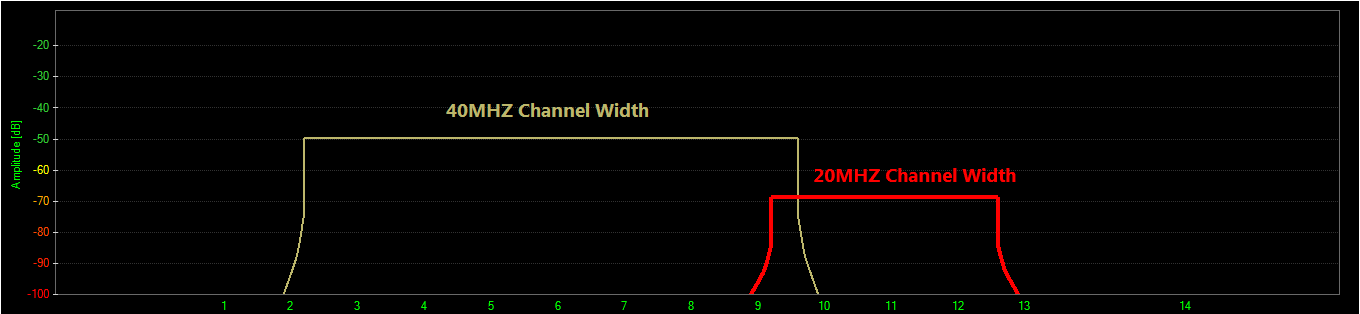
Next you need to make sure the Router is using 40MHZ Channel Width, this will allow greater throughput.
You can do this by logging into the Router via Putty using vi editor edit the file called "wireless" in /etc/config/
By rights 'htmode' is not allowed if there are competing BSSID using that channel (the good neighbor regulation), but you can override that with 'noscan' option. There is also a distance optimization setting which I tested the best values at 20-25.
Below is a graph displaying the difference between 40MHZ Channel Width and 20MHZ Channel Width.
Note that you can define more than 1 Access Point on OpenWRT. You can configure a Second AP as Guest and Fire-walling it from your own LAN.

Higher TXPower (Transmit Power)
Transmit Power allows you to resize the cell. Max Value is 24 only works with US regulatory settings.
You can also try placing the Wireless Router at a higher position for better signal strength.
Tweaking Wired Performance:
Next you need to make sure the Router Ethernet Performance is adjusted by changing the sysctl variable this will allow greater throughput.
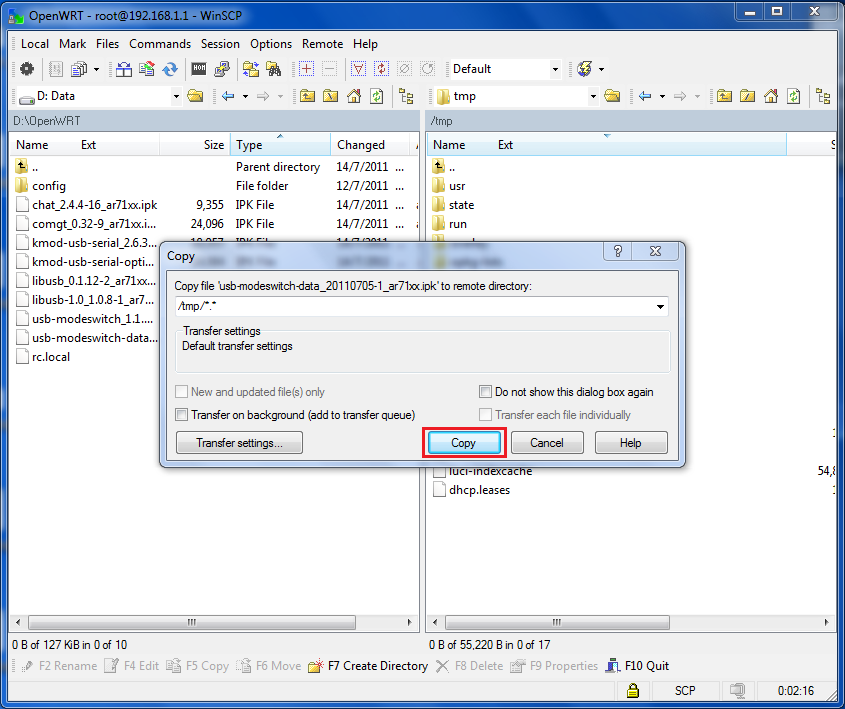
You can do this by logging into the Router via Putty using vi editor edit the file called "sysctl.conf" in /etc/
Note: These tweaks are not found on OpenWRT How Tos, however I soon discovered that someone is working on bufferbloat hence the tweaks on buffersize should be approached with caution.
Also if you have a Windows File Share you want to tell the Router firewall not to monitor SAMBA Packets.
Windows Share also known as SAMBA in Linux uses the Port 445 so you need to tell OpenWRT to stop monitoring Packet Originating from LAN using Port 445.

Tweaking Web Performance:
Web Peformance typically require a lot of DNS Look up so you want to tell OpenWRT to use the Fastest DNS Server available.
You can do this by logging into the Router via Putty using vi editor edit the file called "dnsmasq.conf" in /etc/ or do it in the file /etc/config/dhcp
and add the fastest DNS Server closest to you.
Add the Line Below and change the IP of the server to YOUR fastest DNS Server. My Fastest DNS Servers may not be your Fastest DNS Server.
There is no limit of the number of DNS Server you can set on OpenWRT
Quality of Service
What is Quality of Service?
Quality of Service makes it so that during torrenting, your webpages doesn't take a long time to load even though you are on a 1Mbps Connection.
It does this by prioritizing network traffic, putting webpage network packets in higher importance than torrent packets.
The step to installing QoS is logging into the Router via Putty then

Hopefully you learn a lot from this series of blog post and enjoy the high performance of your Modified Router running on OpenSource Software.
If you run a Windows Share Server when you place the laptop beside the router and do a copy you should be getting insane WiFi Speeds @ 150Mbps at 5m line of sight
Let the numbers speak for themselves!

In case you modified the wrong config files and got lock out the fail safe mode is here.
If you are interested I have a OpenWRT built for TL-WR1043ND that I use personally myself. It is optimized to my satisfaction for pure performance.
You can get it here.
If you actually tried my firmware you will find that all the tweaks I listed above have been already added to the firmware defaults so there is nothing additional to tweak.
There are 4 parts to Tweaking the Performance
- Wireless Performance
- Wired Performance
- Web Performance
- QoS (Quality Of Service)
Setting to Wireless N with G backward compatibility
The TP-Link WR1043ND Hardware has a 3 Transmit 3 Receive Radio that is only Single Band with 20/40MHZ Frequency. It has Wireless B/G/N Capability.
To fully understand WiFi Standards you need to read up on IEEE 802.11 standards.
We start by tweaking the Radio.
Wireless N allows backward compatibility with B and G, you need to set it to 802.11g+n.
You can do this by logging into the Router via Putty using vi editor edit the file called "wireless" in /etc/config/, or do it in LuCI Web Interface(Router Config Page).

Adjusting Channel Width:
Next you need to make sure the Router is using 40MHZ Channel Width, this will allow greater throughput.
You can do this by logging into the Router via Putty using vi editor edit the file called "wireless" in /etc/config/
config 'wifi-device' 'radio0'
option 'type' 'mac80211'
option 'channel' '7'
option 'macaddr' 'XX:XX:XX:XX:XX:XX'
option 'hwmode' '11ng' #Wireless G and N Modes
option 'htmode' 'HT40-' # Set to 2.4GHZ 40MHZ Fat Lower(-) Channeloption 'noscan' '1' # Enable neighbour 'unfriendly' WiFi Settingsoption 'country' 'US'
list 'ht_capab' 'SHORT-GI-40'
list 'ht_capab' 'DSSS_CCK-40'
option 'disabled' '0'option 'txpower' '24'
config 'wifi-iface'
        option 'device' 'radio0'
        option 'network' 'lan'
        option 'mode' 'ap'
        option 'ssid' 'Your_SSID_Here'
        option 'encryption' 'psk2'
        option 'key' 'your_secret_key_here'
By rights 'htmode' is not allowed if there are competing BSSID using that channel (the good neighbor regulation), but you can override that with 'noscan' option. There is also a distance optimization setting which I tested the best values at 20-25.
Below is a graph displaying the difference between 40MHZ Channel Width and 20MHZ Channel Width.
Note that you can define more than 1 Access Point on OpenWRT. You can configure a Second AP as Guest and Fire-walling it from your own LAN.
Higher TXPower (Transmit Power)
Transmit Power allows you to resize the cell. Max Value is 24 only works with US regulatory settings.
You can also try placing the Wireless Router at a higher position for better signal strength.
Tweaking Wired Performance:
Next you need to make sure the Router Ethernet Performance is adjusted by changing the sysctl variable this will allow greater throughput.
You can do this by logging into the Router via Putty using vi editor edit the file called "sysctl.conf" in /etc/
kernel.panic=3
# The following 3 lines helps to ensure Router will always have
# sufficient memory and will not crash during samba file copy
vm.vfs_cache_pressure=1000
vm.min_free_kbytes=4099
vm.swappiness=0
net.ipv4.conf.default.arp_ignore=1
net.ipv4.conf.all.arp_ignore=1
net.ipv4.ip_forward=1
net.ipv4.icmp_echo_ignore_broadcasts=0
net.ipv4.icmp_ignore_bogus_error_responses=1
net.ipv4.tcp_ecn=0
net.ipv4.tcp_fin_timeout=30
net.ipv4.tcp_keepalive_time=120
net.ipv4.tcp_syncookies=1
net.ipv4.tcp_timestamps=1
net.core.netdev_max_backlog=5000
net.netfilter.nf_conntrack_checksum=0
net.netfilter.nf_conntrack_max=32768
net.netfilter.nf_conntrack_tcp_timeout_established=3600
net.netfilter.nf_conntrack_udp_timeout=60
net.netfilter.nf_conntrack_udp_timeout_stream=180
# Use ipv6
net.ipv6.conf.all.forwarding=1
# disable bridge firewalling by default
#net.bridge.bridge-nf-call-arptables=0
#net.bridge.bridge-nf-call-ip6tables=0
#net.bridge.bridge-nf-call-iptables=0
# Increase TCP max buffer size setable using setsockopt()
# 2 MB might be enough for some very long end-to-end paths
net.core.rmem_max = 2097152
net.core.wmem_max = 2097152
# Increase Linux autotuning TCP buffer limits
# min, default, and max number of bytes to use
# (only change the 3rd value, and make it 2 MB or more)
net.ipv4.tcp_rmem = 4096 87380 2097152
net.ipv4.tcp_wmem = 4096 65536 2097152
# The following 2 lines enable ipv6 privacy mode
net.ipv6.conf.all.use_tempaddr=2
net.ipv6.conf.default.use_tempaddr=2
All the TCP tweaks are derived from ESnet
Note: These tweaks are not found on OpenWRT How Tos, however I soon discovered that someone is working on bufferbloat hence the tweaks on buffersize should be approached with caution.
Also if you have a Windows File Share you want to tell the Router firewall not to monitor SAMBA Packets.
Windows Share also known as SAMBA in Linux uses the Port 445 so you need to tell OpenWRT to stop monitoring Packet Originating from LAN using Port 445.

Tweaking Web Performance:
Web Peformance typically require a lot of DNS Look up so you want to tell OpenWRT to use the Fastest DNS Server available.
You can do this by logging into the Router via Putty using vi editor edit the file called "dnsmasq.conf" in /etc/ or do it in the file /etc/config/dhcp
and add the fastest DNS Server closest to you.
Add the Line Below and change the IP of the server to YOUR fastest DNS Server. My Fastest DNS Servers may not be your Fastest DNS Server.
dhcp-option=6,165.21.83.88,8.8.8.8,208.67.222.222Blue is a Singapore ISP DNS Server, Green is Google DNS Server, Red is OpenDNS Server.
There is no limit of the number of DNS Server you can set on OpenWRT
Quality of Service
What is Quality of Service?
Quality of Service makes it so that during torrenting, your webpages doesn't take a long time to load even though you are on a 1Mbps Connection.
It does this by prioritizing network traffic, putting webpage network packets in higher importance than torrent packets.
The step to installing QoS is logging into the Router via Putty then
opkg install luci-app-qosYou set the QoS by setting the Port the Network Originate from and the Priority. Or you can set layer 7 filter to detect torrent traffic. Note that Layer 7 filtering is processor intensive activity and might cause the routing performance of the router to drop.

Hopefully you learn a lot from this series of blog post and enjoy the high performance of your Modified Router running on OpenSource Software.
If you run a Windows Share Server when you place the laptop beside the router and do a copy you should be getting insane WiFi Speeds @ 150Mbps at 5m line of sight
Let the numbers speak for themselves!

In case you modified the wrong config files and got lock out the fail safe mode is here.
If you are interested I have a OpenWRT built for TL-WR1043ND that I use personally myself. It is optimized to my satisfaction for pure performance.
You can get it here.
If you actually tried my firmware you will find that all the tweaks I listed above have been already added to the firmware defaults so there is nothing additional to tweak.