Recently I purchased a WiFi Card on Ebay.
The reason is because at certain areas in public places where I frequent, the WiFi Access Point has poor reception.
On my colleagues' computer especially those with Intel WiFi they were able to get at least 1 bar of signal where my Atheros Card couldn't even connect at all.
My Atheros AR5B91 is a 2 Transmit 2 Receive Single Band Card from Atheros.
It comes default with certain version of Acer Aspire 4740G (Acer use different parts for same laptop models).
The card that I purchased from ebay is a Intel Advance-N 6200 AGN. Search "Intel 6200" in Ebay.
It cost only USD$16 and is a 2 Transmit 2 Receive Dual Band Card from Intel.
Single Band means the Card can transmit and receive from the 2.4GHZ Radio Frequencies while a Dual Band Card can transmit and receive from the 2.4GHZ and 5GHZ Radio Frequencies.
This translates to greater range, frequencies and throughput.
Since it is only USD$16 and it can solve my WiFi issues why not?
In this case the cost over improvement justifies the upgrade.
Moreover it is an OEM Card not Engineering Sample.
The latest Intel 6205 AGN Card cost a whopping USD$30 for a Engineering Sample and $40 for an OEM Card.
That is 2 times the cost of the Intel 6200 AGN Card.
Atheros do have high end Dual Band cards as well but they are even more horribly expensive.
Sorry for the poor picture quality below.
Firstly you need to uninstall the Older WiFi Card Driver:
This step is for Windows only because in Linux the WiFi Driver is a dynamically loaded Kernel Module.
1)Go to Control Panel to locate the Driver of your old Wireless Card. Uninstall it.
2)If it is not inside the Control Panel as an Installation Package go to Device Manager, Right Click and select uninstall.
3)Shutdown the computer.
Secondly you need to install the WiFi Card:
1)Turn over the base and unscrew the cover concealing the WiFi Card
(I placed the Intel card under the existing Atheros Card):
2)Gently unplug the Black and White Cables attached to the WiFi
3)The WiFi Cable connection diagram is as shown below:
The old Atheros AR5B91 is as shown on the left while the new Intel 6200 AGN Card is shown on the right.
"1" Connects to the White Main Cable and "2" Connects to the Black Auxiliary Cable
Intel Cards have helpful Black and White Triangles to indicate the colour of the cable to connect.
Sometimes OEM mess up the Black and White Cables result in laptops having poor reception.
The solution is simply to swap them.
Thirdly you need to install the new WiFi Card Driver:
For Windows
1)By default Windows will not autodetect and Install the Driver for New WiFi Cards;
This is because when Windows 7 was released the device was not ready, the new Drivers were not sent to Microsoft yet hence they were unable to include the drivers inside the default Windows Installation
2)There are 2 Ways of obtaining the driver either 1 will do
For Linux
1)You have to make sure the MicroCode of the WiFi Card is installed in your Linux Distribution.
Most Distribution have it installed by default but will load only if the relevant Card is detected(Dynamically Loaded Module).
Connect your computer via an Ethernet Cable
Open up the Software Manager and search for the keyword "Intel" then check the correct Firmware is installed for the Card Model.
2)If there are no issues, your new Network Interface should be detected as "wlan1" check using "su" enter password then "ifconfig"
If you want it to be called wlan0 as it should have been simply edit this file
Performance
Of course, an upgrade has to yield visible, experimentally reproducible improved results.
If you do not have the data there is no upgrade to speak of.
When taking the readings, only the WiFi cards and the drivers are different (Duh?!) the rest of the variables are kept constant like position of the computer to access point etc.
My Access Point is an Aztech HW550-3G that is a 2 Transmit 2 Receive Ralink Chipset that transmit only on the 2.4GHZ range.
If you have an Dual Band Access Point you get even better performance now that the Intel WiFi can transmit on the 5GHZ frequencies.
Signal Strength Improvement on Windows
I used inSSIDer(google for the program) to get my readings. The value to be compared is the yellow text.
RSSI refers to the signal strength\quality of a WiFi Connection
Note: The RSSI readings are displayed with a negative sign.
Which means the less negative the better.
Also note that the upgrade unlocks the ability to transmit on the 5GHZ range this significantly increases the range because the 2.4GHZ frequencies are currently saturated in many areas.
Your Cordless Phones, Microwave Ovens and other Single Band Wireless Device over-occupies the 2.4GHZ frequency range.
Original Atheros AR5B91 Signal Strength:
Upgraded Intel 6200 AGN Signal Strength:
I noticed this Access Point in my vicinity:
Anyone who buys Apple Overpriced Products automatically earns a "idiot" label from me.
Apple Products are overpriced, run of mill hardware with good looking software and designs.
Hardware Hackers want cheap powerful hardware and they hack the software to unlock new capabilities so you rarely get extra value out of overpriced Apple Hardware.
Signal Strength Improvement on Linux
To Check Signal Strength on Linux, open a terminal.
Enter "su" to enter superuser admin mode.
Then type "iwlist wlan0 scanning".
Your Access Point Details will show up in text. You use the SSID to identify the network you are testing.
The listing sequence is random.
Old Atheros Readings:
Throughput Improvement
Throughput is the rate of Data Flow per second.
The higher the better.
Basically the Sample 1.3GB file is hosted on a Server Connected by Ethernet cable to my router to make sure Wireless Connection is the limiting factor in data transfer rate.
Hence I wirelessly copied the file from the server to my upgraded laptop.
The file has to travel from the server to the router then wirelessly to the laptop, since data transfer over Ethernet Cable is greater than over wireless, Wireless Transfer rate becomes the limiting factor which we want to test.
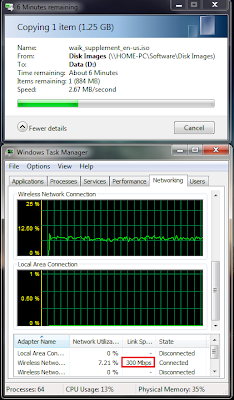
The old Atheros Throughput:
The Atheros Card transfers at approximately 2.67MB/s
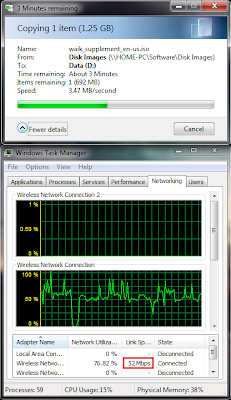
The Intel 6200 AGN Throughput:
The data transfer rate is approximately 3.47+MB/s.
Note that we can't use the percentage as a fair comparison because it is calculated as a percentage over the link speed .
The Atheros Card connects at a fixed link speed of 300Mb/s while the Intel Card connects at a variable speed (according to utilisation) probably for power conservation (Look at the red rectangle above).
During testing the data transfer for Intel Card was still climbing but it was quite obvious the Intel card has higher throughput so I just took a screenshot and concluded.
On a Dual Band capable Access Point the throughput is further boosted.
Basically this was quite an awesome Wireless Card Upgrade considering the low price and the considerable performance improvements.
So if you are suffering from Poor Range and Throughput (and you are sure it is not due to issue from the Acess Point) from your WiFi Card from other manufacturers like "Ralink, Broadcom, Atheros" a cheap upgrade to Intel WiFi might just be the solution.
Feel free ask any question about the upgrade.
The reason is because at certain areas in public places where I frequent, the WiFi Access Point has poor reception.
On my colleagues' computer especially those with Intel WiFi they were able to get at least 1 bar of signal where my Atheros Card couldn't even connect at all.
My Atheros AR5B91 is a 2 Transmit 2 Receive Single Band Card from Atheros.
It comes default with certain version of Acer Aspire 4740G (Acer use different parts for same laptop models).
The card that I purchased from ebay is a Intel Advance-N 6200 AGN. Search "Intel 6200" in Ebay.
It cost only USD$16 and is a 2 Transmit 2 Receive Dual Band Card from Intel.
Single Band means the Card can transmit and receive from the 2.4GHZ Radio Frequencies while a Dual Band Card can transmit and receive from the 2.4GHZ and 5GHZ Radio Frequencies.
This translates to greater range, frequencies and throughput.
Since it is only USD$16 and it can solve my WiFi issues why not?
In this case the cost over improvement justifies the upgrade.
Moreover it is an OEM Card not Engineering Sample.
The latest Intel 6205 AGN Card cost a whopping USD$30 for a Engineering Sample and $40 for an OEM Card.
That is 2 times the cost of the Intel 6200 AGN Card.
Atheros do have high end Dual Band cards as well but they are even more horribly expensive.
Sorry for the poor picture quality below.
Firstly you need to uninstall the Older WiFi Card Driver:
This step is for Windows only because in Linux the WiFi Driver is a dynamically loaded Kernel Module.
1)Go to Control Panel to locate the Driver of your old Wireless Card. Uninstall it.
2)If it is not inside the Control Panel as an Installation Package go to Device Manager, Right Click and select uninstall.
3)Shutdown the computer.
Secondly you need to install the WiFi Card:
1)Turn over the base and unscrew the cover concealing the WiFi Card
(I placed the Intel card under the existing Atheros Card):
2)Gently unplug the Black and White Cables attached to the WiFi
3)The WiFi Cable connection diagram is as shown below:
The old Atheros AR5B91 is as shown on the left while the new Intel 6200 AGN Card is shown on the right.
"1" Connects to the White Main Cable and "2" Connects to the Black Auxiliary Cable
Intel Cards have helpful Black and White Triangles to indicate the colour of the cable to connect.
Sometimes OEM mess up the Black and White Cables result in laptops having poor reception.
The solution is simply to swap them.
Thirdly you need to install the new WiFi Card Driver:
For Windows
1)By default Windows will not autodetect and Install the Driver for New WiFi Cards;
This is because when Windows 7 was released the device was not ready, the new Drivers were not sent to Microsoft yet hence they were unable to include the drivers inside the default Windows Installation
2)There are 2 Ways of obtaining the driver either 1 will do
- Connect your computer via an Ethernet Cable, run Windows Updates and the WiFi Driver will appear in the list of important Updates(The lazy way, only basic drivers are installed).
- Connect your computer via an Ethernet Cable. Download the driver directly from Intel(Recommended way Intel MyWiFi Software is available).
- Note: If the latest version of Intel WiFi Driver package does not include the driver for Intel 6200N download the second latest version instead: currently 14.0.2.2.
- Uninstall the Device (But do not delete the driver)
- Do a Windows Registry Search on the keyword "XXXX" then delete the relevant entries (Please be-careful not to delete the wrong ones)
- Click AutoDetect in Device Manager to reinstall the Device, the name should be corrected.
For Linux
1)You have to make sure the MicroCode of the WiFi Card is installed in your Linux Distribution.
Most Distribution have it installed by default but will load only if the relevant Card is detected(Dynamically Loaded Module).
Connect your computer via an Ethernet Cable
Open up the Software Manager and search for the keyword "Intel" then check the correct Firmware is installed for the Card Model.
2)If there are no issues, your new Network Interface should be detected as "wlan1" check using "su" enter password then "ifconfig"
If you want it to be called wlan0 as it should have been simply edit this file
/etc/udev/rules.d/70-persistent-net.ruleswith a text editor vi or nano then delete the line containing "wlan0", replace it with the line containing "wlan1" then change "wlan1" to "wlan0". Reboot.
Performance
Of course, an upgrade has to yield visible, experimentally reproducible improved results.
If you do not have the data there is no upgrade to speak of.
When taking the readings, only the WiFi cards and the drivers are different (Duh?!) the rest of the variables are kept constant like position of the computer to access point etc.
My Access Point is an Aztech HW550-3G that is a 2 Transmit 2 Receive Ralink Chipset that transmit only on the 2.4GHZ range.
If you have an Dual Band Access Point you get even better performance now that the Intel WiFi can transmit on the 5GHZ frequencies.
Signal Strength Improvement on Windows
I used inSSIDer(google for the program) to get my readings. The value to be compared is the yellow text.
RSSI refers to the signal strength\quality of a WiFi Connection
Note: The RSSI readings are displayed with a negative sign.
Which means the less negative the better.
Also note that the upgrade unlocks the ability to transmit on the 5GHZ range this significantly increases the range because the 2.4GHZ frequencies are currently saturated in many areas.
Your Cordless Phones, Microwave Ovens and other Single Band Wireless Device over-occupies the 2.4GHZ frequency range.
Original Atheros AR5B91 Signal Strength:
Upgraded Intel 6200 AGN Signal Strength:
I noticed this Access Point in my vicinity:
Anyone who buys Apple Overpriced Products automatically earns a "idiot" label from me.
Apple Products are overpriced, run of mill hardware with good looking software and designs.
Hardware Hackers want cheap powerful hardware and they hack the software to unlock new capabilities so you rarely get extra value out of overpriced Apple Hardware.
Signal Strength Improvement on Linux
To Check Signal Strength on Linux, open a terminal.
Enter "su" to enter superuser admin mode.
Then type "iwlist wlan0 scanning".
Your Access Point Details will show up in text. You use the SSID to identify the network you are testing.
The listing sequence is random.
Old Atheros Readings:
Cell 02 - Address: 00:XX:XX:XX:XX:XXThe new Intel 6200 AGN Readings:
Channel:10
Frequency:2.457 GHz (Channel 10)
Quality=38/70 Signal level=-72 dBm
Cell 06 - Address: 00:XX:XX:XX:XX:XXThe Intel 6200 AGN Card has shown improved signal strength on both Windows and Linux Platform.
Channel:10
Frequency:2.457 GHz (Channel 10)
Quality=47/70 Signal level=-63 dBm
Throughput Improvement
Throughput is the rate of Data Flow per second.
The higher the better.
Basically the Sample 1.3GB file is hosted on a Server Connected by Ethernet cable to my router to make sure Wireless Connection is the limiting factor in data transfer rate.
Hence I wirelessly copied the file from the server to my upgraded laptop.
The file has to travel from the server to the router then wirelessly to the laptop, since data transfer over Ethernet Cable is greater than over wireless, Wireless Transfer rate becomes the limiting factor which we want to test.
The old Atheros Throughput:
The Atheros Card transfers at approximately 2.67MB/s
The Intel 6200 AGN Throughput:
The data transfer rate is approximately 3.47+MB/s.
Note that we can't use the percentage as a fair comparison because it is calculated as a percentage over the link speed .
The Atheros Card connects at a fixed link speed of 300Mb/s while the Intel Card connects at a variable speed (according to utilisation) probably for power conservation (Look at the red rectangle above).
During testing the data transfer for Intel Card was still climbing but it was quite obvious the Intel card has higher throughput so I just took a screenshot and concluded.
On a Dual Band capable Access Point the throughput is further boosted.
Basically this was quite an awesome Wireless Card Upgrade considering the low price and the considerable performance improvements.
So if you are suffering from Poor Range and Throughput (and you are sure it is not due to issue from the Acess Point) from your WiFi Card from other manufacturers like "Ralink, Broadcom, Atheros" a cheap upgrade to Intel WiFi might just be the solution.
Feel free ask any question about the upgrade.


